Easter Treat Wraps by Brigit

Hi there, with Easter right around the corner I thought I’d make some of these adorable treat wraps for a quick and easy project. I had a couple of slim bags that I filled with some jelly beans, but these wraps can be used with any kind of treat.

The labels were print and cuts matted to a scalloped rectangle. The paper used, Echo Park’s Easter Wishes designed by Lori matches the cute little labels. You can get these wraps as a bundle at Lori’s shop here or individually. Here’s the three I used, Wrap Easter Egg, (svgsilhouette), Wrap Easter Chick, (svgsilhouette) and Wrap Easter Bunny, (svgsilhouette).

Thanks for stopping by and have a wonderful day!

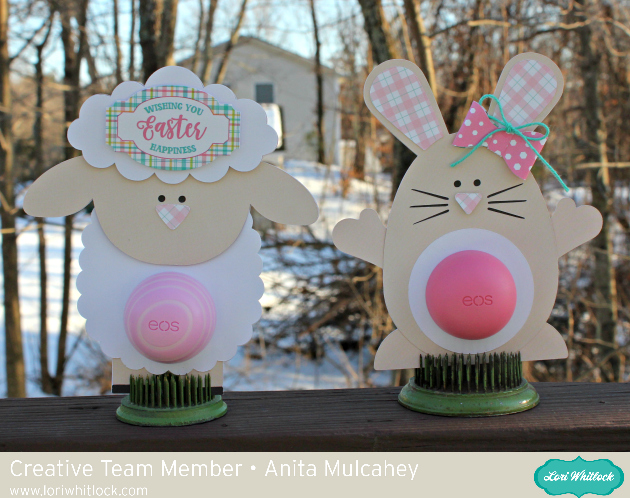
Easter Lip Balm Buddies with Anita

Hi Everyone:

We are traveling to see family in Wisconsin and I made these lip balm holders for a two special young ladies we will be visiting!  They are so cute and very easy to put together.  The lamb is called EOS Lip Balm Lamb and you can find it here in Lori’s store and here in the Silhouette Store.  You can find the SVG file for the Bunny here in Lori’s store and here in the Silhouette Store.   I used some of Lori’s new Echo Park collection called Easter Wishes.  I also used some of her older Echo Park collection, specifically Wish Upon a Star.

Lori has so many wonderful Easter and spring SVG files so be sure to check them all out.

Hugs,

Anita

Easter Treat Favor Box by Aimee

Hello friends! Aimee here with you today with a tutorial on using Lori’s new sketch images to create this sweet little Easter gift bag. I choose a couple of adorable images from the Sketch Easter Bundle that you can find in Lori’s Shop here or in the Silhouette Design Store (rabbitflower). I also used this new Favor Box that can be found in Lori’s store here or in the Silhouette Design Store here.

Open the images and add an offset image around each image. I resized the offset to 0.050. After you have the offset image, highlight both images and group them together so they are easily moved around. The black lines are the sketch lines and the red lines are the cut lines.

Once I had both images with an offset cut grouped, I measured them against the box svg to make sure  they were appropriately sized.

For those of you who are new to using Silhouette sketch pens, here is a Silhouette tutorial for using them. A big HINT when using the sketch pens and then cutting them out is NOT removing your cutting mat after the image is drawn. Leave the mat in place and then switch over to the blade and let your machine cut the image out from your paper.

Here are my images after the sketching and cutting are complete. Now comes the fun part of decorating them. I used Lori’s new collections Easter Wishes and Spring Fling  on this project because the colors and patterns are so fun and vibrant

I fussy cut one of the eggs out of pattern paper and added it to the rabbit so that it looks like he’s holding it. I also added some pink to the back of his ears. For the flower, I trimmed the flower and adhered it to the top of the green flower sketch cut and added a matching button and baker’s twine.

For the finishing touches I added a pink striped bow and the Happy Easter sentiment from the Light Up Card Easter Bunny that can be found in Lori’s store here or in the Silhouette Design Store here.

Thanks for stopping by today! I hope you give the new sketch images a try and create your own little box for Easter or Wedding!

Aimee

Mini Wreath Place Setting Tutorial with Michelle

With family so far away, our Easter Dinner is a quiet gathering where we use our everyday plates. This year, I (Michelle) decided to make dinner fun with some Mini Paper Wreaths.

Lori Whitlock Easter Rabbit Place Setting Svg

Making the mini wreaths was fairly easy with my Silhouette Cameo, but I have a couple hints and tricks to make it really easy! I started with Lori’s Circle Monogram Frame (Silhouette Design Store or Lori Whitlock SVG Shop) to make the wreath. This is possibly my favorite SVG file. The wreath is actually 6 seperate pieces. Since I am making a small wreath, I’m going to release the compound path and make all of the leaves filled in, which is easier for me to cut.

Release Compound Path

I’m also going to cut a 5-inch circle to fit my plate. (Hint: When making a circle hold down the shift key and your circle will be perfect each time.) I recommend cutting three or four monogram wreaths to make your mini wreath nice and full.

Next, I cut some BRAND NEW Bunnies. This Easter Bunny Silhouette is absolutely darling! I love his little tail cut-out. He’s new in the shops and you can find him in the Lori Whitlock SVG Shop and the Silhouette Design Store. I cut two 4-inches bunnies and glued them back to back, but one would’ve been enough. I wanted to add a cute sentiment, and I found exactly what I was looking for in the Bunny Dingbats Font. You can find this in the Silhouette Design Store and the Lori Whitlock SVG Shop. You will find additional bunny silhouettes in the font. They would be cute too. With the bunnies so small, I had trouble getting the sentiment cut cleanly with paper, so I used vinyl instead. It came out perfect the first time!

Lori Whitlock custom vinyl SVG sticker on paper

Yes! Paper crafters can use vinyl too! I love how it came out.

I topped off my wreath with a cute paper bow found in the Silhouette Design Store or at the Lori Whitlock SVG Shop and my project was finished. This would be a great project to try new techniques such as releasing the compound path and using vinyl. if you would like even more information, I would encourage you to check out Lori’s class on Craftsy. With the class, Lori explains numerous techniques for getting the most out of your Silhouette Cameo.

I hope that you’ve enjoyed my Mini Wreath Tutorial. Happy Easter!

Michelle