Baby Month Sign with Anita

Hello Everyone:

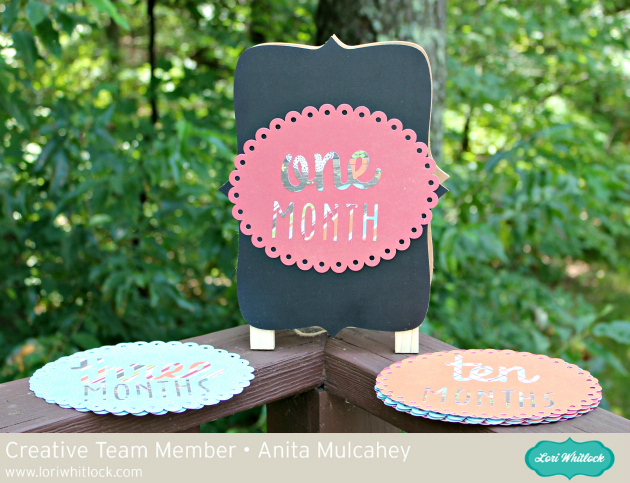
Happy Monday.  I made this sign set for a friend’s daughter who is having a baby in January.  I used Lori’s cut file called Baby T-Shirt Months which you can find here in her store and here in the Silhouette Store.   I also used Scalloped Shapes for the background of my months and you can find that file here in her store and here in the Silhouette Store.  I used Lori’s Echo Park collections called Happiness is Homemade and I Love Family.

I bought a chalkboard stand online and put two sided sticky tape on the back of each oval and then stuck a piece of wax paper over the tape so that they wouldn’t stick together.


Thanks for stopping by and be sure to check out Lori’s store for these cut files and many more new and fun cut files.

Hugs,

Anita

Burp Cloths Tutorial

Hello Everyone:

Anita here with a tutorial showing how to make these adorable burp cloths.  Someone dear to me is going to be a grandmother in the next four months,  and they just found out that the baby is a boy,  so I was inspired to make these burp cloths.  Did you know that in addition to creating for Echo Park and her own cut files, Lori also designs fabric?  I used a collection called Fine and Dandy and I also used a print from her Oh Boy collection for my elephant.


The cut files that I used are called:

Baby Boy Onesie Card                                    In Lori’s store                                      in the Silhouette store
Baby Elephant                                                 In Lori’s store                                       in the Silhouette store
A2 Baby Bottle Shaped Card                        In Lori’s store                                       in the Silhouette store
Lion                                                                                                                                    in the Silhouette store

The are the materials that you will need to make this project.  I used Heat N Bond Lite and of course Lori’s awesome fabric.  I also used my Silhouette Cameo and the fabric blade to cut the fabric.  I used the Cricut Strong Grip mat which comes in their multi pack and a brayer.

I used my cutting mat to organize my cut shapes.  I decided which fabrics I wanted to use for which parts and then put them together on a mat to determine the size of fabric,  and the size of the Heat N Bond I needed to complete my project.  I grouped the shapes together and then figured out the dimensions to cut my interfacing.  I cut that first and then labeled it, including any directional hints I needed to remember.

Here are two that are ready to go.  The onesie haf a directional arrow and the elephant didn’t.  I  ironed on the interfacing and cut around the fabric leaving a 1/4″ border on all sides.  Before you cut, you should peel off the paper backing from the interfacing and place it with the fabric face up on your mat.  Use your brayer on a flat surface to make sure that the fabric is well adhered.  I set my Silhouette to thin cotton fabric and a blade depth of 3.  The more fabric you cut at one time, the greater the likelihood that you might have to increase the blade depth.

Here is what it looks like after it was cut.

Once everything was all cut I pressed the burp cloths and then ironed on the pieces that I had cut out for each design (no steam setting).  Next I headed to my sewing machine to use a blanket stitch to reinforce the designs, to make sure that it could stand up to the many washes that I am expecting them to undergo.

There you have it.  There are so many cute burp cloths out there and you can also use the thick Gerber cloth diapers to delight new parents.  Lori has so many wonderful baby cut files to choose from.  Be sure to check out her SVG store for these and many more awesome files.

Hugs,

Anita


Sew Happy Jar with Anita

Happy Monday everyone.

Anita here with a quick gift that I made for a dear friend.  She is my quilting buddy and I filled this jar with goodies for her.  I used some adorable cut files from Lori’s store and papers from her amazing Echo Park collection called Perfect Princess.  The cut files that I used are the 4 Vintage Buttons and 4 Christmas Tags files.   You can find the Vintage Button files here in Lori’s  store and here in the Silhouette Store.  You can also find the Christmas Tag files here in the Silhouette Store.    Here are some views of the button on the top and the tag.  I also used embellishments from  Lori’s Celebrate Easter   collection, including the Paper Clip Bows and Enamel Dots.

Hope you are having the best summer ever and be sure to check out Lori’s files for all your summer celebration needs.

Hugs,

Anita

Dream Big Little One Light Box with Anita

Anita here with a quick tutorial to use some of Lori’s adorable phrase files in a fun and different way.  I used the file called Dream Big Little One 2 which you can find here in Lori’s wonderful shop and here in the Silhouette store.  I used files similar to these to embellish some baby onesies.  When I found this box at a craft store I knew I could make something cute with it.  I used Lori’s brand new Echo Park Collection called Perfect Princess.  It is a very sweet line.

Here are the materials for this project.  I used some fun milk paint which was so soft and pretty, and some Mod Podge at the end to seal my letters, stars and moon onto the project.

Here is a photo of the top of the box.

Here is a photo of the front of the box.  You can see how cute this paper line is.

This is a photo of the top of the box with the light on.  It runs on two AA batteries.

That’s it for me today.  Be sure to check out Lori’s store for this and many other amazing cut files.

Hugs,

Anita

4th of July Firecracker with Anita

Anita here today with a tutorial on how to make Lori’s 3D Firecracker.  You can find this file in her SVG shop here and here in the Silhouette Store.  I also used some parts of the 5X7 Box Card July 4th to add to the embellishments of my project.  You can find that file  here in Lori’s store and here in the Silhouette Store.  I love to mix and match Lori’s Echo Park collections on my projects and used I Love Winter and Go See Explore.

Here are the materials that I used for my project.

The firecracker wick is perforated so that you can fold the wick into a small square and then put it through the hole.

Next you are going to fold the tabs back and glue them to the inside of the cover of the tube.

Here is what is looks like from the front.

Next, fold down the tabs on the cover piece and glue them to one of the circles.  One of the extra red circles gets glued to the inside of the top to hide the tabs and glue.

Here is a photo of the Stickles that I put on the edges of the wick.

Repeat the process for the tube body.  This photo shows the red circle inside and I love the finished look.

Here is a close up photo of the embellishments.  I used the 4th of July circle from the box card.

That’s it for me today.  This is so cute and you can fill it with candy or leave it empty and on your table for a holiday centerpiece.

Hugs,

Anita