Monogramed Home Decor with Traci

Hi everyone, it’s Traci from Artsy Albums, and I’m back to share an easy home decor project with you.  This monogramed piece would make a wonderful gift for a wedding, shower, new baby, or new home!

I framed mine on paper from Carta Bella’s Yesterday collection, designed by Lori.  I added some Prima flowers and stickers from the collection to add some extra pops of color.

I’ve seen monograms like this cut from vinyl and placed in clear “floating” frames, cut from fabric and embroidered onto pillows, or incorporated into invitations and party decor.  You could include a wedding couple’s names in the center as I did, or use a last name, an address, or a new baby’s name. Lori gives you four designs for each letter so you have lots of possibilities for this wonderful set of monograms!

The Mega Monogram Set is located in the SVG Shop HERE. Each letter is available individually in the Silhouette Design Store HERE.

Thanks for stopping by!

Traci

www.artsyalbums.com


Using Your 6×6 Paper Pad Scraps – Tutorial with Tya

Hi everyone! It’s Tya here to share with you a fun tutorial today. I adore, like really adore 6×6 paper pads. They are the perfect size for card making, but inevitably I am always stuck with oodles of little scraps after I am done with my projects, so today, I wanted to share with you a quick and easy tutorial on how to use up those scraps.


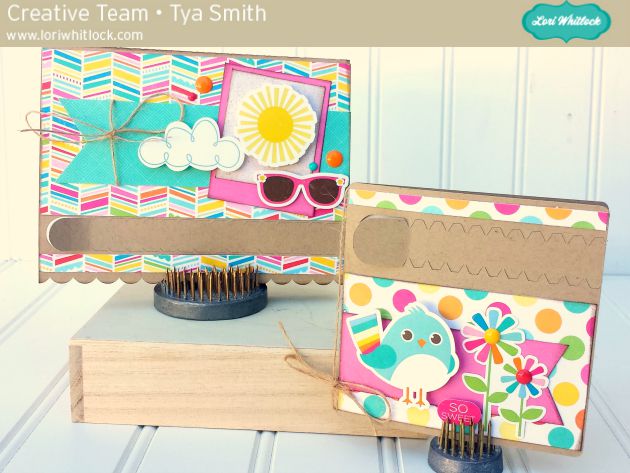
First-  I gathered up my supplies to make my card. I am using the 6×6 paper pad from the Jill collection that Lori designed for Echo Park. I am also using the decorative brads, chipboard stickers and element stickers.

I also used a sheet of kraft cardstock.

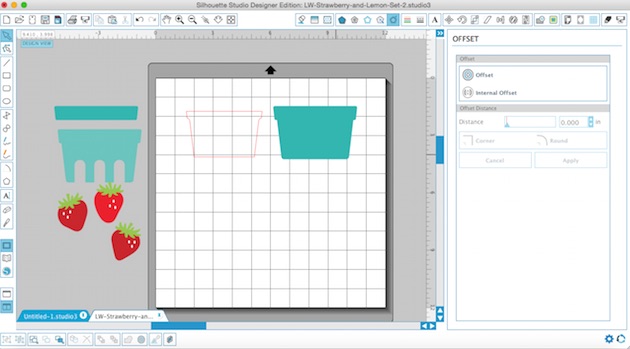
Next I opened up the Silhouette. I like to used the grid function when I am dealing with scraps. The Grid is on the far right side of the toolbar. To make it true to size, I do 1 inch spacing and 1 divisions – this basically makes (12)  1 inch squares along the top and sides so it is just like the Silhouette mat.

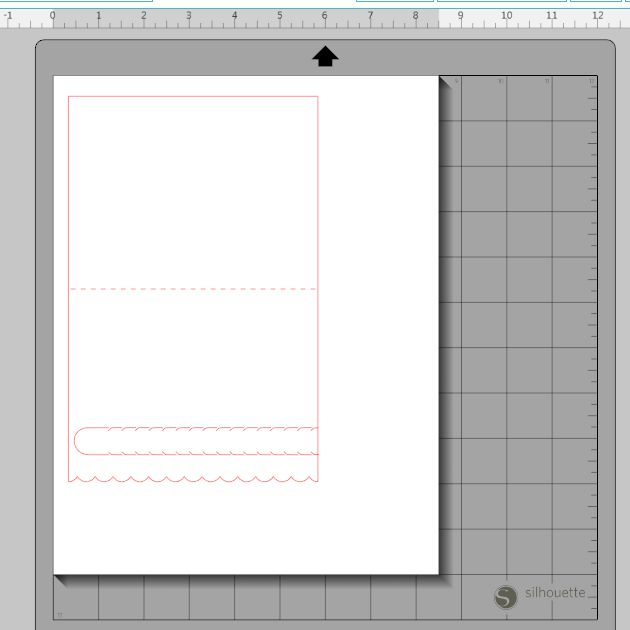
Now, I find my card shapes and lay them out on the workspace. I try and utilize the mat and lay my shapes out evenly so they will be easy to cut out.  I used the Card 1 shape (Lori Whitlock Shop) or a2 Flower Card (Silhouette Store).


Now this next step, it’s just what I do when I cut scraps, I am sure there is an easier way, but this is what I like to do because it is pretty fool proof. So I take a scrap piece of paper and cut out all my shapes. I like to do either white or kraft because I save these and can use them on another card. So I lay out all my shapes and cut them out.


Here is where those pesky cut marks, like the one below, that we get on our mats come in handy. I take my real papers and basically lay them over the cut marks that were previously made.

Now the shapes are all cut out and we were able to use up some of those little scraps- AND we only had to make ONE cut! This is such a time saver! No having to guess or measure exactly where the papers are, just lay them over the cut marks and you are set!

 Here is the finished card –

Thank you so much for stopping by! I hope I have inspired you to pull out all those scraps and have fun creating beautiful cards! Have a great day!

Print and Cut Label Tutorial with Traci

Hi everyone, it’s Traci and I’m back with a quick and easy tutorial for making print and cut labels. I do a lot of scrapbooking, but when it comes to cards, I usually find myself scrambling to create one for a special event at the last minute. So I decided to create a bunch of labels to keep on hand.

Lori has a brand new set of layered labels available, and as soon as I saw them, I knew they would be perfect for my project. I’ll walk you through the steps to create these so let’s get started.

Step 1: Assuming your printer is for 8.5” x 11” paper, resize your paper in your software. I have the Silhouette Designer Edition, but I believe most of these steps will work with the original software also.


Step 2: Show your registration marks so that your printer and Silhouette machine talk nicely to each other.


Step 3: Add your first label design to the mat and right click to ungroup the pieces.


Step 4: Layer each piece of the design on top of each other. Now go to the “Align” window, highlight all the pieces of the design, and click “Align Center” so that all of your pieces are stacked evenly. Note that on some labels you may need to “align center” and “align middle” to get the pieces all stacked up evenly.  Now, right-click, group, and then resize the label to the finished size you desire.


Step 5: Repeat steps 1-4 for each label.

Step 6: Once your labels are all stacked and sized the way you want them, highlight all of them and go to your cut setting window. Select the “Cut Edge” style so that only the outer edge of your label gets cut.


Step 7: Now here is a fun part. Let’s add some monograms and sentiments to our labels. Using the Type tool, add a monogram letter or phrase to one of your labels. Resize it to fit inside the label and then go to the “Color Fill” window. Highlight the text (this is key!) and then click on the eye dropper tool in the color fill window. Hold the eye dropper and drag your mouse over the colors on your label. You will see the eye dropper “picks up” the color you hover over. Once you decide on a matching color, release your mouse and the color will fill your text with a perfectly matched color for the label.


Step 8: Each time you add a phrase or monogram to your label, be sure to highlight the text, go to the “Cut Settings” window, and select the “No Cut” option. Once that is done, print your labels and cut them out. Now you have a whole set of beautiful labels to quickly add a sentiment or monogram to a card or other project!

Supplies:
Layered Labels

LW Bubble and Perfect Print Fonts

Jack and Jill paper collection by Lori for Echo Park

Monogram Set

I hope I have given you a few fun tips today … thanks for stopping by Lori’s blog! Come visit me over at Artsy Albums sometime!
Traci
www.artsyalbums.com

A Chalkboard Tutorial

Happy Spring everyone!  Cathy here with you today and I have a quick chalkboard tutorial to share with you.  The chalkboard look is all the rage in almost everything right now, from home decor to scrapbooking and cardmaking.  Lori Whitlock has so many fabulous phrases that are perfect and easy to create that chalkboard look.  I created a springy card in no time at all with a few Lori Whitlock files, and the awesome print and cut feature with the Silhouette Cameo!

I used Lori’s Echo Park Fine And Dandy Collection along with some plain smooth white card stock to create my card!

First, I cut my card base using A2 Banner Card.

Next, change your mat setting to 8 1/2 by 11 on your Cameo.  This way you have it set for when you need to print!  I used  the 7 shapes label set and  Quote Set 1, using the Your Smile is like Sunshine phrase.  I kept my label the same size and sized down the phrase to fit inside.

Now fill in your label with black and your phrase with white.  I also, change my cut lines to the colors I am using, just so I can visualize it a bit easier.

Now, make a duplicate of your phrase and pull it off to the side!

Next, go back to the Fill Color window and scroll down a bit to the Advanced Options…there you will see that you can change the Transparency of an image.  I changed mine to about 60%…this gives your image that chalky shadow.

After you change the transparency, simply layer your phrase back over the original, just slightly offsetting it!

(Sorry for the blurry photo, but I wanted you to be able to see how I offset it.)  Layering and changing the transparency really gives it that chalkboard look!  Now group your image!

I duplicated the image so I had two…just in case!  Now add registration marks for the print and cut feature and print your images.  Once printed, go back and add the cut lines for the label.  I slightly offset mine to match the white border behind my banner!  Then send it through your Cameo to cut!

After your images are cut, just for a bit more fun, I just went over it with some real chalk and smudged it with my finger.  It really helps pull off that true chalkboard feel!

Really, this takes no time at all once you have figured out the steps and layering.  Now just layer and embellish your card.  I added a cute sun with some of the patterned paper from the Fine and Dandy Collection using Summer Icons and then a couple of stickers from the Fine and Dandy collection.  So cute.  I hope you give this technique a try.  The possibilities are endless with all the files from Lori’s Shop.

St. Patrick’s Day Treats with Tya

Before we get started with Tya, I wanted to point out an awesome post today over at Scrapbook & Cards Today blog. Paige Evans has a lovely layout featuring one of my cut files AND it just might include a free file!! Be sure to go take a look and get your free file!

Hi everyone – its Tya here to share with you a fun set of St. Patrick’s Day treats just in time for all your little leprechaun festivities coming up. Lori has a darling new St. Patrick’s Day Digital Collection over on Snap Click Supply that I used to spruce up a simple cupcake and a soda bottle. I used the Print and Cut feature on my Silhouette on both of these projects – it’s one of my favorite things to do with my Silhouette and Lori’s files. Here is what I did-

First off – let’s start with the Cupcake Stand – here is a quick tip for you. As you can see, the original cut file had just a simple scallop edge. I wanted to make the cupcake stand a little more festive , so I went in and found a shamrock from one of my favorite Lori cut files and went in and replaced the circles in the scallop edge with the shamrocks. The wonderful thing about owning a Silhouette is that I can mix and match and customize my cut files to fit a theme or holiday. It was simply a matter of ungrouping the orginal shape, deleting the circles and replacing it with my resized shamrocks instead. Super easy and think of all the different shapes you could substitute – hearts for Valentines Day or stars for the 4th of July – the possibilities are so fun!

Here are a few close ups –

 Check out the cute cupcake wrap and here is a better photo of the shamrocks that I added instead of the scallop circles.

 I did a print and cut of the Kiss Me I’m Irish sentiment and made it into a cupcake topper with the help of  a scallop circle and a some button and twine. Add a green Pixie from Doodlebug Design – and you have a custom made cupcake topper!

Next up I decided to grab a green bottle of Sprite and add a bottle label and a custom sentiment to the label that I made with the beautiful Vintage Font for the Shamrock Soda. I added a polka dot shamrock with an orange button and some twine to finish it off. I also added a scallop border punch to the top and bottom edges of the sentiment.


So that’s all there is to my projects. I love taking basic everyday items like cupcakes and Soda bottles and using my Lori Whitlock shapes to fancy them up and make them fun and festive! Thanks for stopping by!

Digital Shapes and Papers –

St. Patrick’s Day Collection – Snap Click Supply

Shapes used: (All on loriwhitlock.com or Silhouette Design Store unless otherwise noted)

Nested Scalloped Circle

Bottle Label Tag – Flag

LW Vintage Font

5 Clover Shamrocks (Silhouette) Lucky Set (Lori Whitlock.com)

3D Cupcake Stand

Scalloped Cupcake Holder