A Chalkboard Tutorial

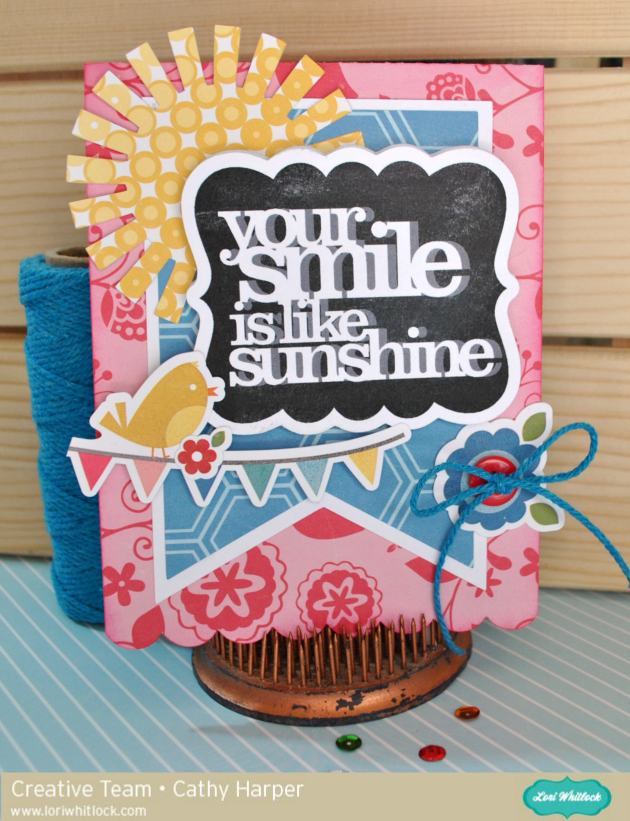
Happy Spring everyone!  Cathy here with you today and I have a quick chalkboard tutorial to share with you.  The chalkboard look is all the rage in almost everything right now, from home decor to scrapbooking and cardmaking.  Lori Whitlock has so many fabulous phrases that are perfect and easy to create that chalkboard look.  I created a springy card in no time at all with a few Lori Whitlock files, and the awesome print and cut feature with the Silhouette Cameo!

I used Lori’s Echo Park Fine And Dandy Collection along with some plain smooth white card stock to create my card!

First, I cut my card base using A2 Banner Card.

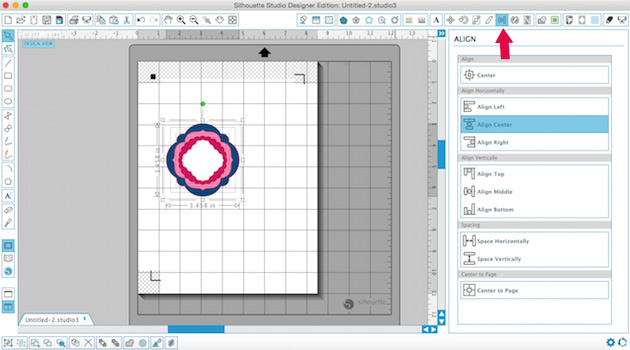
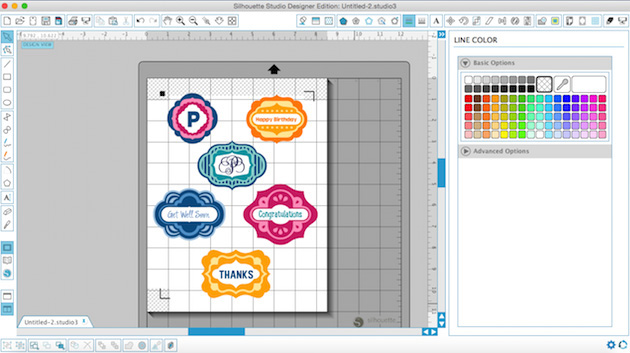
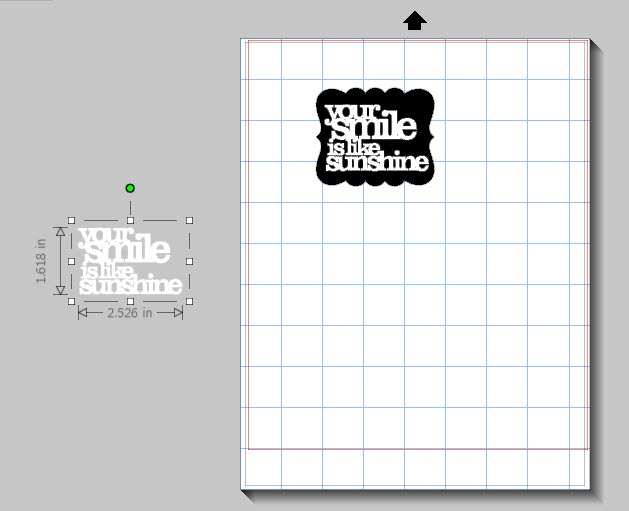
Next, change your mat setting to 8 1/2 by 11 on your Cameo.  This way you have it set for when you need to print!  I used  the 7 shapes label set and  Quote Set 1, using the Your Smile is like Sunshine phrase.  I kept my label the same size and sized down the phrase to fit inside.

Now fill in your label with black and your phrase with white.  I also, change my cut lines to the colors I am using, just so I can visualize it a bit easier.

Now, make a duplicate of your phrase and pull it off to the side!

Next, go back to the Fill Color window and scroll down a bit to the Advanced Options…there you will see that you can change the Transparency of an image.  I changed mine to about 60%…this gives your image that chalky shadow.

After you change the transparency, simply layer your phrase back over the original, just slightly offsetting it!

(Sorry for the blurry photo, but I wanted you to be able to see how I offset it.)  Layering and changing the transparency really gives it that chalkboard look!  Now group your image!

I duplicated the image so I had two…just in case!  Now add registration marks for the print and cut feature and print your images.  Once printed, go back and add the cut lines for the label.  I slightly offset mine to match the white border behind my banner!  Then send it through your Cameo to cut!

After your images are cut, just for a bit more fun, I just went over it with some real chalk and smudged it with my finger.  It really helps pull off that true chalkboard feel!

Really, this takes no time at all once you have figured out the steps and layering.  Now just layer and embellish your card.  I added a cute sun with some of the patterned paper from the Fine and Dandy Collection using Summer Icons and then a couple of stickers from the Fine and Dandy collection.  So cute.  I hope you give this technique a try.  The possibilities are endless with all the files from Lori’s Shop.

St. Patrick’s Day Treats with Tya

Before we get started with Tya, I wanted to point out an awesome post today over at Scrapbook & Cards Today blog. Paige Evans has a lovely layout featuring one of my cut files AND it just might include a free file!! Be sure to go take a look and get your free file!

Hi everyone – its Tya here to share with you a fun set of St. Patrick’s Day treats just in time for all your little leprechaun festivities coming up. Lori has a darling new St. Patrick’s Day Digital Collection over on Snap Click Supply that I used to spruce up a simple cupcake and a soda bottle. I used the Print and Cut feature on my Silhouette on both of these projects – it’s one of my favorite things to do with my Silhouette and Lori’s files. Here is what I did-

First off – let’s start with the Cupcake Stand – here is a quick tip for you. As you can see, the original cut file had just a simple scallop edge. I wanted to make the cupcake stand a little more festive , so I went in and found a shamrock from one of my favorite Lori cut files and went in and replaced the circles in the scallop edge with the shamrocks. The wonderful thing about owning a Silhouette is that I can mix and match and customize my cut files to fit a theme or holiday. It was simply a matter of ungrouping the orginal shape, deleting the circles and replacing it with my resized shamrocks instead. Super easy and think of all the different shapes you could substitute – hearts for Valentines Day or stars for the 4th of July – the possibilities are so fun!

Here are a few close ups –

 Check out the cute cupcake wrap and here is a better photo of the shamrocks that I added instead of the scallop circles.

 I did a print and cut of the Kiss Me I’m Irish sentiment and made it into a cupcake topper with the help of  a scallop circle and a some button and twine. Add a green Pixie from Doodlebug Design – and you have a custom made cupcake topper!

Next up I decided to grab a green bottle of Sprite and add a bottle label and a custom sentiment to the label that I made with the beautiful Vintage Font for the Shamrock Soda. I added a polka dot shamrock with an orange button and some twine to finish it off. I also added a scallop border punch to the top and bottom edges of the sentiment.


So that’s all there is to my projects. I love taking basic everyday items like cupcakes and Soda bottles and using my Lori Whitlock shapes to fancy them up and make them fun and festive! Thanks for stopping by!

Digital Shapes and Papers –

St. Patrick’s Day Collection – Snap Click Supply

Shapes used: (All on loriwhitlock.com or Silhouette Design Store unless otherwise noted)

Nested Scalloped Circle

Bottle Label Tag – Flag

LW Vintage Font

5 Clover Shamrocks (Silhouette) Lucky Set (Lori Whitlock.com)

3D Cupcake Stand

Scalloped Cupcake Holder

Heat Transfer Tutorial with Cathy

Hi everyone!  Cathy here with you today.  I have been wanting to try heat transfer vinyl with my Silhouette Cameo for quite some time….I have to admit I was more than a little intimidated by it. But I kept seeing all of these adorable onesies and I wanted to created one for our grandbaby!  It will take you some time to search through all of Lori Whitlock’s files to find the perfect choice, so many awesome to designs to choose from.  I think that was the hardest part of this project.

I chose her “too cute for words” file and a couple of hearts from her “11 hearts” file!

I used two colors of heart transfer vinyl from SRM.  Hot Pink and Black on a light pink onesie.  Wash and dry your item before your get started.

I enlarged the file just a bit to fit the onesie.  And the most important part of working with heat transfer vinyl is remembering to mirror your design.  Simply highlight your design, go to the Replicate window and click mirror right.

You will want to load your heat transfer material into the machine with the clear plastic backing facing down.  The backing of heat transfer material will be facing up.

Start with the default cut settings for the type of heat transfer you are cutting and do a test cut.  You should be able to see the cut on the heat transfer side, however, you might not be able to see the cuts if you turn the material over and look through the clear side.  This is okay!  Heat transfer material is VERY thin and the cuts will be very fine

Weeding your heat transfer. Once your design is cut, you can trim around the design if there is extra around.  Then you will want to peel off any parts of the design that you don’t want to be ironed on, or the negative space.  You can use a weeding tool for this, or just use a safety pin. Make sure and get inside of any letters like A and O! When you are done you should have the design you want to transfer left stuck to the clear backing.

Ironing the design on. Last but not least we get to iron!  Read the directions on the back of your specific heat transfer, but most direct you to place your iron on a  very hot setting.  I used a heat resistant craft sheet between my onesie and iron.  A lot of people use parchment paper, but the craft sheet worked wonderfully.

Now you will want to put your hot iron on the design for between 10-40 seconds depending on the type, again read the directions for your specific heat transfer.  Make sure that you are covering all of the edges of the design with the iron. You can release it and carefully pull up the backing to see if the design has stuck or needs to be heated more.  I also found that on designs larger than the iron, it was easiest to iron the design in sections rather than going back and forth across the entire design.

Once the design has transferred I like to let it cool for about 30-45 seconds and then gently peel back the clear plastic until it is completely removed.  I find that letting it cool for just a short bit helps because on smooth vinyl, if it gets too hot it can pull a little bit when you are removing the backing and cause wrinkles in the vinyl.  Cooling a little seems to prevent this.

Awesome!  I love how this came out and it was so easy!  And from everything I read, you just have to remember to wash the item inside out and dry on a cool temp!

Here’s my little grandbaby modeling her onesie with a little help from her older brother.  Every time you lay her down, her feet come up and she rolls over.  So it took a bit of brotherly love to get a photo!

Too Cute For Words

11 hearts

Cutting Acetate with the Silhouette Tutorial by Tya

Hi friends – today I am here to show you a fun technique using acetate! I am a sucker for cute packaging so when I was pondering about what to do my tutorial on for this month I knew I wanted to share this one with you. I decided to do a couple of colorful St. Patrick’s Day Favors to show off this technique. It just wouldn’t be the same if you couldn’t see the Skittles and Gold Coins that these boxes hold, so when you really want to show off what is inside your packaging or if your treats fit a holiday or a theme like my treats do, acetate is the way to go!  It may seem basic and easy, but it is so fun to use something other than cardstock and pattern paper when using our digital cutting machines.


I use this brand of acetate (also know as transparency film) for my projects. It cuts beautifully in my Silhouette machine.  Apollo Transparency Film

Apollo® Plain Paper Copier Transparency Film, Clear, 8 1/2in.(W) x 11in.(H), 100/Box
Here are the steps to my project –
1- Open up Silhouette program.
2- Find the 2 box cut files and place them in the workspace.
When deciding what boxes to use from Lori’s library – I chose to use 2 of my favorite boxes to use with acetate. I love these boxes because they require no gluing – which can be tricky with acetate because a lot of the adhesives show through so these boxes were perfect. I used the Santa Petal box (minus the “santa” parts) and the No Glue Gable Box.I used some of Lori’s darling Hang Tags well.
Links below

3- Since the acetate is fairly thick, I used the textured cardstock settings (Blade Depth 6, Cutting speed 3, Thickness 33. I also checked the Double Cut box to make sure that the cuts are nice and deep and this also helps when you go to fold up the boxes.

So my challenge to you is to go pick up some of this fun medium from your local office supply store and try your hand at this fun technique. Thank you for stopping by!


Using Glitter Heat Transfer Vinyl with Kathy

Hi Everyone!  It’s Kathy today with a fun tutorial using the new Silhouette Glitter Heat Transfer Vinyl.  This medium is perfect for making custom t-shirts, and bags but I thought it would be fun to do a pillow for a friend!  Take a peek…

I found a great, easy tutorial to make an envelope pillow cover here on YouTube.  I followed the directions but before I stitched the pillow cover together, I did the following to decorate the front.

 First, I decided on my design and laid it all out in the Silhouette Studio.  I used the word “love” and some hearts from Lori’s Homespun Hearts collection.  When cutting words from heat transfer material, make sure to mirror the image (select Object from the menu, then Mirror) because you cut the back of the transfer material.

I chose to work with the White Silver, Red and Hot pink Glitter Heat Transfer.

If you like, you can load the Glitter Heat Transfer material directly into your Silhouette without a mat, using the Load Media button.  I chose to use my mat, since I was using smaller pieces of the material.  The load media is great if your cut is larger than 12 x 12.    Change your cut settings to Heat Transfer Material, Flocked. (It’s the same for the Glitter) and your blade to a depth of 3.  Be sure to put your material on your mat shiny side down (you’re cutting the back).

Once you’ve cut your image, you want to peel off the “negative” sections of your material so that only your image remains on the plastic transfer sheet.  If you have small sections that are hard to peel with your fingers, you can use a piercer or hook to snag those sections.  I did this with my letters, putting the image over a piercing mat to make it easier.

Next, I laid all my cut pieces out on the cover fabric to get the perfect placement.

A little trick…to make sure you leave space for your stitching seam allowance ( in my case 1/2 inch), put some 1/2 inch washi tape around the edges.  This way you can see exactly how much space you have!

Now for the fun part…Ironing the design to the front of the pillow cover!  I preheated my iron to the cotton setting. (no steam)  Place your design on your fabric.  When layering it is best to do one layer at a time starting with the bottom. (my silver heart for example).    Cover the transfer material with a scrap piece of fabric and iron the design for 45 – 60 seconds.

Check to make sure all of your design has transferred to the fabric by carefully lifting the transfer sheet. (it can be hot!!) If it doesn’t peel off easily, place it back down and iron for a bit more time.

Once your design is all ironed on, you can finish stitching your pillow cover together according to the instructions above.

Here is the finished pillow!  It was really easy to make, I don’t sew fabric a lot but it’s really just a series of straight lines!  My friend doesn’t know this is coming her way…I’m wondering if she’ll know it’s for her!!

That’s it for me today!  Thanks for stopping by!