Silhouette Tutorial: Printing on Burlap with Cathy

Hi Lori Whitlock fans!  Cathy hosting the blog today and I have a quick Halloween project to share with you.  I used Lori’s new “Something Wicked” phrase and printed in on printable burlap.  A quick and easy addition to my Halloween mantel this year.


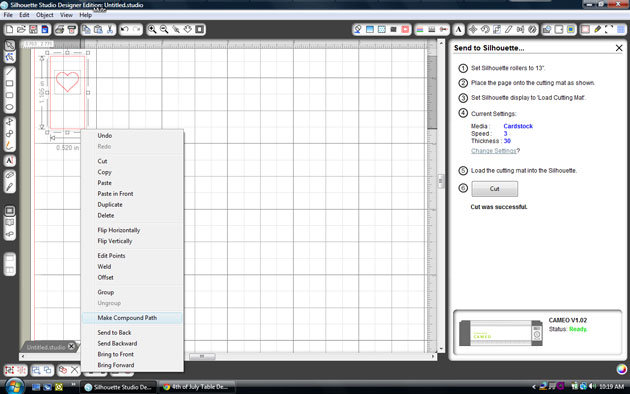
First, open up the design in your Silhouette Studio and ungroup the design, highlight the red outline text and delete it.  All you have left then is the colored text with the red outline.  Lori has made this so easy for us by adding the color.  Of course, you could delete the colored text and created your own colors with the red outline too!

All I have to do now is change the red outline, or cut line on the colored text.

 Make sure to change your page setting down to 8.5 x 11 for this printable burlap, which I found at Walmart in the hobby section.  Next, reduce the design to the size you want and center it to the page.


Ungroup your design again, and highlight each row to change the line color.  Simply click on the color you want it to be.  Some were not an exact match to Lori’s colors but they were close enough!  I matched all my colors to the same color except the purple was just a shade different!


That’s it, just hit the printer setting on your Silhouette and print it out.  Super fast project!


Then all you have left to do is frame it, I used an 8×10 frame.  The burlap was easy to trim with my Tonic Trimmer. I added one of Lori’s Pinwheel Rosette, a bit of twine and some brads to finish it off!


Thanks for joining us today!


Silhouette Tutorial: How to Make Smooth Score Lines and Cut in One Step

Hi everyone, Linda here from Paper Boutique with Linda. In today’s video tutorial, I demonstrate how to make smooth score lines and cut in one step using your Silhouette Cameo.


I used this technique on Lori’s 5 x7 serving tray (# 48179) that I purchased from the Silhouette on-line store and it turned out perfectly. I love how cute these mini cupcakes look on this tray! To make the toppers, I used the spider from Lori’s Cute Halloween Set . Her set also comes with an adorable pumpkin and ghost. I used washi tape and attached the toppers to a toothpick.

Notice how smooth the score lines are. Please see the video below for detailed directions on how to make smooth score lines.

Hope you enjoyed the video and have a wonderful day!

Linda

Silhouette tutorial with Corri: Creating Your Own Chalkboard

Hi everyone!  Corri here today sharing a fun tutorial with you guys.  I just love chalkboard art….it’s very popular right now!  I thought it would be fun to try and make one.

Here’s what you need to make one.


I picked up this simple chalkboard and chalk marker at my local Wal-mart in the craft section.  You can find these at almost any store….I’ve seen them at all my local craft stores.

Now all you need to do is cut the “Happy Haunting” title from vinyl (resize to fit your chalkboard).  Next, weed out the letter portion of the vinyl and apply the stencil to your chalkboard.  Color in the letters with the chalk marker.  Allow a few minutes for the marker to dry, then peel away the vinyl leaving your chalk design.   Super easy and you can reuse the chalkboard for any season!  The possibilities are endless.  You could make a sign for a birthday or a menu board for a party.

I hope you enjoy this fun technique.  Be sure to stop by Lori’s shop to see the latest files.

Silhouette Tutorial: Adding Stitch Lines and Embellishments

Hi everyone!  It’s Traci and I’m so excited to share a tutorial with you today!   For my project, I used several of Lori’s adorable shapes to create the cover for my latest “Artsy Albums” mini album kit.
As you’ll notice, I added some details to my green banner.  Here’s how I got the words to bend along the banner shape, and how I added those cute stitch lines.
First, find a banner shape in Lori’s shop … she has several really cute ones that you can add a title to.
Next, highlight your shape and go to the “Offset” window.  Create an internal offset and set the offset distance to .50.
Now, with your offset line highlighted, open the “Line Style” window and choose a dashed line and set the line thickness to .75.  With the line still highlighted, go to the “Line Color” window and select the color for your dashed “stitched” line.  I chose white for my project.
For the title, use the type tool to add a title for your project.  Highlight the title and change the fill color and size if desired.  Now, with the title highlighted (with green box around it) hover your cursor over the small circle with a cross in it.  Click on the small circle, hold it and drag the title over the curved line of your shape.
Release your cursor, and the words should pop onto your line as shown in the photo below.
Now, notice in the photo above, there is a little grey bar just to the left of the “E” in my title.  If you slide the oval part up and down the bar, your title should move up into your shape, rather than sitting right on the line.  See the photo below.
Now you can treat the shape as a print & cut.  Make sure to go to the “Cut Style” window and make sure the outer edge is all that will be cut.
Lori’s shapes used on this cover:
Thanks for letting me share this fun technique with you!  If you are interested in seeing additional photos of this mini album, or purchasing the kit for yourself, please visit my blog at www.artsyalbums.com or my Etsy shop here.
Traci

Silhouette Tutorial: Using the Compound Path with Corri

Hi everyone!  Corri here today sharing a couple of fun ways to dress up your die cuts using the make compound path feature in Silhouette Studio.   I like to add glitter to some of my die cuts and this is an easy way to make it a lot less messy.

Here’s my card.


For my card base, I used one of Lori’s #10 cards and envelopes.  I love this adorable new car and trailer.  Here’s a quick and easy way to add some glitter.


I cut the rectangle shape for the door from some red paper from the Echo Park –  We are Family Collection.


Then I placed the heart shape on top of the door, right clicked and pulled down to make compound path.  This makes the two shapes into one.


Run the red layer through the Xyron to make the front of it sticky.


Apply the blue layer on top and then sprinkle with glitter.


Shake off the extra glitter and you have a sparkly little heart without all the mess. You can use the release compound path feature to break apart layers that won’t ungroup.


I hope you enjoyed this fun tip for adding some shine to your die cuts.  Be sure to check out all the new files that are in Lori’s Shop.