It’s Lorri Nunmaker, and I’m so excited to be a guest on LoriWhitlock.com. I was a part of the Lori Whitlock design team for a couple of years, and was so excited to be offered a guest blog post. Lori’s products have always been super inspiring!
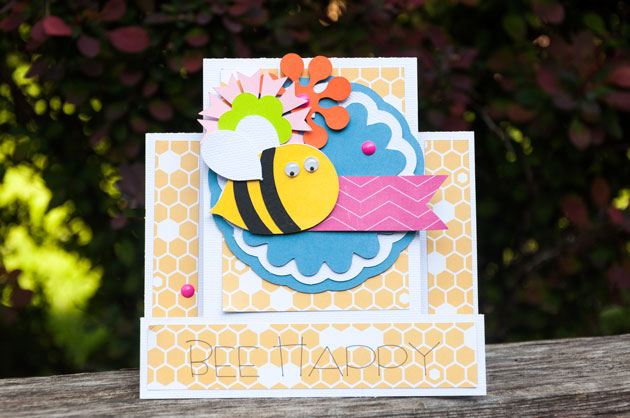
Today, I am happy to share with you a tutorial for this “Bee Happy” card. When I started thinking about what I would like to create for this post, I instantly knew I wanted to use the Lori Whitlock “Fine and Dandy” paper line for Echo Park Paper, which led me to this card.
I created this card in Cricut Design Space, and then cut the card base and elements with my Cricut Explore. I just love how the papers went with this theme. Here’s a video tutorial for the card set up in Design Space. Have a great day!
I used the Happy Summer Collection from Echo Park for the papers and stickers. I did change the card a little to suit my needs, first I added the heart and letter stickers to the front for the “label”, and I added a pocket to the back of the card to hold a gift card (the pocket was taken from the Apple Gift Card Holder)
The card really goes together easily. If you need some guidance, check out Lori’s Box Card Video here. That’s it for me today, thanks for stopping by to peek!
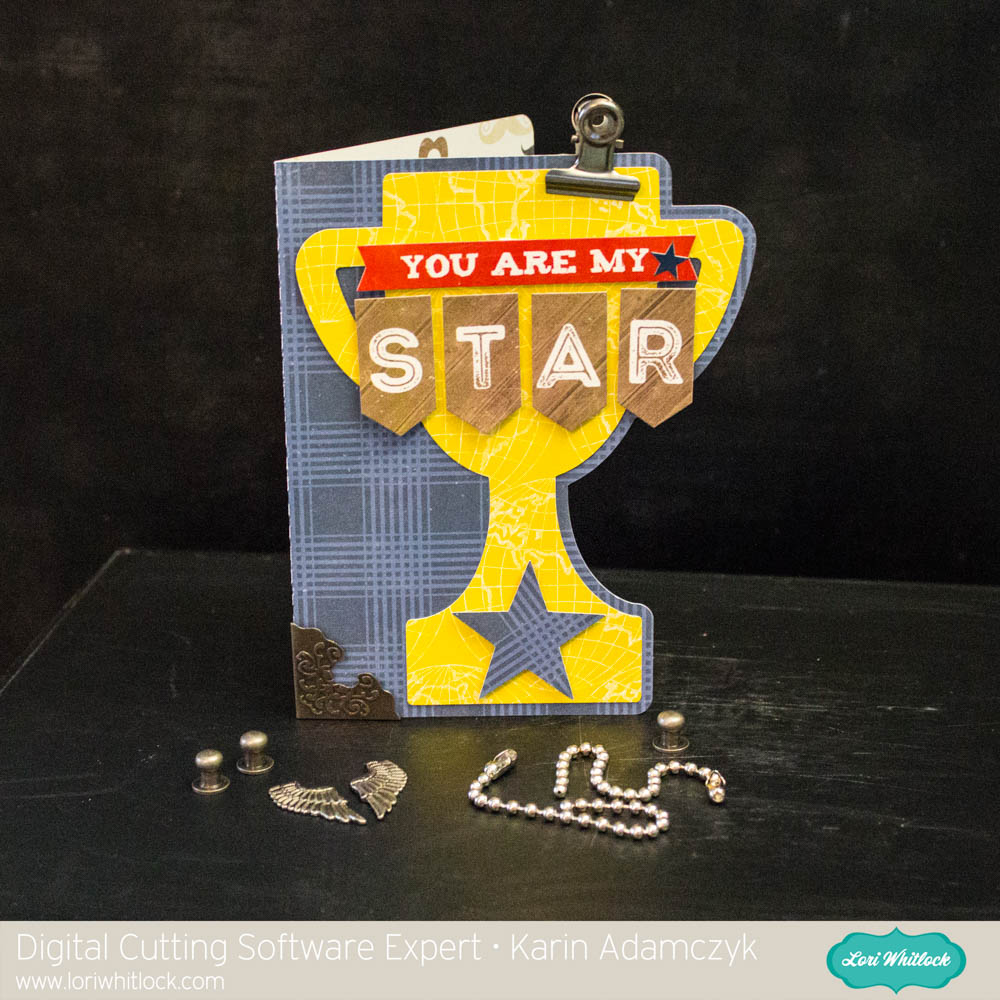
I brought the SVG file into Cricut Design Space and cut out all the pieces with my Cricut Explore. I added the “YOU ARE MY STAR” pieces and the little blue star from the element stickers. It was super quick to make and I had a card ready for Father’s Day.
Hi everyone! It’s Traci, from Artsy Albums, and I’m excited to be on Lori’s blog today to share some fun projects using her Sizzix dies. As you know, Lori designs fabulous cutting files for our digital cutting machines, and creates beautiful paper collections for Echo Park. She also designs wonderful dies for Sizzix! For crafters who don’t have a digital cutting machine, or who want to cut heavier materials like chipboard, these are so much fun!
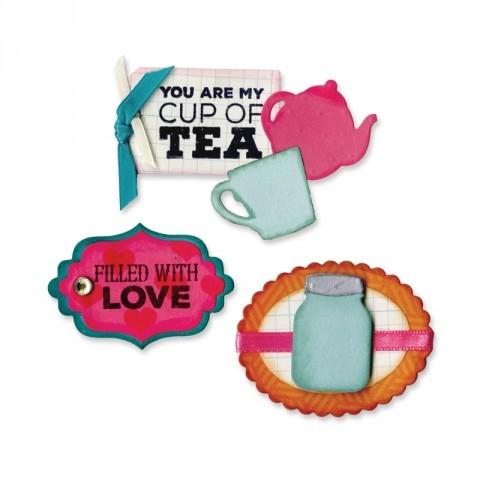
I used several different dies and stamps to create a sweet tea party set for a little girl. I’ve added links below so you can get all of the details. The papers and embellishments are from the Petticoats collection that Lori designed for Echo Park.
Before you can have a tea party, you have to invite some friends. I used Lori’s Sizzix Bigz Teapot die to create my invitation. To create a card, I folded my white card stock and cut the shape out with my fold positioned to the right of the handle’s cut line. This prevented that area of the handle from cutting and allowed the fold to stay in tact. I then cut two more teapots to add to the front, and inside, of the card.
I created a thank-you card using several of the dies and a stamp from the Jar and Teapot Framelit set and finished my set with a cute little mini album. The Cupcake #2 Bigz die was perfect for this since I wanted to cut several pieces of thick chipboard. After cutting the cupcake out of pattern paper also, I glued the page pieces together and punched a hole in one side for a binding ring. A little ribbon and a lot of enamel dots finished off my mini in no time.
I hope you visit some of the links I’ve included to learn more about Lori’s wonderful designs over at Sizzix.com, and stop by my blog at Artsy Albums sometime and say hello!
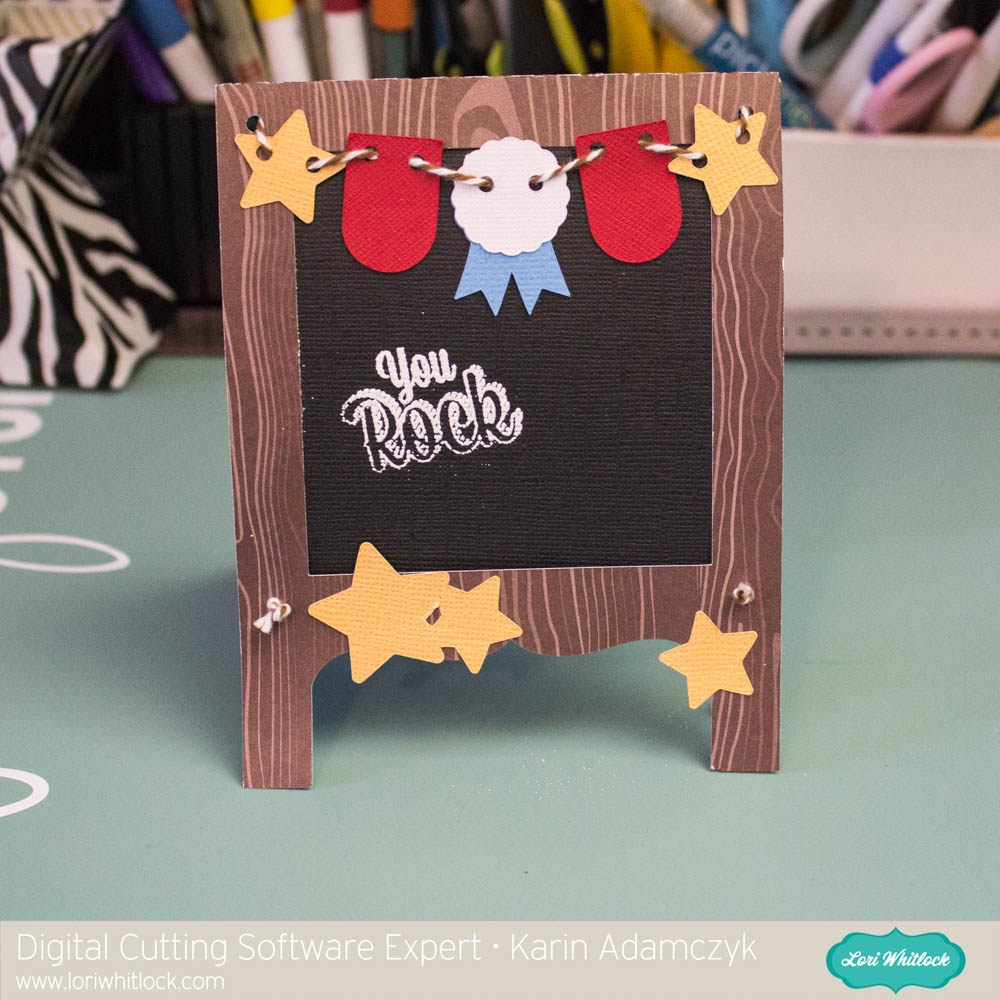
I made this adorable chalkboard card that you can use to give a special teacher a gift card.
To make the card, I brought the files into Design Space by choosing Upload Image.I opened the image of the cutting file (JPG) in Preview on my Mac and just moved that window onto the screen next to the cutting file pieces so I could see the colours used in the original project. In this case, I loved the colours because they are nice and bright so I used all the same colours for my card. I even had a great piece of wood grain patterned paper.To change the colours of the components in Design Space, all I did was click the piece, that piece is highlighted in the Layers panel, then I clicked the scissors icon and then the colour I wanted for that piece.Here you can see that I changed the colour of these tabs to red.Before clicking Go, I selected the individual pieces by drawing a rectangle around them and then I right clicked and chose Attach. This is so that the little circular cuts and scoring lines stay in the right place on that particular piece.After I cut and assembled the pieces, I used some baker’s twine to string the banner pieces along.I put knots in the baker’s twine to attach the legs at the front and back.I just used my ATG gun to put adhesive on the back of the iTunes card and attached it to the back of the card.I stamped a sentiment on the front of the card. The You Rock stamp is from the Avery Elle Celebrate Stamp set. I used American Crafts Zing Embossing Powder in White Opaque Finish, my VersaMark watermark stamp pad and my Ranger Black Heat Tool for the sentiment.