Silhouette Tutorial Filling Shapes with Digital Prints by Brigit

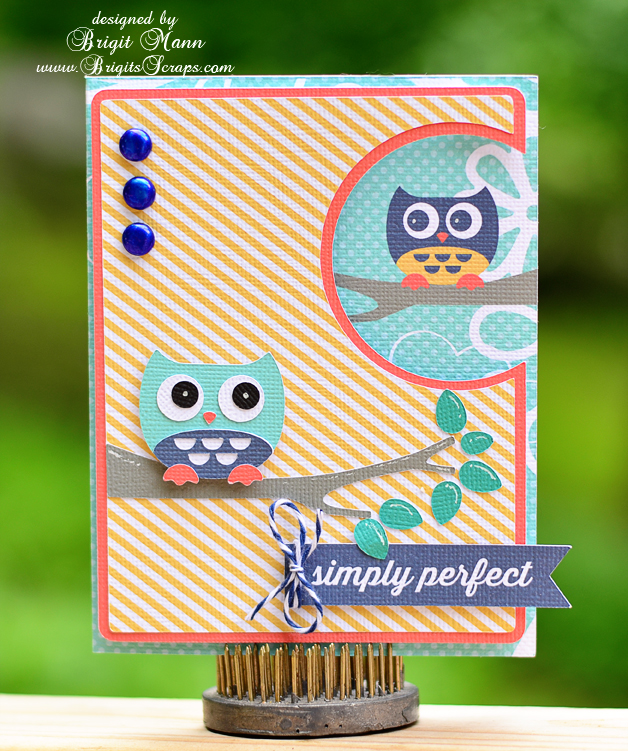
Hi everyone Brigit here with another SSDE Tutorial.  I love to fill my shapes with digital paper and then do a print n cut with my Silhouette Cameo.  It does such an awesome job cutting out the pattern filled shapes as you can see in the card below.

For this project I used one of the cards from the Christmas Card Set 2 and Lori’s digital paper collection Sweet Life.  I only used the card and the two front layers, you can delete the other pieces.

If you need help with ungrouping and making compound paths check out my tutorial here.

I do not import my digital paper into SSDE, I have it all organized by designer in a folder on my computer.  You can see in the photo how I have the folder opened onthe right-hand side next to my program.

I just dragged the pattern paper from the folder and dropped it into the shape.

Notice on the card the owl design is to the left and cutoff.

Select the card, go to the Fill Pattern and Advanced Options, click on the Pan Pattern, a circle with crosshairs will appear in the middle of the card, click on it and move the paper around.

I wanted my owl on the opposite side with the white swirls to the right so I clicked on the Horizontally under the Mirror Pattern.

I line up the card fronts so when panning I can see exactly where I’d like the owl to be.  I used the Scale Pattern and enlarged the paper to 110% so the edge of the paper wouldn’t show.  The scale pattern is great to make your pattern paper designs larger or smaller I use it all the time.

Lori has a cute owl and tree cut file that matches this collection in the owls set, I used the eyedropper under the Fill Color and selected colors from the collection so everything would match or you can fill them also with the digital paper.  The sentiment is an element from the Sweet Life collection, to cut that out you need to first do a trace, that will be covered in another tutorial.

All my pieces fit on one 12″ x 12″ piece of cardstock, registration is checked under the Registration Marks and I make sure all my cuts are selected under the Cut Style.  Now I’m ready to do a print n cut.

Other Supplies Used: AC White Textured Cardstock, In the Navy Trendy Twine, Brads
Thanks for stopping by, I hope this tutorial has helped!!  You can visit me at http://www.brigitsscraps.com.

Silhouette Sale and Giveaway

Have you seen all the consumable products that Silhouette offers on their website? I am amazed at everything the Silhouette Machines can do. Be Sure to check out their blog and get a sneak peak of all their new products.

Today until July 30 ALL Silhouette Consumables both new and old are on sale at 40% off, I will take one of each please! Check out the new products released at CHA. Use this link and use coupon code LORI at checkout.

Along with this promotion, Silhouette is also giving away a portrait machine. Would you like to be our lucky winner? To enter follow the steps below. Good luck to you all. We will announce the winner on Monday July 29.


a Rafflecopter giveaway

Working With Silhouette Files Tutorial by Brigit

Hi Everyone, I have a couple of helpful hints today, things I do in Silhouette Studio Desiger Edition to help me prepare my files before I cut them out.  I’ll be using Lori’s 2 boxes on a 12 x 12 file and one of the cards from the belly band set.

The flag on the box is from the patriotic icon set, I resized both of these to make a smaller treat box.  The ungrouped box measures 10.170w x 5.840h and the flag pieces ungrouped measures, stars – 1.580w x 1.060, stripes – 3.015w x 1.905h and the flag box – 3.015w x 1.905h.

When I added the card the pieces are bigger than the mat, so I select all and ungroup.  Notice the score lines, they are ungrouped also, so I click and drag around the card and score lines to select, go to the modify window and select make compound path (or group), you can also right click and select make compound path. You are going to do the same thing to the belly band so it’s easier to have the modify window open so you can select make compound path or group again.

I like to fill with the color or pattern paper I’m going to use and arrange my project to see how it will look.

Here is a picture of the flag, I ungrouped but it also ungrouped the stars. If you go to move it and this happens just go to edit and undo move, then click and drag and select over the stars and box and make a compound path.

Here’s a picture of the make compound path and group, they both will cut the stars out, but I like to see exactly how it will look with the make compound path.

There are two boxes with this file, so I ungrouped and deleted the other box then resized, (I also did another ungroup and make compound path on this box so I would see the lines when resized and fit the flag.)

I group my pieces together by color or pattern paper.  Keeping your groups to the left side, moving to the mat to cut, then to the right side helps you keep track of what’s been cut.

For this project though I did a print-n- cut on two 12 x 12 pieces of white textured cardstock, (American Crafts 80lb), I arranged and grouped the pieces together.  I then selected my group and go to the line color window and select none.  Now print-n- cut. Next, move those shapes to the right and place the next group on your mat and finish cutting those out.

I used Echo Park’s 4th of July Mini Theme digital paper, Stars & Stripes Trendy Twine and Jaded Blossom’s Celebrate America stamp set.

Thanks for stopping by, I hope these tips help, I have a couple more project photos on my blog.

Hopefully this is a helpful tutorial. Thank you for dropping by!

Silhouette Tutorial Bending Text by Traci

Hi everyone!  I’m excited to share a fun and easy tutorial with you today!  These steps will show you how to bend lines of text, either to create a phrase that wraps around an object, or to fit inside a curved shape as I have done on Lori’s adorable hot air balloon.
Here is the card I created with a curved “Thank You” cut out of the band.
First, pull up the shape you want to place your text in and resize it if necessary.
If there are multiple pieces to your shape, ungroup them and move everything to the side except the piece you want the word in.  Zoom in on your shape a bit, and chose the text option on the left tool bar.  As you type your word or phrase, a green box will appear.  Note that there will also be a little circle, with a cross in it, along the green line.
If you place your curser over this circle and click, you are able to drag your word into your shape.  When you hover the word over a line, the letters snap to the shape of the line.  To move your word up into the center of your shape, you will use the grey sliding bar that appears through your letters.  If you place your curser along that bar and slide upwards, your letters will move up.  However, in some cases, the spacing on your letters will also move in and start overlapping.
To prevent this, move your word over to the left so that you can see how much room you will have to increase your character spacing.
Play with the character spacing (found toward the bottom of your text style window) until you like the way the word looks.


Now you should be able to go back to the sliding grey line and move your word up into the center of your shape without the letters bunching up together.  You will notice once you’ve done this however, that your original shape line is now grey (no cut line).  This would be okay if you just wanted to cut out the bent word.

But, for this tutorial, we want to cut out the banner shape for the front of my balloon, so I will need to make this a cut line (red) again.  Highlight your shape and click on the Cut Style icon at the top.  In the Cut Style window, click the button that says “Enable Cut Style”.

Now your entire image is red and will be cut.


This is also a fun technique to use for cutting a phrase to wrap around a circle.  You would just snap your phrase on the outside line of the circle, rather than inside the shape.  I will post another project showing an example of this on my blog today, so I invite you to stop by Artsy Albums to check it out!
Thanks! Traci

Silhouette Tutorial by Corri Using the Offset Feature

Hi everyone! Corri here.

I have a quick tutorial for you today using the Offset feature in Silhouette Studio software. The offset feature is great for creating a shadow layer around your image.

I used paper and a sticker from the Echo Park “Here & Now” Collection .  I love the chalkboard paper!


First, I typed 2013 in Lori’s Happy Font at 1.5″h.

Next, I opened this graduation cap file, ungrouped and deleted the 2012. I sized the cap file (including both layers) to 1.75″h and positioned the cap’s base layer on top of the numbers. Select the offset menu from the tool bar in the upper right of the screen and click offset.

You can adjust the slider to make the shadow smaller or larger.  I left it at .25 so that I wouldn’t get a cut out in the middle of the “O”.


Click apply.


To create a little tighter shadow, click the new offset layer that you just created and click internal offset and then apply.    Now you can drag the layers apart and cut.


For the base of my card, I used the Easel Bracket Card.  I used my new sketch pens to draw this pretty flower flourish in each corner.

To get your Cameo to sketch the flourish, first select the bracket shape.

Click the cut style menu at the top of your screen and select no cute.

Replace your blade with a sketch pen and select sketch pen in your cut settings.

Click cut.


Do not unload your mat.  Replace the pen with the blade.

Select the bracket again, go to the cut style menu and change it to cut.

Select the flourishes and change them to no cut. Adjust your cut setting back to pattern paper and then cut.