Print and Cut Labels

Welcome to the weekend.  I hope you have fun plans.  Christmas is almost here.  This year, I made some extracts to give as gifts.  I followed instructions from Our Best Bites.  I started back in September, so I hope they are ready to give.  I used Lori’s Pantry Labels to make up a quick label.  I used the new Darling Font for the extract name, and I used Dreamy Font for the other text.


Hope you get some of your list checked off this weekend. The Blog Hop sale is still going, so grab up those last files needed for your Christmas projects.


Print and Cut Stamps with Kathy

Hi Everyone, Kathy here today!  Have you seen Lori’s new Print and Cut Stamps??  They are so cute!  I used the Print and Cut Stamps Fall to create this fun little thank you note…

I printed the stamped images on some watercolor paper and used some water color markers to fill the images.   The papers I used are from Lori’s The Story of Our Family from Echo Park Paper.  Make sure to take a peek at all her new Stamp and Cut sets, they are only available through the Lori Whitlock SVG Shop, but come with .PDF, PNG and SVG Files so they can be used with many cutters.  That’s it for me today, don’t forget, today is the last day of the August Sale!  Use code AUG2016 and get 30% off your order in the Lori Whitlock SVG Shop!  Thanks for stopping by to peek!


3×3 Pop-up Valentines Using Print and Cut with Courtney

Hello Lori Whitlock fans! 🙂 This is Courtney Lee from Court’s Crafts  with my first official Creative Team post and I am here to inspire you to make those last minute valentines for your kiddos! I know it seems easier to buy them at the store… but I promise this is SO simple, unique, AND you can just print them again next year!

I used four different files to create these valentines (and actually two different machines!) Valentine Print and Cut Set 1, Valentine Print and Cut Set 2, Valentine Print and Cut Set 3, and the 3×3 Valentine Pop-up Cards.  I was determined to get to know my print and cut feature on my Silhouette so I resized the digital file to fit the front of the 3×3 card from the 3×3 Valentine file. You can just print them out as they come and you will have super cute valentines! I printed 6 extra for the girls because they were just too darling. Here are the outsides.

After I printed and cut them, I cut them down to a smaller size to fit on the front of the 3×3 cards. The front is actually 3 x 2.75 because of the way they fold. I corner rounded some of the edges and started on decoration! I used border stickers, stickers, and enamel shapes to add some depth and interest.

The insides were too cute. I cut all of the 3×3 Valentine bases and insides with my Cricut Explore Air. It was made SO simple because the different layers are color coded and you can sync them so easily. I moved a bunch of color layers together so that I wouldn’t have so many mats to cut and so the valentines would have some super cute continuity. Here are the insides. I arranged the collage so you could see how they coordinate with the outsides above.

Have fun with the decoration! I tried not to over-think it and I just had a blast. I love that when you decorate the bottom of the pop-up that you also get to see it on the inside of the card. It’s super fun.
I hope this inspires you to grab some of Lori’s adorable valentine files! There are SO many cute ones to chose from and the kids have such a great time helping you make them! My two littles are fighting over who gets which ones! Time go to make some more! 🙂 The SVG links to Lori’s shop are above in the text. Here are the Silhouette File links.

Silhouette Files:
Butterfly and Heart Valentine
Elephant and Rocket Valentine
Frog and Fish Valentine
Owl and Hearts Valentine
Dinosaur Valentine
3×3 Valentine Pop-Up Dinosaur Card
3×3 Valentine Pop-Up Owl Card
3×3 Valentine Pop-Up Rocket Card
3×3 Valentine Pop-Up Butterfly Card
3×3 Valentine Pop-Up Heart Card

St. Patrick’s Day Treats with Tya

Before we get started with Tya, I wanted to point out an awesome post today over at Scrapbook & Cards Today blog. Paige Evans has a lovely layout featuring one of my cut files AND it just might include a free file!! Be sure to go take a look and get your free file!

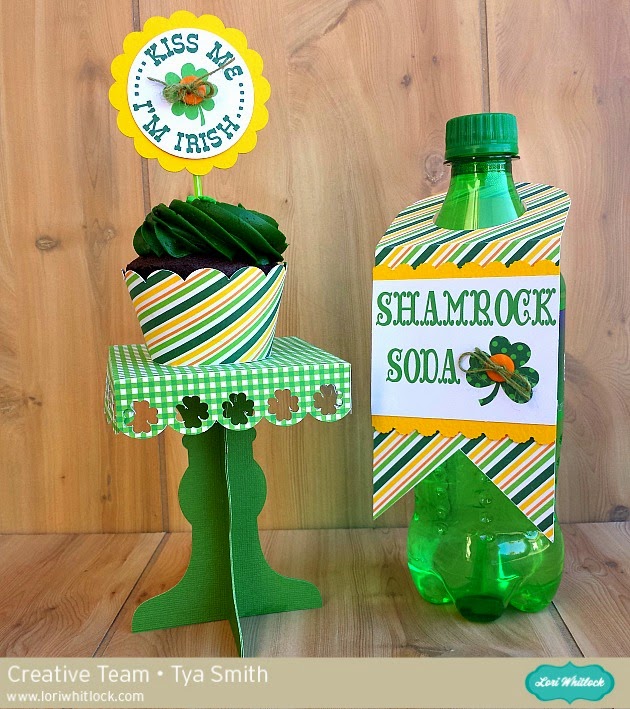
Hi everyone – its Tya here to share with you a fun set of St. Patrick’s Day treats just in time for all your little leprechaun festivities coming up. Lori has a darling new St. Patrick’s Day Digital Collection over on Snap Click Supply that I used to spruce up a simple cupcake and a soda bottle. I used the Print and Cut feature on my Silhouette on both of these projects – it’s one of my favorite things to do with my Silhouette and Lori’s files. Here is what I did-

First off – let’s start with the Cupcake Stand – here is a quick tip for you. As you can see, the original cut file had just a simple scallop edge. I wanted to make the cupcake stand a little more festive , so I went in and found a shamrock from one of my favorite Lori cut files and went in and replaced the circles in the scallop edge with the shamrocks. The wonderful thing about owning a Silhouette is that I can mix and match and customize my cut files to fit a theme or holiday. It was simply a matter of ungrouping the orginal shape, deleting the circles and replacing it with my resized shamrocks instead. Super easy and think of all the different shapes you could substitute – hearts for Valentines Day or stars for the 4th of July – the possibilities are so fun!

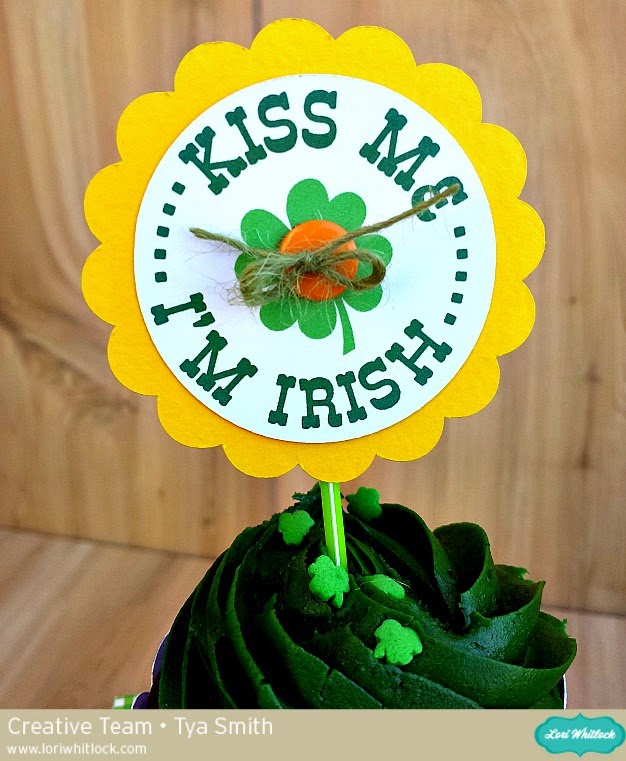
Here are a few close ups –

 Check out the cute cupcake wrap and here is a better photo of the shamrocks that I added instead of the scallop circles.

 I did a print and cut of the Kiss Me I’m Irish sentiment and made it into a cupcake topper with the help of  a scallop circle and a some button and twine. Add a green Pixie from Doodlebug Design – and you have a custom made cupcake topper!

Next up I decided to grab a green bottle of Sprite and add a bottle label and a custom sentiment to the label that I made with the beautiful Vintage Font for the Shamrock Soda. I added a polka dot shamrock with an orange button and some twine to finish it off. I also added a scallop border punch to the top and bottom edges of the sentiment.


So that’s all there is to my projects. I love taking basic everyday items like cupcakes and Soda bottles and using my Lori Whitlock shapes to fancy them up and make them fun and festive! Thanks for stopping by!

Digital Shapes and Papers –

St. Patrick’s Day Collection – Snap Click Supply

Shapes used: (All on loriwhitlock.com or Silhouette Design Store unless otherwise noted)

Nested Scalloped Circle

Bottle Label Tag – Flag

LW Vintage Font

5 Clover Shamrocks (Silhouette) Lucky Set (Lori Whitlock.com)

3D Cupcake Stand

Scalloped Cupcake Holder

Silhouette Tutorial Print & Cut by Mendi

I’m excited to be back today to share a Silhouette video tutorial with all of you!
Today’s card and video shares several little tricks and tips, but my primary focus was to share how to take one of Lori’s many versatile shapes and to personalize it to create your own customized “print & cut” file.  The creative possibilities using this basic idea are endless which is really exciting!
I decided for my card it would be fun to make a chalkboard themed speech bubble to match the feel of Lori’s “Here & Now” collection using one of her everyday shapes, sentiments and digital paper files.
To create my project I used the following cutting files designed by Lori:
Patriotic Icons (Ice Cream Cone)
Heart Flowers (Pom Pom–Silhouette Store Only)

The chalkboard paper I used can be purchased at Jessica Sprague here: