3D Paper Succulent Plants with Michelle

Hello Lori Whitlock Fans! Michelle here today to share some brand new 3D paper succulent designs that Lori has created.  You are going to love how fun and easy these are to make!

Each miniature paper plant stands about 2 1/2 inches tall. Such tiny little treasures! These designs can be scaled up and made larger if you would like to create something bigger. I had so much fun putting these together and I know that I will be making more! There are five new succulent designs available. You can purchase The Succulent Bundle 2 at the Lori Whitlock SVG Shop, or you can purchase them individually. They are also available at the Silhouette Design Store.

paper plant

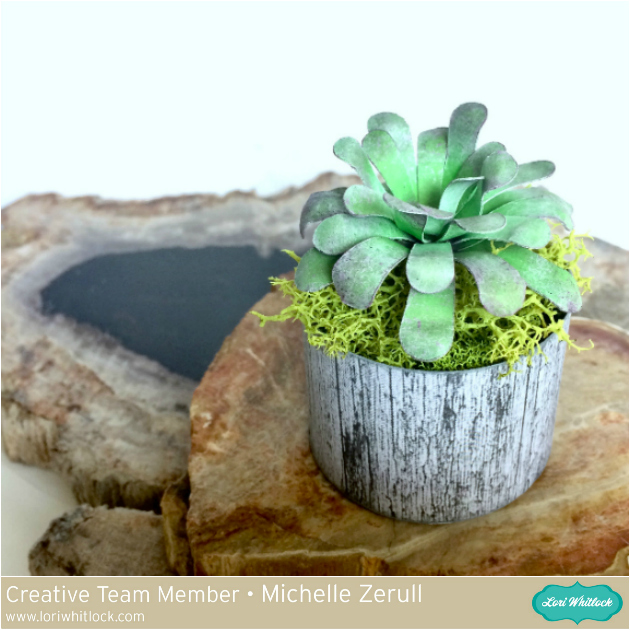
Each succulent comes complete with its own little planter. Feel free to mix and match them all to create your own garden! This plant, Succulent #8, can be purchased alone at the Lori Whitlock SVG Shop, or at the Silhouette Design Store. I loved using pastel chalks to give it color variations.

paper plant

My second paper succulent was made with Succulent 11 files from the Lori Whitlock Store. You could also purchase these paper succulent files from the Silhouette Design Store. It originally came with a square planter, but like I mentioned before, they can easily be mixed and matched.

Succulent #10 can also be found by itself at the Lori Whitlock SVG Shop, or can be found at the Silhouette Design Store.  I gave all of my plants unique shapes by using a kitchen kabob skewer.

paper plants


I’ve really enjoyed creating my Miniature Succulent Garden and I hope that I’ve inspired you to create your own garden too!

Have a creative day!

Michelle


Modifying Print and Cut Sentiments: A Silhouette Cameo Tutorial by Michelle

Hello Crafty Friends! Michelle here, to share a quick and easy tutorial for changing your print and cut sentiments. Have you seen all of the recent Valentine’s Day cards that Lori Whitlock has designed? With so many fun interactive styles, you can make a card for everyone. I’ll be sending cards to the people that I love, but I also want to give cards to the people that I like. Sending coworkers cards that say, “I Love You” would make everyone feel a little awkward, so I’m going to change the print and cut sentiments with my Silhouette Cameo.

Today, I’m going to change the sentiments in two pop up box cards. I made the Pop Up Box Card Valentine Whale from the Lori Whitlock SVG Shop. You can also purchase it from the Silhouette Design Store. I also made the Pop Up Box Card Valentine Waffle card from the Lori Whitlock SVG Shop and at the Silhouette Design Store. Both of these adorable designs contain sentiments that say, “love.” We are going to change that in three easy steps with my Silhouette Cameo.

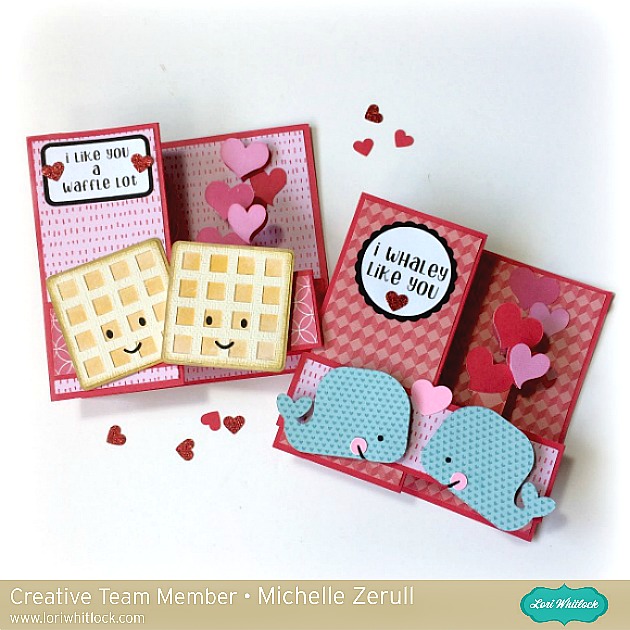
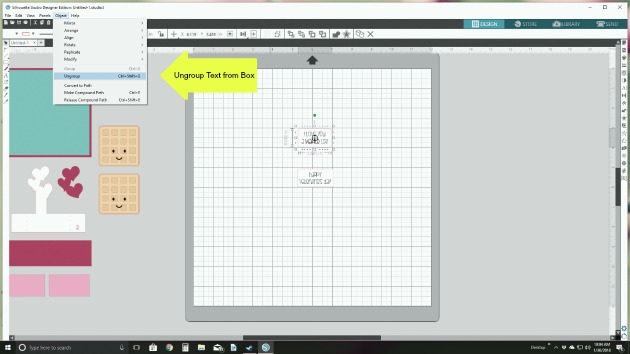
1. Prepare the sentiments to be changed. Ungroup and move all of the design elements off of the mat and on to the grey area. Leave the two print and cut designs on the mat. I’m going to change both print elements at the same time so the fonts match. Ungroup the text from the box and delete the sentiment. Leave the rectangular box piece on the mat. Our new sentiment will fit inside.

2. Design your NEW sentiment. Create a text box by clicking on the left hand side. Type your new sentiment. You will need to resize your sentiment to fit the text box by using the text icon on the far right side. You can also change your font at this time too. Lori has a lot of great fonts to choose from. I changed my font to Jackie Font that I downloaded from the Lori Whitlock SVG Shop. You an also find it here at the Silhouette Design Store. Important: You need to fill the sentiment with black in order for it to print. You can do this by clicking on the new text and then click on the art palette icon the the right side menu. Technically, you can choose any color, but we are sticking with black for this project. Make sure your new text fits in the old text box piece.

3. Prepare your new sentiment for printing. Now that you have your new text in the old text box piece, you will need to make sure that it will print instead of cut. To do this click on the blue “send” tab on the top right. This screen will show you what cuts by placing read lines around it. Leave the red lines around the box, but remove the red lines from the sentiment by clicking the “No Cut” on the send screen. Now flip back to the “Design” tab. Here, you can group your sentiment and box so that you can move them around together. Set up your page to print as usual.

As you can see from the card, the original sentiment has now been replaced with, “I Like You a Waffle Lot,” instead of “I Love you a Waffle Lot.” It’s just as cute, and now I can give this card to anyone!

I love that all of Lori’s designs are so versatile. And so very, very cute! Thank you for visiting, and have a crafty day!

Michelle


Snowbirds! with Michelle

It is so cold outside! The cold and snow inspired me, Michelle, to create these little snowbirds.

You can find the SVG files for this tiny 4″ birdhouse at the Lori Whitlock SVG Shop and also at the Silhouette Design Store. In the files, you’ll notice that the branch has leaves. With my Silhouette Cameo, I used the knife tool to remove the leaves because we won’t be seeing green for months!

I made some snowflake embellishments to keep the little birds company in my large vase. Lori has designed many gorgeous snowflakes, but this one is my favorite. You can find the set at the Lori Whitlock SVG Shop or at the Silhouette Design Store. Using Echo Park’s A Perfect Winter paper, the snowflakes cut perfectly each and every time. Adding glitter was a fun way to make them sparkle!

I hope that I have inspired you to create something fun today.

Stay warm! This weather is for the birds.

~Michelle

Gingerbread House Gift Box Tutorial with Michelle

Christmas is almost here! It’s time to add your those personal touches to your holiday preparations. If you are like me, Michelle, you’re going to need an extra box or two! Today I would like to share a tutorial for Lori’s Gingerbread House Box.

This is quite possibly the cutest gift box ever!

This little box is the perfect size for a generous helping of candy and cookie treats, a fuzzy pair of winter socks, or a gorgeous handmade ornament. Whatever your gift is, you’ll receive lots of “oohs!” and “aahs!” when they see this box!

You can find the SVG files to make your Gingerbread House Box at the Silhouette Design Store, or at the Lori Whitlock SVG Shop.

Open your files and get ready to cut! When you prepare your files for cutting, I like to group them all together by color. For this project, I used plain cardstock, but patterned paper would be cute too!

Now that you’ve cut out all of the pieces, it’s time to get creative! This is a good time to add glitter, inking, stamping or other elements to your decorative pieces.

Here’s a tip: Add glitter to your pieces AFTER they are cut. It’s much easier to cut cardstock then it is to cut glitter paper, and it will make your blade last a little longer too! Don’t forget to slow your machine way down to cut intricate details.

For some “icing”, I used a glittered 3d puffy paint. If you want to do this, you’ll have to allow extra drying time before handling. Don’t forget to make certain that your icing scallops are all going the same direction.

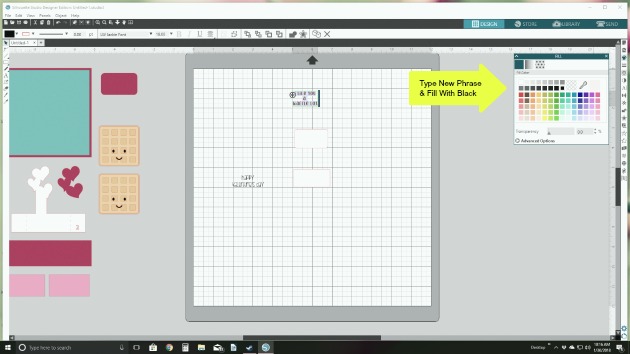
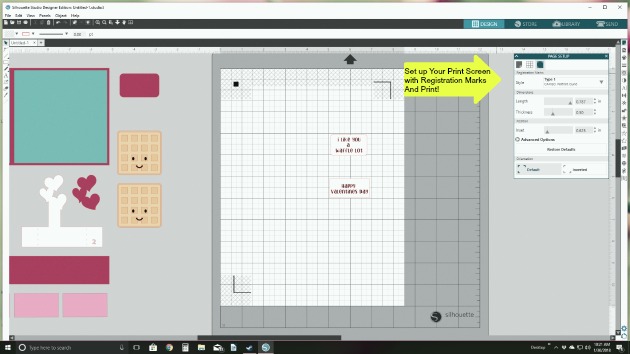
Now that your decorative pieces are ready, let’s assemble the box! Starting with the box shape, glue the side tabs pieces to the straight pieces.

Set the assembled box aside, and let’s make the lid, or roof of the box. I added the decorative pieces to my roof first. Apply glue to the tabs and the lid will go together easily.

To add the shingle strips to the lid, start at the bottom. There will be a small overlap, so space the shingle strips ends approximately 1/2″ apart as shown.

Working from the bottom up, glue your strips. When you get to the top piece, add the white “frosting strip.”

It’s adorable already and we are not even done yet! Add the rest of the decorative elements to the box base using the finished photos as a guide. It’s as much fun as decorating a real gingerbread house! Tip: Place the lid on the box before adding the decorative elements. This way, you can be certain that your lid will not cover the cute candy pieces.

You can use enamel dots, glitter glue, ribbon…anything! Be creative and have fun with it!

I hope that my tutorial has inspired you to make your own Gingerbread House Box.

Merry Christmas and Happy Holidays to you all!

~Michelle


Holiday Gift Tags with Michelle

Gift giving is my favorite holiday activity. I really enjoy shopping and wrapping and making each gift uniquely special. This is Michelle, and I would like to share some holiday gift tags that I made using using files from the Lori Whitlock SVG Shop.

I crafted a set a four different holiday tags and packaged them in their own special box, which I also made with my Silhouette Cameo. The tag set includes an adorable Santa, a Snowman, a Penguin and a Polar Bear that can be purchased individually from the Silhouette Design Store, or you can purchase them all together in a Christmas Tag Bundle at the Lori Whitlock SVG Shop.

These are easy to assemble and are so much fun to put together! A touch of felt and glitter really makes the designs “pop.”

Using papers from the Echo Park “A Perfect Winter” Collection, I made a sweet little box to house the tags. These are perfect for gift giving, but I’ve decided to keep these cuties for myself! When the tags have been used, I will use the box to hold to store ornaments until next year. The box is actually a Candy Box with removable insert compartments that have a sweet scalloped edge. The Candy Box and can be found in the Silhouette Design Store along with the Compartment Inserts, or, you can purchase the Candy Box at the Lori Whitlock SVG Shop. I enlarged the Box a little bit to house the tags. To do this, simply group all of the pieces together before enlarging. The lid has a clear acetate insert so I can see how many tags I have left.

I hope that you’ve enjoyed my Holiday Tag Set.

Happy Crafting!

~Michelle