Lori Whitlock SVG Envelope Necessities

Hello Crafty Friends!

Today I would like to share my Top Ten Envelopes that are a must-have for any crafter. How many times have you made an awesome card and stuck it in an ordinary, thin, white envelope? It happens all of the time, which is why I’ve compiled this easy-to-reference list so you can find the right size and style for almost any card. I’ve also included some tips and embellishment ideas too!

All of the following envelopes are my very favorite. I know that they’ll be yours, too! All can be sent through the US Post Office, with the exception of the Money Holder. The Money Holder envelope is meant to be hand delivered, but it’s a great envelope to have on hand, so I included it too!

Envelope Card Size Lori Whitlock

SVG Shop

Silhouette Design Store Features
1. A2 Envelope Liner Card Base 4.25” X 5.5” A2 Envelope with Liner & Card Design Id# 50776 Includes Liner & Card Base
2. #10 Envelope with Liner Card Base 3.75” X 8.5” #10 Envelope with Liner Card Base Design Id# 50783 Fun Size, Liner and Card Base
3. A7 Envelope Liner and Card Base 5” X 7” A7 Envelope Liner and Card Base Design Id# 50780 Nice Larger Size, Includes Liner & Card Base
4. Straight Flap Envelope 4.25” X 5.5” 3 Envelopes Design Id# 24862 Great Basic Envelope for Average Sized Card
5. 3” X 4” Envelope 3” X 4” Design Id# 4212 Smaller Notecard Size
6. A2 Thick Envelope Bracket 4.25” X 5.5” A2 Thick Envelope Set Design Id# 135341 For Thicker Cards w/ Embellishments
7. 6.5” Square Thick Envelope Curve 6.25”X 6.25” 6.5” Square Thick Envelope Set Design Id# 135392 Holds Large Square Card w/Thick Embellishments
8. Valentine Print & Cut Unicorn Card 3” X 4” Valentine Print and Cut Unicorn Design Id# 286426 Cute 3”X4” Envelope with Cut-Out Heart: File Includes Card
9. A7 Thick Envelope Card Bracket 5” X 7” A7 Thick Envelope Set Design Id# 135353 Thicker Size for cards with lots of embellishment
10. Money Holder Envelope* US Currency Money Holder Envelope with Tag Design Id# 209573 *Not to be mailed. This money holder envelope includes a print & cut tag

That seems like a lot, but there’s more! Did you know that there’s an entire category for  envelopes at the Lori Whitlock SVG Shop? You can find them all here!

You can make your envelopes in advance too! I like to use Easy-Tear Double Sided Tape. Simply leave the tape liner on and when you’re ready to seal the envelope, remove the tape liner and press firmly. It certainly beats licking the envelopes! Currently, a standard size envelope can be mailed First-Class mail for 55-cents. Square, oversized, thick, or oddly shaped envelopes start out at 70-cents. I always take mine to my local Post Office to be weighed. You can find out where your local branch is at: usps.com.

Want to make that envelope extra special? Make a coordinating label! I love the “Label 3 Dingbat Font.”

Label 3 has many different shapes and you can customize the size to fit your envelope. You can find the font at the Lori Whitlock SVG Shop, or at the Silhouette Design Store.

Curious about the samples posted above? They were made with Lori’s “Forward with Faith” Echo Park Paper line. I love, love, love the colors!

Bookmark this page so you will be able to create the perfect envelope for any project. Now, get those cards in the mail!

Happy Crafting!

Michelle

Camping Box Card Cut File

Hello crafty friends! Michelle here with you today to share one of the new Lori Whitlock Box Cards. This was so much fun to make!

The Camping Box Card is my new favorite guy card. I love the details! It folds flat and fits in a standard A7 envelope. Isn’t that cool? I changed the sentiment because I’m sending it to someone who has been in poor health lately. I know that he’ll like it as much as I do!

You can find the files for this card at the Lori Whitlock SVG Shop, or at the Silhouette Design Store. Either way, be sure to check out her other new files too. They are all pretty amazing!

Have a great week!

Kit of the Month Projects with Michelle

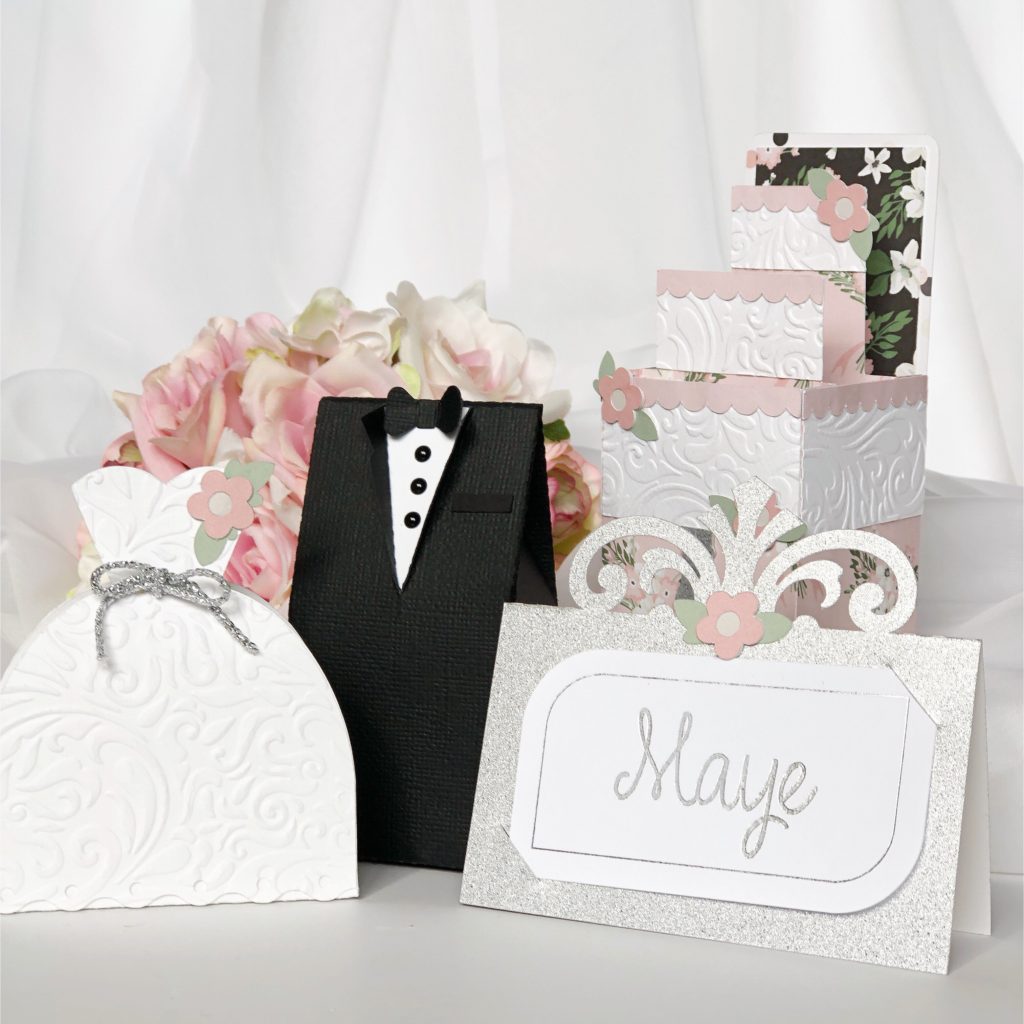
Hello Crafty Friends! How is it June already? June is traditionally wedding season, so I’m here with you today to share a very special set of projects that you can make for free! Yes, free!

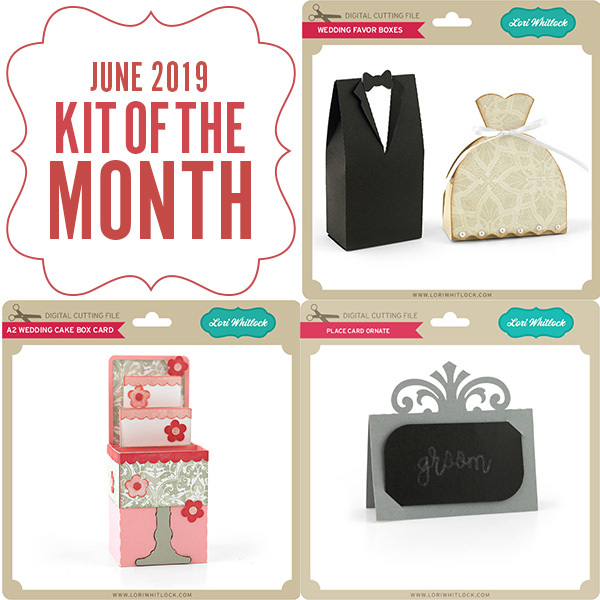
Each month Lori has a Kit of the Month. This month, it’s wedding themed, but you can use it for so much more. I’m planning on using these place cards for my holiday table next Christmas! This kit includes the SVG files for the items shown. It’s available for FREE with any $20 purchase during the month of June 2019. Simply add this item to your cart at the Lori Whitlock SVG Shop along with your purchase and enter coupon code: JUN19KOTM. This kit will then be FREE upon checkout. Limit one coupon code per order.

Of course you can always buy the SVG files for the items individually as well. All of the projects are available at the Silhouette Design Store as well as at the Lori Whitlock SVG Shop. I’ll include the links below.

I had so much fun putting all of these together. I hope that I’ve inspired you to make your own fabulous projects with your free Kit of the Month this month!

Links:

2019 June Kit of the Month
A2 Wedding Cake Box Card (SVG, Silhouette)
Place Card Ornate (SVG, Silhouette)
Wedding Favor Boxes SVG
3D Wedding Dress Favor Box Silhouette Design Store 
3D Wedding Tuxedo Favor Box Silhouette Design Store

Michelle

Easy Paper Flower Tutorial with Michelle

Hello Crafty Friends! Michelle here with you today to share a paper flower tutorial to make what could be the world’s easiest paper flower, but no one will know that except for you! You don’t need any tools or any experience to create this full, lush, dimensional bloom. You just need your electronic cutting machine and Lori’s cute cut files! Let’s get started!

Lori Whitlock Easy Paper Flower Tutorial DIY with Michelle Zerull

For this flower, I used “3D Flower 43” that can be purchased at the Lori Whitlock SVG Shop or at the Silhouette Design Store. The flower looks different in the photo, but that’s only because we’re using the super easy construction method. Download all of the files and cut them out in your choice of colors. I made mine pink to coordinate with the paper from Lori’s “I Love Summer” Echo Park Paper Collection. Even the tag matches. Isn’t that the cutest?

Cut out all of your petals and group them by size. You should have five groups of three.

Starting with the smallest group, curl the petal strips that are the same size, upward with your fingers and glue them on top of each other as shown. Don’t stress about the curling them because we have more to do with them anyway and the curling will barely show. Use whatever glue you’re comfortable with. A fast drying glue, or hot glue is recommended. Glue all five groups in this manner.

Place your index finger in the middle of each petal, and gently pinch the petal ends so the form a “cup”. Do this to each group and set aside.


Pinch the “leaves” together just as you did with the petals. Your groups will look like the above photo. But we still need to complete the center!

The center will be completed in two steps. First, glue the two sides together. Do not fold a crease in the strip. Instead gently hold the the sides together until the glue sets, and move down along the sides until it is all glued together.

Add a line of glue down the cut edge and gently roll the strip. I tried to keep my roll tight. You can roll it tight, or loose. It’s up to you! When it’s all rolled up, set it aside to dry.

While your center is drying, start combining your petal sets. I started with my smallest set and glued it to the set that’s a little bigger, by placing a drop of glue in the middle and holding it down with finger as shown. Make sure your glue has taken hold before adding your next set. For best results, stagger the petal placement so that they are not right on top of each other.

Finish the flower by placing your center in the middle and by adding your leaf piece to the back.

I cut my flower in the dimensions shown when I opened my file. It makes an impressive size! You can scale the size of your flower up or down depending on the project. These would be great for wall decor or used in place of a bow like I made mine. In fact, I scaled up the size of my gable box in order to accommodate the flower’s width. I used the Gable box here in the Lori Whitlock SVG Shop, and also found in the Silhouette Design Store.


That’s it! You are going to impress everyone with your flower making skills!

Have fun!


Easter Treats with Michelle

Hello Crafty Friends!

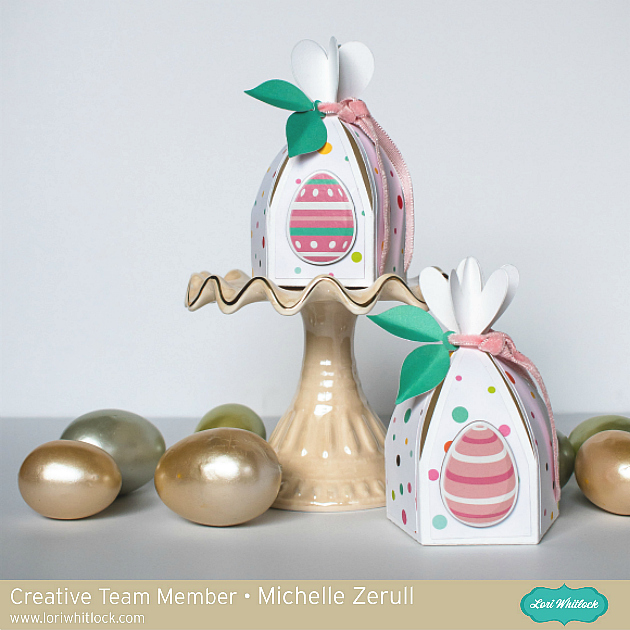
I’d like to introduce you to a couple of my new favorite treat boxes. They’re super fast to assemble and are so sweet. I know that you’ll love them too!

My treat boxes were made with the Pentagon Heart Box and the Pentagon Petal Box. They’re both similar and you put them together the same way. The only difference between the two is their tops. There’s actually a third box in this set as well, so be sure to check that out also. You can find the SVG files for the Petal Box at the Lori Whitlock SVG Shop as well as at the Silhouette Design Store. You can find the Heart Box at the Lori Whitlock SVG Shop and the Silhouette Design Store. For my boxes, I used Lori’s Echo Park Paper Easter Wishes line of paper and embellishments. The Chipboard Eggs are from the Easter Wishes line too. They fit so nicely on the box panels!

Have a crafty day!

Michelle