Delicate Flower Card

I’m sharing today a quick tutorial for the Delicate Flower Card.  This card is so pretty and easy to assemble!  It folds to fit into a standard A7 envelope.

Silhouette/SVG

This card has only 5 pieces to cut and assemble.  The sentiment is done using the print and cut function of your machine.

After cutting the pieces, adhere the delicate floral piece to the white floral backer. It’s best to use an adhesive with a fine tip.  Carefully adhere the piece.  Add the sentiment to the banner.  Then adhere the assembled pieces to the card.  The banner can go above or below the bouquet, whatever your preference.

Lori has several other delicate floral cards.  Check out the bundle here.

Have a great day!

Ashley

Shutter Card Fox

Hi! As we move into the fall season in some parts of the world, we reach for fall colors. Foxes seem to match right along with the seasonal decor. I’m sharing today Lori’s Fox Shutter Card–SVG, Silhouette.

I used Lori’s My Favorite Fall Collection from Echo Park Paper.

Enjoy the holiday!

Ashley

Box Castle Card and Sketch Fonts

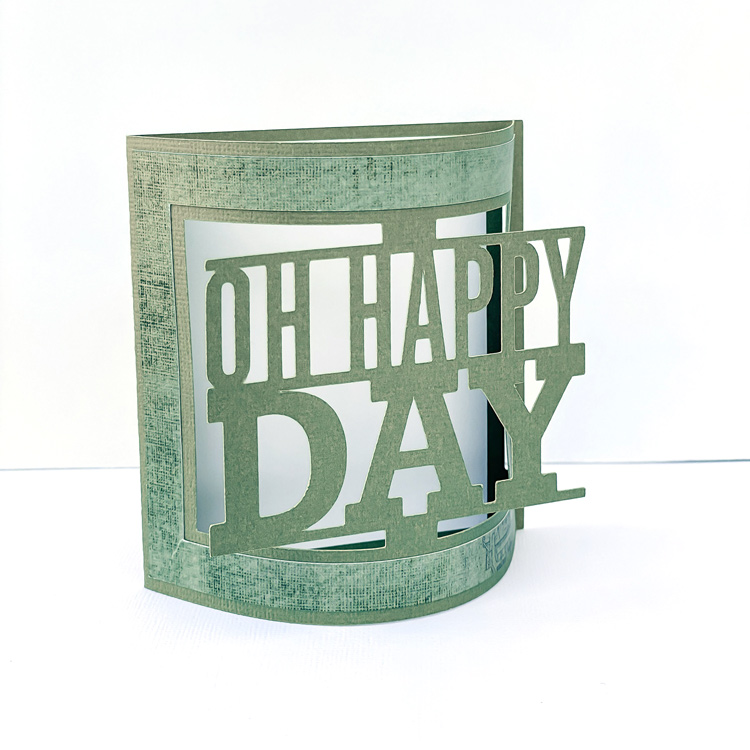
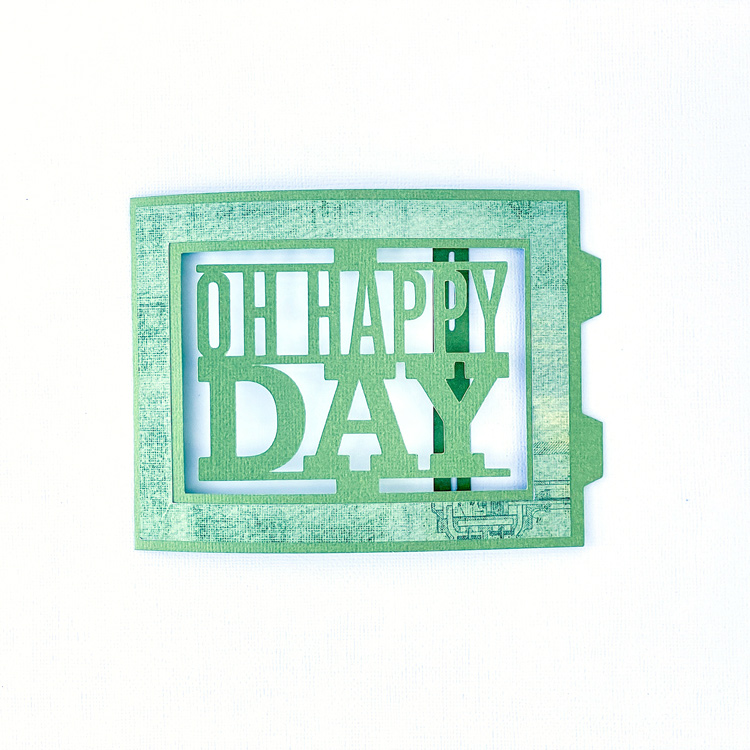
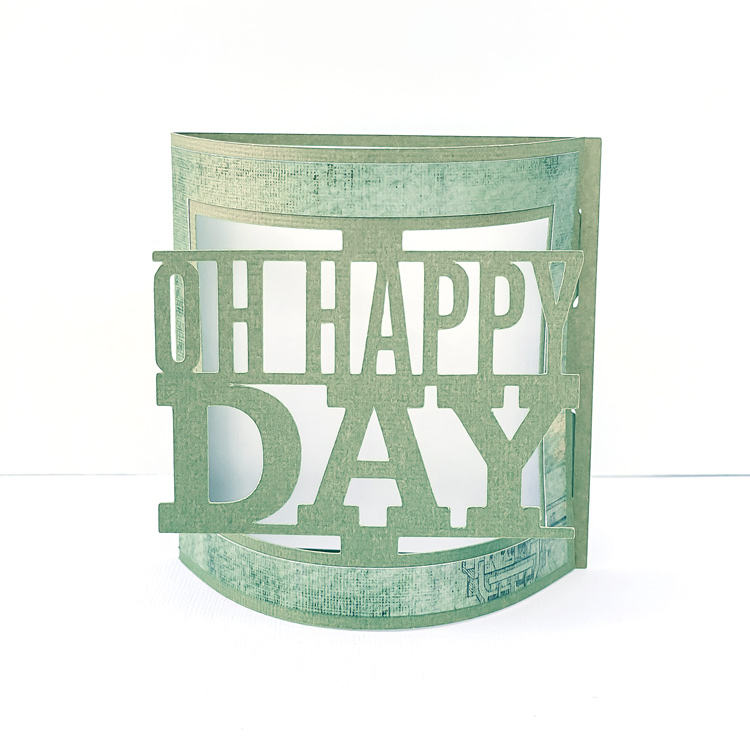
Hello!  Today I have a great castle card to show off and a review of some of Lori’s Sketch Fonts.

Image 1

SVG/Silhouette

On the back is a Happy Birthday sentiment.  I decided I wanted to try out some sketch fonts with different pens.  On the card I used the LW Favorite Sketch font. Here are fonts I experimented with:

Tall Sketch Font: SVG/Silhouette

Jordan Sketch Font: SVG/Silhouette

Favorite Sketch Font: SVG/Silhouette

Block Sketch Font: SVG/Silhouette

Dot Sketch Font: SVG/Silhouette

I also tried some fonts that aren’t Sketch:

Delightful SVG/Silhouette

Skinny Minnie SVG/Silhouette

State Heart Dingbats SVG/Silhouette

I’m using the Cricut Explore Air 2 today.  These sketch fonts will also work with other Cricut machines as well as Silhouette machines.  I first used a pen, and I forgot to select Draw for several of the fonts (so some were cut).  First tip when using sketch fonts and pens is to make sure to select Draw for your font.

You can see the sketch fonts are a single line and the other fonts, the machine draws an outline of the letters.  I think they all look great though.  Next I used a 1 mm marker.  This was an older marker, so by the end of the drawing, it is getting a little faded.

I learned that you select the type of pen or marker in the pallet square next to the Linetype selection drop down menu in Cricut Design Space. I think the marker is especially great for the Tall Sketch Font and the State Dingbats font.

Last I tried selecting some fonts with the pen and some fonts with a marker.  The turquoise words are in pen and the gold are 1 mm marker. The machine stops after finishing drawing with the pen, and then tells you to change tools.  You can see what the different fonts look like.  I love having some sketch fonts to be able to add your own sentiments to cards.

The first font in the above picture is the Dot Sketch font (not Block).  The marker writes the Skinny Minnie font really great too.

Well there you go–an exploration in using different fonts with your sketch pens.  Is anyone interested in seeing the Silhouette sketch pens?  We can try that in another post!

And don’t forget,  all SVGs, Fonts, pattern fills and commercial licenses are on sale now in the Lori Whitlock SVG Shop.  Get 30% off when you use code AUG2020 at checkout.  Sale Ends Saturday.

Have a great day!

Ashley


DIY Doormat with Ashley

You probably have seen the popular DIY coir doormats around.  I tried my hand at one using a font from Lori’s shop. I used the Monogram Family 7 Font.

SVG  / Silhouette

I didn’t use the circle part, so I just deleted those parts.

For our last name Cook and the numbers, I used the font Georgia–a font I have in my library. I used freezer paper as a stencil and outdoor paint on the mat. I used a 24 inch long mat, so I could cut the stencil in one piece from the freezer paper.  I carefully removed the freezer paper and placed it on the mat as the stencil.  I then used a stencil brush to paint.  I also used a skinny brush for some of the parts that are very skinny.  I let the black dry, then I used the banner part of the stencil to add Cook in white paint. I used some straight pins to hold down some of the skinny edges and the middles of the letters.  Stick the straight pins down at an angle and push them in as far as you can, so they don’t get in the way of the painting.  And just throw away the freezer paper stencil and straight pins once finished painting.

A fun way to pep up our front porch. Lori has several fonts and quote files that would be great on a doormat!

~Ashley

Iris Shutter Card Tutorial

How are you today? Around the world this week, most of us are working and/or staying at home. Guess what, crafters?  It is time to use your stash!  All those items you have been saving–this is it.  This is the time to use it!!  Lori recently released these fun Iris Cards.  She has 2 video tutorials to help you make them.  This video is the first with paper only, and this tutorial uses mini brads.  The cards are available in the Silhouette Design Store individually and in Lori’s SVG Shop individually and in Bundles.

5×7 Iris Shutter Card Bundle
A2 Iris Shutter Card Birthday Bundle

I have made several of these cards, and I just love them.  I’m going to inspire you today with ways you can personalize them.

5×7 Iris Shutter Card Camera: SVG, Silhouette

For this Camera Card, I though it would be so cute to add a picture.  Have you heard of the front porch project?  Photographers that are participating, stop at your house, and take pics of you while staying at least 6 feet away.  This would be a great way to send a pic to a loved one.  To do this in Cricut Design Space:

1. Open the Camera Card File

2. Ungroup the card pieces

3. Draw a circle that is 2.36″ using the shapes tool.

4. Upload a photo, and select your preferred image type option, click continue then save as print then cut image.  Insert this image onto the mat with your circle.

5. Resize your photo to fit the 2.36 circle.

6. Layer the circle on top of the photo.  Make sure the circle doesn’t hang off any edge of the picture.

7. Select both the photo and circle, right mouse click and select slice.

8. Delete the part of the picture you don’t need as well as the circle you drew.

9. Layer the photo over the heart and starburst on the card base.  Once it is lined up, delete the heart and starburst.

10. Select the photo circle and the rectangular white card, and select flatten.

11. Don’t forget to flatten the sentiments as well.

Now print then cut your photo and sentiments and cut all the other pieces of the card to assemble.


Here are some of the other iris cards that I have made:

5×7 Iris Shutter Card Flower SVG, Silhouette

A2 Iris Shutter Card Birthday Donut  SVG, Silhouette

5×7 Iris Shutter Card Camera: SVG, Silhouette

This one has a foiled heart.  I changed the red heart to black before I printed with my laser printer, then foiled it. These cards are so fun.  Personalize them, and send them off.

Enjoy crafting!

Ashley