Layout by Traci and Cake Explosion Box by Christine

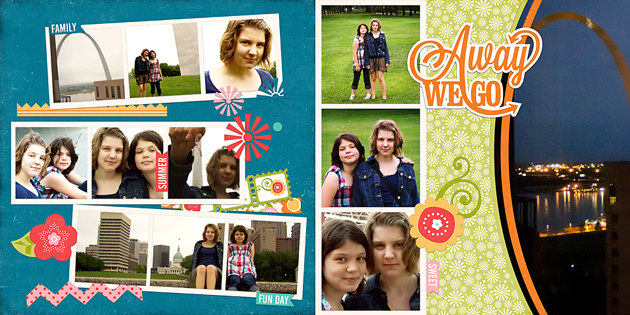
Traci is on the blog today sharing this beautiful layout with us… Hi everyone! I’m back today to share a sweet layout with you.  This is my darling niece back in 1997 (I’m just a tad behind on my scrapbooking).  She was at such a cute age back then that even though each of these photos wasn’t from the same day or event, I wanted to use them together.  (How cute is that hat)??  Every time I saw Taylor back then, she made me laugh — so Lori’s title was perfect for this layout.  I’ve also been wanting to use one of Lori’s 12×12 backgrounds and I fell in love with the honeycomb pattern.  Using my cameo, I was able to cut the entire 12×12 background out of a sheet of pink pattern paper.  Then, I clipped parts of the inside away, so that the pattern was left on the bottom and up one side.
I also cut a few of the hexagons out of other pattern papers to give the layout some random pops of color.  I cut a hexagon shaped card in half to layer under some embellishments in the top right corner, and I finished up the page with twine around the edge and a few flowers.
Here are the cutting files that I used…thanks for letting me share with you today!
Lori Whitlock Geometric Lace, also available in the Silhouette store as Honeycomb Background Lace
and check out what Christine made today
It just so happens that my day to share on Lori’s blog is also my daughter’s 21st birthday so I thought that it would be fitting to share something birthday related.  This birthday explosion box is new in Lori Whitlock’s store and I had a lot of fun putting it together and adding my own personal touches.

On the top of the box, I added a bow that comes with the Birthday Box file.  Just cut a couple of strips of paper and secure with a brad.  When you lift the top off the box, the sides fall open and the cake inside is revealed.

I made the little 21 myself by typing the numbers out first and ungrouping them.  Then I drew a small rectangle the width of the numbers and welded it to the bottom of the numbers.  This created a little tab that I was able to use to attach it to the top of the box.  If I had thought about it before I cut out the box, I would have put an extra slit in the top of the box like the others have, so that I could just slide the tab in and secure it underneath.  Next time I make this, it will be easier to make it look nice.  Make sure that you can fold the number over, or the lid won’t fit on the box.
I used October Afternoon’s CakeWalk collection to cut out my box and added a few sticker embellishments here and there.
This way a really fun box to create.  I am excited to try it again in different colors.
So, if I may, a big Happy 21 Birthday Wish to my daughter.  I hope this day brings you joy and happiness!
Lori Whitlock Supplies used:

Silhouette Tutorial Filling Shapes with Digital Prints by Brigit

Hi everyone Brigit here with another SSDE Tutorial.  I love to fill my shapes with digital paper and then do a print n cut with my Silhouette Cameo.  It does such an awesome job cutting out the pattern filled shapes as you can see in the card below.

For this project I used one of the cards from the Christmas Card Set 2 and Lori’s digital paper collection Sweet Life.  I only used the card and the two front layers, you can delete the other pieces.

If you need help with ungrouping and making compound paths check out my tutorial here.

I do not import my digital paper into SSDE, I have it all organized by designer in a folder on my computer.  You can see in the photo how I have the folder opened onthe right-hand side next to my program.

I just dragged the pattern paper from the folder and dropped it into the shape.

Notice on the card the owl design is to the left and cutoff.

Select the card, go to the Fill Pattern and Advanced Options, click on the Pan Pattern, a circle with crosshairs will appear in the middle of the card, click on it and move the paper around.

I wanted my owl on the opposite side with the white swirls to the right so I clicked on the Horizontally under the Mirror Pattern.

I line up the card fronts so when panning I can see exactly where I’d like the owl to be.  I used the Scale Pattern and enlarged the paper to 110% so the edge of the paper wouldn’t show.  The scale pattern is great to make your pattern paper designs larger or smaller I use it all the time.

Lori has a cute owl and tree cut file that matches this collection in the owls set, I used the eyedropper under the Fill Color and selected colors from the collection so everything would match or you can fill them also with the digital paper.  The sentiment is an element from the Sweet Life collection, to cut that out you need to first do a trace, that will be covered in another tutorial.

All my pieces fit on one 12″ x 12″ piece of cardstock, registration is checked under the Registration Marks and I make sure all my cuts are selected under the Cut Style.  Now I’m ready to do a print n cut.

Other Supplies Used: AC White Textured Cardstock, In the Navy Trendy Twine, Brads

Thanks for stopping by, I hope this tutorial has helped!!  You can visit me at http://www.brigitsscraps.com.

One Dollar Wednesday at Jessica Sprague

One Dollar Wednesday at JessicaSprague.com!

It’s Wednesday again and that means TODAY ONLY you can snag two digital kits for an amazing deal…
TODAY for JUST $1 you can grab this awesome set: Green Basics

GREEN BASICS

And, you can get the following awesome product for HALF OFF, Basics Life Cards

BASICS LIFE CARDS

While you are at jessicasprague.com getting your kits, be sure to check out the samples made with each of these kits at the bottom of each listing.

TODAY IS THE LAST DAY TO SAVE 40% at Silhouette. Be sure to use coupon code LORI at checkout to get 40% off your entire purchase of Silhouette supplies, including the Designer Edition Software! SHOP HERE

Tuesday Freebie 4 Borders 2

TODAY ONLY, this 4 BORDERS 2 SVG file is FREE with any purchase.

Before coupon code total should be $1.98 or higher. Just add coupon code: BORDERS at checkout and the cost will be deducted from your purchase. This freebie is good until tomorrow.

Here are some of Lori’s newest shapes added to the SVG shop and her Silhouette Portfolio! Thanks for stopping by… Lisa

Only a purchase in Lori’s SVG shop will qualify for the free shape.

Thank you everyone for your support and participation in the Silhouette Portrait Giveaway! We have a winner! Congrats to Lee B! Lee won with her ‘refer a friend’ entry! Lee, I’ve emailed you with instructions. Please send your mailing address to info@loriwhitlock.com. Have a wonderful day, everyone!!

Don’t forget about the awesome sale at Silhouette. They have extended the sale through tomorrow. Be sure to use coupon code LORI at checkout to get 40% off your entire purchase of Silhouette supplies, including the Designer Edition Software!