One Dollar Wednesday + Silhouette Sale

One Dollar Wednesday at JessicaSprague.com!

It’s Wednesday again and that means TODAY ONLY you can snag two digital kits for an amazing deal…
TODAY for JUST $1 you can grab this awesome set: Sweet Memories Collection. This kit is regularly priced for $6.99 and today only you can get the paper AND elements for $1

SWEET MEMORIES COLLECTION

And, you can get the following awesome product for HALF OFF, 4×6 and 3×4 Template Set 

4×6 AND 3×4 TEMPLATE SET

While you are at jessicasprague.com getting your kits, be sure to check out the samples made with each of these kits at the bottom of each listing.
PS DON’T FORGET these great deals on Silhouette and stamp material going on this week.  Don’t forget to use code LORI at checkout
If you purchase one of these great deals be sure to send us an email at info@loriwhitlock.com to receive this beautiful freebie.


New in Shop + Tuesday Freebie

TODAY ONLY, the HALLOWEEN KEYS SVG file is FREE with purchase.

Before coupon code total should be $5.00 or higher. Just add coupon code: HALLOWEEN at checkout and the cost will be deducted from your purchase. This freebie is good until midnight tonight!

Here are some of Lori’s newest shapes added to the SVG shop and her Silhouette Portfolio! Thanks for stopping by… Lisa

Only a purchase in Lori’s SVG shop will qualify for the free cutting file.

Cards by Christine

Today I want to show you how you can make a card using the same die cut shape and the same paper collection and have it turn out completely different.  For both of my cards, I used  the banner shaped card from Lori Whitlock’s die cut card file, A2 Card Base Set 1. This simply shaped card can be used vertically or horizontally, though vertically it needed a little coaxing to get it to stand up straight for pictures.  To decorate the pictures, I used Lori Whitlock’s new Reflections paper and embellishment collection created for Echo Park.

My first card is a little more masculine.  There are so many papers and elements in this collection to choose from, I was able to pick colors and shapes that were better suited for a card for a woman or a man.  I used the card base horizontally for this card and decorated it with cardstock stickers that I popped up with foam adhesive.

I also adhered a bit of stickers to the inside of the card that shows when closed to add an interesting element.  The gem, in this space, is also from the collection. On my cards, I like to use the brads a little bit differently.  I really don’t like to see the prongs, so I will bend and break them off and then adhere them to the card with a little foam adhesive.  Works great every time!
My second card is definitely more feminine.  I took advantage of the floral papers and the yellow monochromatic color scheme to change the look entirely.  This time I rotated the card so that it is opened vertically.  I used the beautiful floral arrangement sticker as my focal point and topped it off with a Layered Chipboard sentiment.  The brad in this card was adhered again with foam adhesive.
Thank you for stopping by today and I want to challenge you to use card bases in different ways with just a few flips and paper changes.  You’ll find a whole bunch of die cut card base files in Lori’s store, I bet!
Lori Whitlock Supplies:
Reflections  paper collection and embellishments by Lori Whitlock for Echo Park

Silhouette Tutorial by Brigit: Polygon Tool

Hi everyone, Brigit here, Today I have a tutorial using the polygon tool to create cutouts from the acorn box to make this luminary.  It’s a fun and easy project that looks so pretty when done!

Import the acorn and resize it to 15.5″w with aspect ratio checked. Now ungroup, you can move the other pieces off the mat, (the hole on the lid ungroups also so make sure you group it together again with the lid before you move.)

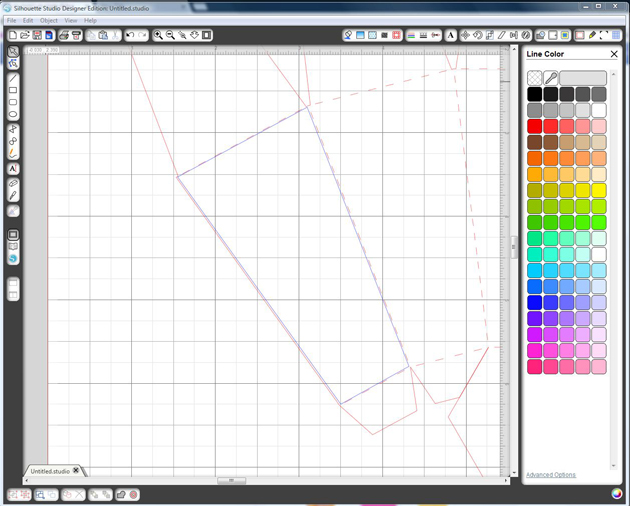
On the first panel zoom in close, select the Polygon tool, click in one corner then the second, third, forth and back to the first to form your shape like I did here in blue, don’t worry about being precise.

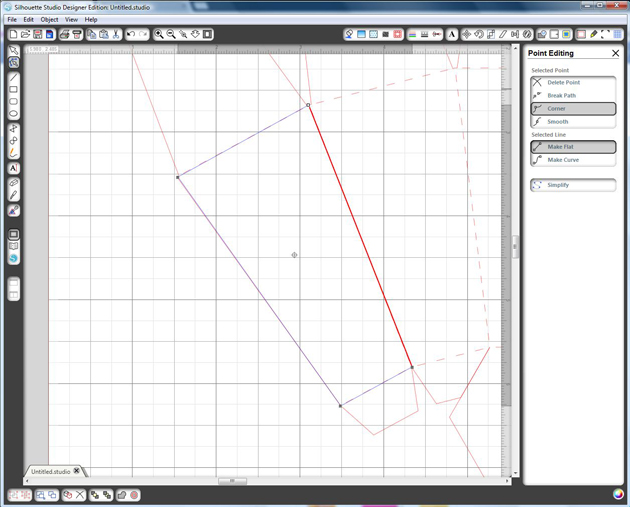
If you double click on the shape you will see 4 dots in the corners, click on them and you can easily adjust the lines if need be.

Now select the shape you just created, go to the offset window and select internal offset, I used a .250 offset distance.  Delete your original shape, you just want the internal one.

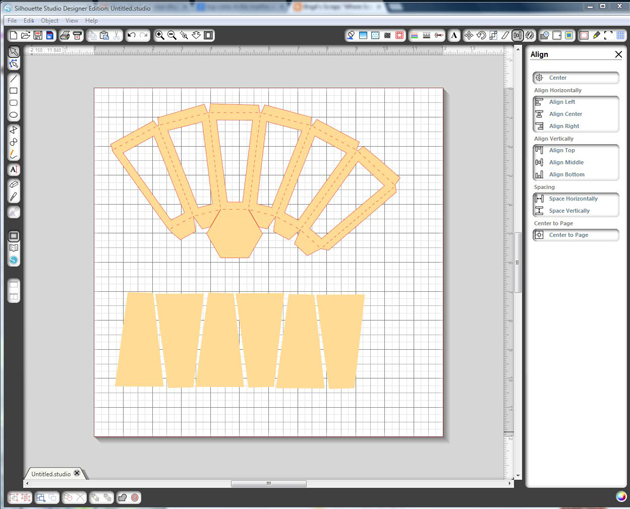
Continue and repeat the same steps with the next 5 panels.  After you finish the last one, select the whole acorn including the shapes you just made, go to the modify window and select Make, you can do this after each one if you don’t want to worry about moving it but I just use the undo if that happens.  This is how it looks filled.

With the knife tool I cut leaving just enough to folder over at the top and some off the side flap, you don’t have to be exact, leave more you can trim with a scissor if you have too.  Tip, when I was cutting the flaps after the third one from the left I lost one of the bottom lines, so I ctrl z (undo) selected the whole shape again, and used make a compound path.  I could continue cutting the other flaps without losing the cut line.

The last thing you need to do is make the vellum pieces so use the polygon tool again and draw inside the score marks on one of the panels, you’ll need 6 of them.

Here’s how the body of the luminary looks with the vellum pieces.  Make sure you glue the vellum on first and then fold over the top flaps before you assemble.  Follow Lori’s video here for the instructions on putting the rest of the acorn together.

To decorate I used the flowers from the 3D Flower Set 5 and the leaf that came with the acorn.  I embossed the vellum and rubbed a little distress ink over. Paper is from Echo Park’s Reflections Fall Collection designed by Lori, it’s so beautiful, love the stickers and chipboard pieces too!  Finished with some Thanksgiving Orange Truffle Trendy Twine, a cute little button and sentiment from the paper collection.

Hope you enjoyed this tutorial, you can visit me at http://www.brigitsscraps.com