50% OFF Sale + FREE Sticker + $5 Bundle!

Spring is here! In fact, this week is spring break in our town and Easter is just a week away. I have some exciting news for you (keep reading to see all the awesomeness). Let’s get springtime started with a 50% OFF spring sale on SVGs at shop.loriwhitlock.com now through Monday, April 3 at midnight! Use code: SPRINGSALE at checkout. This is the perfect opportunity to stock up on all your Easter, Spring, Mother’s Day and Graduation SVG projects. This sale includes all svg files, pattern fills, fonts, and commercial licenses.

SHOP SVG FILES HERE

Not only do we have this awesome spring sale going on, I have a FREEBIE for you that is available throughout the sale. This super cute Easter Sticker Sheet is FREE for 4-days (March 31-April 3)! No Purchase Necessary. Simply add the file to your cart and it will be FREE. Click HERE to go to the file and add it to your cart.

Also, it’s Friday which means we have a Friday $5 Bundle available until Sunday at midnight. This week’s bundle includes 6 gorgeous flowers for just $5.

But don’t wait, this bundle will only be around until Sunday at midnight!
 
** Because Friday $5 Bundles are already heavily discounted they are not eligible for further discounts including monthly, seasonal and flash sales.

Have a great day!

~Lori

Thank you for joining us today! Have fun crafting!!
Lori

50% OFF Spring Sale + FREE Sticker Sheet!

Spring is here! In fact, this week is spring break in our town and Easter is just a week away. I have some exciting news for you (keep reading to see all the awesomeness). Let’s get springtime started with a 50% OFF spring sale on SVGs at shop.loriwhitlock.com now through Monday, April 3 at midnight! Use code: SPRINGSALE at checkout. This is the perfect opportunity to stock up on all your Easter, Spring, Mother’s Day and Graduation SVG projects. This sale includes all svg files, pattern fills, fonts, and commercial licenses.

SHOP SVG FILES HERE

Not only do we have this awesome spring sale going on, I have a FREEBIE for you that is available throughout the sale. This super cute Easter Sticker Sheet is FREE for 4-days (March 31-April 3)! No Purchase Necessary. Simply add the file to your cart and it will be FREE. Click HERE to go to the file and add it to your cart.

Also, it’s Friday which means we have a Friday $5 Bundle available until Sunday at midnight. This week’s bundle includes 6 gorgeous flowers for just $5.

But don’t wait, this bundle will only be around until Sunday at midnight!
 
** Because Friday $5 Bundles are already heavily discounted they are not eligible for further discounts including monthly, seasonal and flash sales.

Have a great day!

~Lori

Thank you for joining us today! Have fun crafting!!
Lori

Birthday Presents Wish Pop-up Card Tutorial

Hello everyone! Marcia here today. I have a tutorial to share with you today for the A2 Birthday Presents Wish Card (SVGSilhouette). This cut file can be found in Lori’s store along with some new 5×7 Pop-up cards with the same inside blocks that pop up when the card is opened. I used pattern papers from Lori’s Birthday Boy collection as well as coordinating cardstock from my stash. The front of the card looks like any normal card. I added a few die-cut ephemera to go along with the birthday presents from the cut file.

When the card is opened, The blocks with the word WISH pop out.

Let me show you how this card is assembled.

1. Choose your papers and cut all pieces out. I used the Silhouette print and cut feature to get the sentiment Sending you a Birthday printed on my white Neenah cardstock. I like to ink the edges of some of my pieces especially if the paper has a white core. Inking the edges also adds depth.

2. Let’s assemble the inside of the card first. Adhere your colored squares between the cut lines. Fold the big squares out and the thinner base of the card in. Using a bone folder to get a good crease really helps. Fold the card base in half on the scored line as well.


3. With the white cardstock folded in half, line it up with the scored line on the card base. I find it easier to glue half of the white cardstock to the card base at a time.

4. Apply glue to the white cardstock and fold the card closed. Flip the card base over and repeat adhering the other side to the card base.

5. Assemble the birthday presents for the front of the card. Adhere the front panel to the card base. Use the birthday presents alone, or add other fun birthday die-cut ephemera.

Thanks so much for stopping by. Be sure to check out Lori’s Store for more amazing cut files.

~Marcia

Memorydex Cards

Memorydex Cards have really made a comeback this year in the scrapping world, so I thought I would join in and create a bit.  I used Lori’s new Echo Park collection Life Is Beautiful.  Beautiful patterned papers, tons of embellishments, including puffy stickers. It was so much fun to play with this beautiful collection.  I added my cards to a Heidi Swapp Memory Dex Spinner but Lori has a super cute Memory Dex box you can make, you can find it here in Lori’s Shop or here in the Silhouette Store.

My first set is the Memory Dex Scalloped Cards or here in the Silhouette Store.  I added some stitching, lots of layers and lots of embellishments from the Life is Beautiful Collection.
Next are the Memorydex Envelopes or here in the Silhouette Store, again stitching and stuffed with embellishments…oh so much fun!
And one more set, Memorydex Foldover Cards or here in the Silhouette Store.  There is also a bit of stitching on these and layered up with all the goodies.  I had so much fun creating all of these.  They are fast and fun.  I can see why they are making a comeback.  I hope you give them a try.


Birthday Gum Ball Card

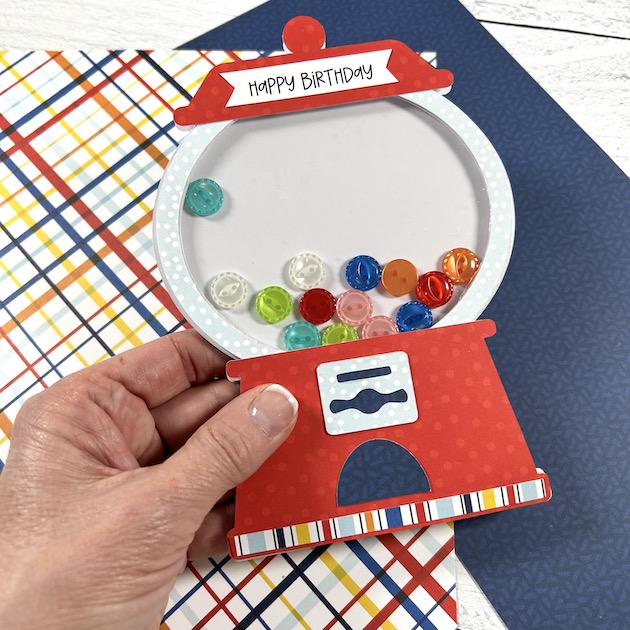
Have you ever seen a design that immediately made the creative side of your brain start sparking?  That happened to me the minute I saw Lori’s cute birthday gumball machine (SVG, Silhouette) and I thought — shaker card! For some reason, the thought of buttons flying around in the middle of this card just made me happy!  So here’s a quick tutorial on what I did … 


First, I cut out all of the pieces as they were in Lori’s file.  Then, I used the shape tool to create an oval.  I hovered the oval over the gumball machine to get the right size, and then I did an offset of the oval to create a frame.  


Once I had my frame shape, I cut it out 5 times from white card stock, and once from the light blue dot paper (Echo Park, First Responders, Emergency Vehicles paper).  The 5 layers of white card stock ovals will give the frame thickness and dimension so that the buttons can move freely underneath.


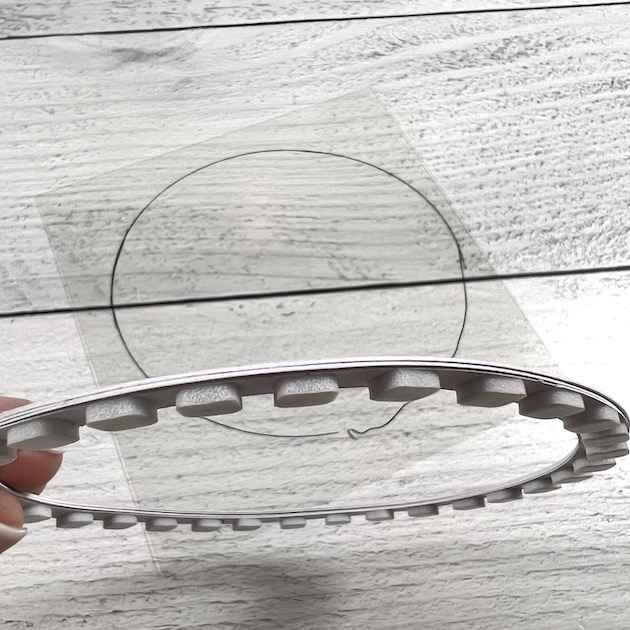
I layered the five card stock ovals, added small foam adhesive as shown, and traced the shape onto a piece of clear acetate.  Clearly, you don’t need to be accurate about this because you’re going to use scissors to cut inside the lines in order for your acetate to sit within the border of the oval frame.  I used a thin line of liquid glue to adhere the acetate to the top of my white oval frame.
I adhered the light blue dot oval over the acetate and then adhered everything together.  I layered the folded white card base, then the plain white template placed the buttons on the template, then added the oval over the template/buttons.  Finally, I added the red top and bottom pieces (also paper from the Echo Park First Responders collection) with more foam tape and finished the card with the sentiment and remaining cut file pieces.  The stripe is just a piece of scrap cut to 1/4″ thick to add along the bottom if desired.


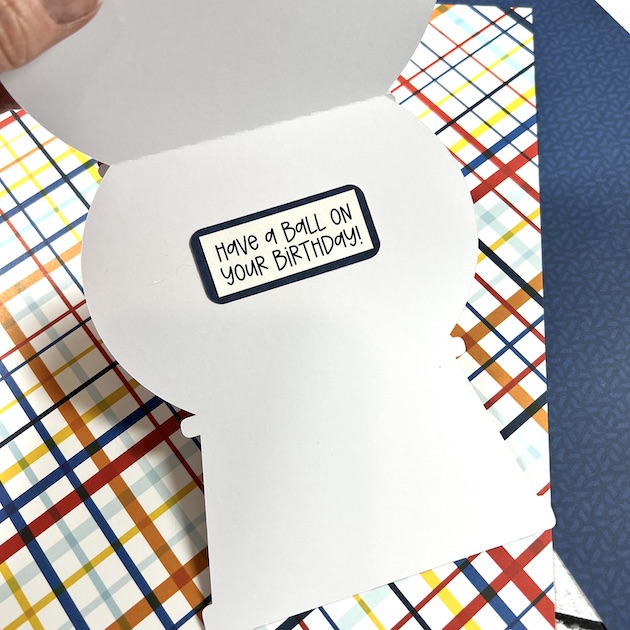
Inside, the finishing touch was a cute little phrase that comes with the cutting file.


Thanks for stopping by Lori’s blog today! I hope this card will inspire you to think outside the box and create something fun with Lori’s wonderful cutting files!  Until next time, happy crafting my friends!