Customized Graduation Cards with Kathy

Hi Everyone!  It’s Kathy today with some Graduation cards. We have at least 4 graduation parties coming up and I wanted to use the new Flexi Card Congrats Grad (SVG, Silhouette).  I decided to embellish them a bit and also to add a gift card pocket to the back of the card.  I used the Graduation Cap with Year (SVG, Silhouette), and the pocket piece from the Gift Card Purse (SVG, Silhouette) to customize my cards.

I looked up the colors for each of the schools and used those colors for the frame and background piece on the Flexi Cards.  I resized the graduation cap and year to fit the front of the card and added them with some foam tape to make them pop a bit.  I used a gold enamel dot to top off the tassel.

I resized the pocket from Gift Card Purse to fit on the back of the card, this way I can add a little something to the card!

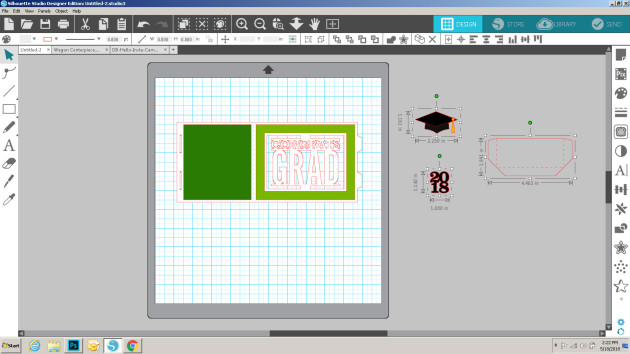
Below, I’ve highlighted the pieces I resized so you can see how big to make them if you wish to recreate this card. (you can also use the pocket on the other cards in the Flexi Card Sentiment Bundle as well)

(Measurements:  Hat: 1.161″h x 2.25″w    Year:  1.140″h x 1.0″w   Pocket:  1.991″h x 4.463″w)

That’s it for me today, thanks for stopping by to peek!

A2 Pop Up Round Cake Card Tutorial with Michelle

Hello! Michelle here today to share a fun, interactive birthday card that will impress all of your family and friends. Birthday cards are a staple for every card maker, but with busy lives, they are often made at the last minute. This pop up card can be made quickly, but no one else will know that. They’ll think you spent days working on it! Let me give you some hints and tricks and show you how easy it is to make.

A2 Round Cake Pop Up Birthday Card

  1. To make this pop up card, you’ll need to download the A2 Pop Up Round Cake Card files from the Lori Whitlock SVG Shop or the Silhouette Design Store and cut out your pieces. (Note: The Semicircle pieces I later cut from brown instead)  Layer and glue your letters and semi circle pieces together as shown in the finished card photo and set the pieces aside.

2. Take the large piece with scallops and fold it in half on the score lines. The other side, or back side of the paper will now be facing up. We will be shaping the piece from it’s backside.

Use two hands to help “train” the cake piece in to its desired shape. Assuming that you’re right handed, place your right hand on the paper near the score folds to hold the paper in place. Using your left hand, hold on to the scalloped edge and gently nudge the paper towards your right hand. The paper will begin to fold itself. Some the edges may need assistance and need to be folded individually. Now turn the paper over and repeat this process on the other side.

3. When you turn the paper right side up, you will see that it still lays flat, but has a gentle “lift” to it. At this time, layer the semi circles to the front as shown and glue in place. (hint: Use dry adhesive to avoid your pop up from warping and losing its shape.) Now you should only have two pieces left.

4. It’s now time to glue your scalloped cake to your card base. We are only going to glue one half at a time. Fold your scalloped cake piece in half as shown below. Add adhesive to only the scalloped piece and glue as close to the line as possible without going over the center folded line. I found that it was easier to find the center scored line if I held it at a 90-degree angle as shown in the photo.

Now you need to add adhesive and glue the other side (the side facing you) to the card base too. (Important Reminder: Do not add adhesive to any other area. Only the scalloped edge) Simply close the card so the adhesive on the scalloped piece will adhere to the base. Open the card and Viola! Your cake pops up when the base is flat! (Notice that in the photo below, the scallops were glued close to the center fold, but not touching the center fold line.)

5. Now you can embellish your card as desired. The card has enough of a “Wow” factor that it really doesn’t need much embellishment. I chose to use the “Sweet Baby Girl” line by  Echo Park Paper. The line was designed for a baby, but I think that it works for little girls too. Since the inside is so awesome, I left the outside fairly simple. I made a crepe paper fringe and used the “Birthday Girl” round sentiment for embellishment. You can find that sentiment file at the Silhouette Design Store and at Lori Whitlock SVG Shop. I really like that the Round Sentiment echos sentiment on the pop up, but no matter how you embellish your card, it’s going to look fabulous.

I truly believe that this A2 Pop Up Round Cake Card is going to be one of my “go to” cards. I’m anxious to make a masculine version in dark colors. Won’t that be great? If you make this pop up card, share it with us on social media using the #loriwhitlock hashtag.

A2 Round Cake Pop Up Card


Thanks for reading my tutorial. I hope that you have a creative day!

Michelle

 

3D Graduation Cap Favor Box by Aimee

Hi crafty peeps!! Aimee here with you today with a tutorial on how to assemble and create the new Graduation Cap Favor Box. I made this box for my niece Katie who will soon be receiving her Masters in Early Education and I couldn’t be more proud of her!

This fun and adorable box svg is available at the Lori Whitlock store *here* and at the Silhouette Store *here*. I also added some of the beautiful Lori Whitlock flowers after seeing a lot of graduates are now decorating the top of their caps which is a fabulous idea!! Wished that was a thing when I graduated!! (Rolled Flower 11 – Lori Whitlock or Silhouette, Rolled Flower 20 – Lori Whitlock or Silhouette)

Alrighty, let’s get started! I resized the original file to create a bigger sized box.

Since each piece was so big I used 2 sheets of cardstock…1 for the top piece and 1 for the bottom piece.

After I had each piece cut out, I folded each cut line.

The bottom piece is easily assembled by adhering the gluetabs to the inside of the box.


For the top piece, start with the 2 sides with the extra gluetabs and adhere them down to the base of the hat. Follow along as I step you through it in the following pictures.

And this is what the underside of the top piece should look like after you’ve adhered all pieces down.

Now comes the fun part of decorating the top of the Graduate Cap!

That’s it for me today! I hope you enjoyed this tutorial and Congrats to all those graduates!!

Aimee

Pop Up Birthday Cake Card Tutorial with Kathy

Hi Everyone!  It’s Kathy today with a tutorial showing how to fold and assemble the new A2 Pop Up Birthday Cake Card, which is available here in Lori’s SVG Shop and here in the Silhouette Store.

This card is really pretty easy to make,  but I know a lot of people get intimidated by the folding.  I started by cutting my pieces.

Next I started folding the insert or pop up piece.  It’s easiest to start folding from either the very top or very bottom score lines.  That way it’s a little easier to keep track.   I put together this graphic showing which way to fold which lines.   The V means a valley fold, the upside down V means a mountain fold.

Here is what it looks like from the side when it is folded:

And from the front.  I do recommend you go slowly and have a little patience.

Once you have the pop up insert folded, it helps to open and close it a few times to sharpen the folds.  Next step is to add adhesive to the back of the insert.   You want to add adhesive only to the outer parts of the card.  The blue area on the graphic below shows the pop up portion.  You do not want to add any adhesive to those parts.

Once you have the adhesive added, I find it easier to fold the insert and center it onto one side of the card base.  Make sure the outermost side folds are flush with the center crease on the card base.   You can then fold the other side over to adhere, and it should be centered.

Lastly, add the presents with their bows to the front panels beneath the BIRTHDAY letters.  I also added some enamels to the bows for some sparkle!

That’s it for me today, thanks for stopping by to peek!


Pineapple Box Tutorial with Brigit

Hello everyone, it’s Brigit here today sharing a quick tutorial on making this adorable pineapple box. I just added the criss-cross panels from the shaped card pineapple file. You can get both of these files from the Silhouette Design Store, here and19 here.

I used Silhouette Studio to edit my project, I have the business edition and use the files from Lori’s shop so I’m able to save my project as an svg and cut it out with my Cricut Maker.

I imported the pineapple shaped card and only kept the criss-cross piece.

I imported the pineapple box next.

I zoomed in really close and sized the criss-cross to fit inside one of the sides.

I double clicked on the criss-cross piece which brought up point editing and I selected the point in the corner and moved it so it would reach the score lines, I did that on all four corners.

I duplicated until I had 6 pieces, saved, imported into Cricut Design Space and cut out.

Added some twine, decorative brad from Echo Park’s For the Record 2 collection and some brown sequins. The sentiment is from My Creative Time and paper is from Doodlebug Design.

Hope you enjoyed this project, thanks for stopping by and have a wonderful day!!