Star Spangled Box Card Truck Tutorial

Hi there paper crafting friends!  It’s Michelle Starcher, aka the Bookish Designer, hopping onto the blog to walk you through the steps to create Lori’s XL Box Card Truck July 4 (SVGSilhouette).  This little truck can be made large enough to use as a table decoration or home décor item. It’s perfect for your upcoming 4th of July cookout! In this photo tutorial, I will break down the steps to create the XL Box Card Truck July 4.

After cutting all of your pieces, sort them into stacks to make it easier when assembling the pieces.  Once you have sorted your pieces, attach the first layer of pieces to the truck frame as pictured below. You will need to attach the light blue truck front before adding the silver door handle and mirror.  I assembled the tires on the black circles before adding them to the truck frame.  Don’t forget to add the three white stars to the door of the truck.

Next, you will add the bumpers, stripes, and a few extra details. You will want to attach the blue bumper to the front of the truck before you add the three small silver accents.  In addition, you need to add the red bumper to the back of the truck before you add the white and gray stripes.  The gray stripes create a shadow effect on the truck bed.  When I attached the white stripes to the bed of the first truck, I used the long white stripe to help me with placement.  This made it easier to line up my stripes.   I used the first truck bed as my guide on the second one.

Next, I attached my stars to the inner card piece as shown.  Add adhesive to the tabs on each end.

Once all of your truck beds are decorated, you are ready to assemble your 3D truck.  You should have a blue rectangle with two scored tabs.  Add adhesive tape to each tab, and then line up the front panel with the pre-cut guidelines on the sides of the truck and adhere as shown in the bottom photo.  Use the stripe pattern on the back of the truck bed to replicate the pattern on the red connecting piece.  Attach the license plate and July 4 letters.  (Mine didn’t turn out so well, so I replaced them with a sticker.)  Add adhesive to the two tabs of the red connecting piece and attach as shown in the bottom photo.


You last step is to connect all of the pieces.  You will add your middle truck piece to the connecting blue and red pieces.  The attach the connecting pieces to the other truck piece to close the card.

You make the XL Box Card Truck July 4 (SVGSilhouette) today, so that it will be ready for your cookout this weekend.  If you are looking for some additional 4th of July decorations, be sure to check out the 4th of July Project Bundle that includes this truck plus several other patriotic projects.


Until next time,

Michelle

1776 Shadow Box Tutorial

The 4th of July is approaching.  Do you love decorating with red, white, and blue? Today I’m sharing Lori’s 1776 Decor Shadow Box (SVG, Silhouette).  You can sing along to Hamilton lyrics while making this fun project.

To assemble, first cut all the pieces.

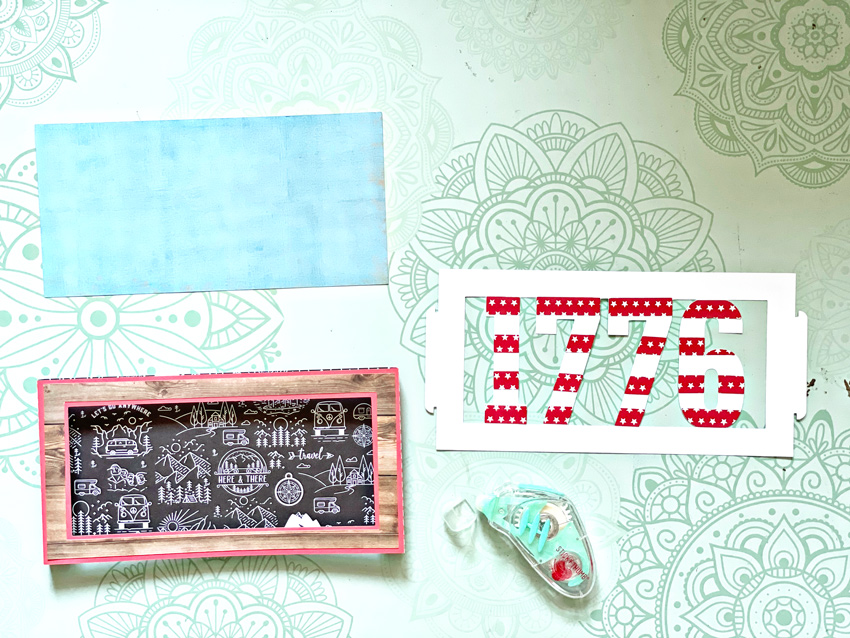
Next, adhere the decorative panel to the front frame and also adhere the stripes to the 1776.  I recommend starting with the top stripe, next the bottom stripe. Then place the second stripe parts on the number 6, and line up the other number stripes with that one.  This will help everything line up correctly.

You then want to glue the front and back panels together to form the “box”, and finally insert the 1776 panel into the frame, inserting the tabs on this piece through the slots in the “box”.

This will look lovely alone or as part of your patriotic decor!

Have a great day!

July 4th Shaker Star Tutorial

Hi everyone!  Corri here today sharing a quick assembly tutorial for Lori’s Shaker Star (SVG, Silhouette).    To make this, you will need cardstock, chipboard (I used a soda box), a dowel or straw and a piece of clear acetate.   I normally use transparency sheets for the clear part but this time I used a piece of a clam shell package from some craft supplies.

When you cut out all the pieces, this is what you will have plus a bunch of confetti pieces that will go inside the shaker.

First, glue the three chipboard stars together.  This step creates a spacer that will allow the confetti pieces to shake.

Next, glue the chipboard to the solid red star and glue the star frame piece on top of the acetate star.

Now you can add the confetti pieces to the inside of the star and then glue the clear star on top.

I wrapped the paper strips around a pencil to form into corkscrew shapes.   I glued those and a wooden dowel to to the back of the completed star and then cut an extra star “back” to cover up where they were attached.

There you have it!  Super simple to put together and so much fun!  The kids will love to wave them to celebrate the 4th!  Thanks so much for stopping by!

A Pinwheel Bouquet

It’s time to start creating for the 4th of July…celebrate the country we love.  Lori has this amazing bundle available, you can find it here.  So many cute projects.  You can also find them individually in her store or in the Silhouette Design Store.  I played with the pinwheel design for this project.

As I said I am using the new Pinwheel (SVG, Silhouette) for my project.   You will need some double sided papers or card stock, brads to secure your pinwheel and paper straws or dowels to attach the pinwheels.


This is how the file looks when you open it, ungroup it and cut the two pieces for your pinwheel.  I was able to get both on one 12×12 with some trial and error.

Once your pinwheel is cut, layer the two pieces just as shown in the screenshot or the picture below.  Have your brad handy.

Just start bring the tip of each point to the middle, lining up the tiny holes that your machine cut for you.

Keep going all the way around, one by one, lining them up…..

Once you have them all lined up, insert your brad.  It takes a little patience to get all those little holes lined up.  I’ve made so many pinwheels in my life time that I’m used to this step…so I didn’t think about this until after, but it may be easier for you to secure it with a paper piercer as you pick it up.  That way each point will be secure and lined up, then just slide the brad in.  So adorable!  I cut three pinwheels, starting with the original size in the file, then sized it down 1.5 inches the next two times.

For the smallest pinwheel, I wanted to have it two colors, so I simply flipped one.  You will have one going clockwise and one going counter clockwise.  Notice the direction of both on the screenshot below.

Once I had all three cut and secured with a brad, I hot glued them onto paper straws and added to a mason jar.  I love this, it’s fun and a unique centerpiece for my 4th of July holiday cookout.  I can’t wait.

Thank you for joining us today! And don’t forget, all SVG files in the Lori Whitlock SVG Shop are 30% off through Saturday when you use code JUN2021 at checkout!

SHOP NOW

You’re The Best Pop – Tutorial

Hello everybody! Marcia here today. I thought I would do a tutorial on this adorable popcorn box card. I made this Father’s Day Popcorn box card (SVG, Silhouette) for my Dad. I have fond memories as a child of him taking my siblings and I to the movie theater. Now that he is older, I am the one who is taking him out to the movies.

This tutorial is based on Silhouette Studio, but there are parts applicable to all different cutting machines.

After opening the file in Silhouette, you will want to ungroup all the pieces. If there is a printable sentiment, set your print registration marks in the Page Setup Menu. This lets the software detect where your cut lines should be in reference to the printed text. Ungroup the text from the shape surrounding it and move the shape to cut outside of the print registration marks. Select the printer icon to send the text to your printer. After printing, mount the paper in the upper left corner of your mat and load the mat into your Silhouette. Move the shape to cut back around the text. Now select the text and move it away from the shape to cut. Send to Silhouette to cut. Cut the rest of the pieces from whatever desired cardstock or pattern paper you like.

Before assembling the pieces together, I like to ink the edges of some pieces to make them look more dimensional. I selected a yellow and light brown here for inking my popcorn edges.

After inking, assemble the popcorn box and the card inserts. I used pop dots behind some popcorn pieces for added dimension.

Adhere the card inserts to the inside of the popcorn box, placing the popcorn insert in front of the sentiment insert. Use more pop dots to adhere the filmstrip slightly behind the sentiment.

Lori has lots more Father’s Day cards in her shop. Go take a look. Thanks so much for stopping by.

~Marcia