A2 Graduation Cap Card 2 Tutorial

Anita here with a tutorial for assembling Lori’s A2 Grad Cap Card (SVGSilhouette).  I also used a tutorial that one of my fellow Creative Team Members created to make the tassel for my card.  You can find Teri’s tutorial here.  Below are the pieces that you will need to cut out to make this card.

This is the card base and you will be closing the card by gluing on the tabs.
Next, we will fold the inner part of the card that makes the sentiment card base and grad hat shape.  You will want to flip your card over and fold across the score lines as shown below.
Flip the card back over with the right side facing up and fold on the diagonal score lines.  I did one fold to the left and then the next diagonal score line was folded to the right.
Once you have your card folded it should look like the card below.
I glued the tassel with a wet adhesive to make sure that it would stay in place.

Here is what the card insert looks like with the grad cap topper on the base and a brad through the holes.

Here is a photo of the pieces of the card pieces together and you are now ready to insert the card base into the envelope pocket.
That’s it for me today.  Be sure to check out all of Lori’s graduation cards.
Hugs,
Anita


You’re So Cool – Island Hut Box Card Tutorial

Hello friends, Marcia here.

I have a tutorial for you today for this fun summer Island Hut Box Card (SVGSilhouette). I used solid pattern papers from the Here Comes The Sun, Bee Happy, and Pets collections. I love the beachy vibe of this card.

Box cards are actually much simpler to put together than you may think. Plus once you have done one, other cards will be so much simpler. Let me show you.

1. Pick out your colors and cut out all the pieces. I like using cardstock for my base as it is stronger than a pattern paper base. Lighter-weight pattern papers work better for the paper piecing layers that are added on top. Once I have all my pieces cut out, I like to ink the edges to add dimension.

2. Let’s do our card base first. Glue the door and windows on the front of the island hut as indicated in the photo below. Then adhere the two layers of grass roof, lining up the curve at the roof’s top.

3. Bend at the dotted lines to form a box. Glue the small tab to the back of the island hut’s front panel. Fold the card flat to ensure it will fold flat to fit in an envelope.

4. Let’s piece together the back panel next. Adhere the sun’s face to the black circle and then onto the sun rays. Glue this onto the card panel matching up the notches as best you can. Glue the palm tree trunk overlay to the palm tree trunk. Then adhere the palm tree’s trunk to the card base. Glue the palm tree leaves to the top of the palm tree and add the coconuts.

5. Bend the tabs of the back panel back and adhere to the card base lining up the edge of the tab to the back of the card base. After adhering both sides, ensure you can still fold the card flat.

6. The front panel is next. Adhere the orange beak piece to the black beak leaving the tip of the beak black. Glue the white eye on top of the black beak too. Adhere the beak in place on the parrot’s body. Glue the parrot’s wing in place. Adhere the parrot onto the card base. Glue the palm leaf on the card base too.

7. Bend the tabs of the front panel forward and adhere to the card base lining up the edge of the tab to the front of the card base. After adhering both sides, ensure you can still fold the card flat.

8.  Add embellishments if you want. I added the You’re so Cool! die cut ephemera piece from the Here Comes The Sun Frames and Tags ephemera pack and added a puffy flower sticker.

I hope you give assembling one a try. Thanks so much for stopping by.
~Marcia

A2 Curved Pop Up Card Mother’s Day Tulips

Hi! Ashley here!

Today I’m sharing a curved pop-up card.  You can find these cards in Lori’s Shop and Silhouette Store.

First, cut all the pieces.


You can use print and cut for the sentiment panel.

Adhere the panel pieces and the flower pieces.

The sentiment panel goes on the back of the card.

Adhere the flower pot to the smaller card piece.  Adhere that piece to the card.

Adhere the rectangular piece to the front of the card.

There are several curved pop-up cards in Lori’s shop.

Thanks for reading.

Ashley

Graduation Tassel Tutorial

It’s graduation season and you may need a tassel for one of Lori’s many great graduation cards. The card that I’m making a tassel for is Lori’s 5×7 Gate Fold Graduation Card (SVG, Silhouette). Here is how I make them. I start with a yellow-gold color. Of course, you can choose your own color that will coordinate with your graduate’s school colors.

I then cut TWO 6-inch pieces. These pieces will be used to attach the tassel to the card and to assure that the tassel stays together. Set those aside.
Next, I start to wrap the thread through my fingers so that I can hold the end piece securely. This is also when I decide the appropriate length of my tassel for my project. For this project, the tassel is about 4 inches long. make sure to add about half an inch as you will trim the ends to even them up.
Then I wrap the thread around my fingers until I feel like I have enough thread to make a good tassel for my project. For this card, I did about 15 wraps.
Then I tie one of those 6-inch pieces at the top, doubling the thread so that I have 2 3-inch pieces after knotting the the thread. This will be the piece that gets threaded through the card’s hat top.

Then I will add the second 6-inch thread to wrap the threads together. I will tie this in a secure knot. If I feel like the thread isn’t feeling too secure I will put a small dot of super glue on the knot to help secure it.

Then I will cut the bottom thread pieces as well as the tied and knotted threads to evenly trim them up.

To help thread the tassel through the cap, I use some of my favorite liquid glue and add a small dot of glue to the ends and then twist the threads together. Set this aside to dry for a few minutes to make a “needle”.

When the glue is dry, go ahead and thread it through the hole in the cap, knotting the thread on the underside of the cap. I will usually knot it a couple of times to make a big enough knot so that it doesn’t slip through the hole.

This is how the card looks when finished. I love it! Lori makes the best designs. She puts great thought into her products.

Enjoy!
Teri

Strawberry Purse and Jam Jar Card

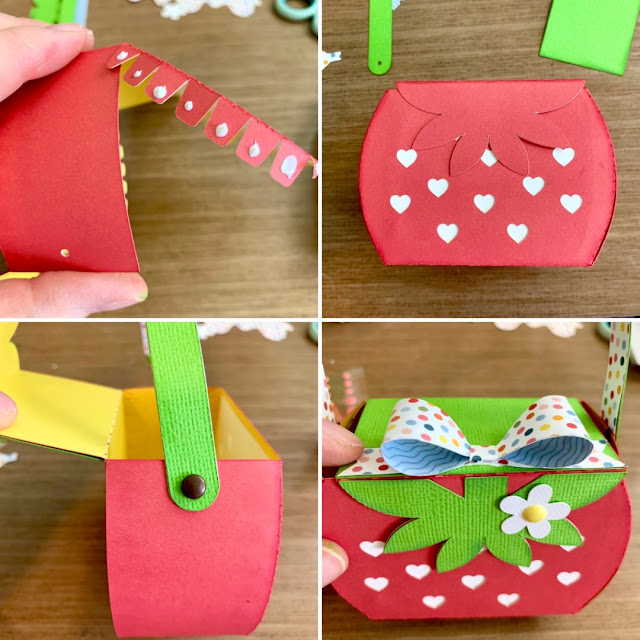
Good Moring friends! Today I am sharing an assembly tutorial for some of the new strawberry projects that were posted this week. I made the Strawberry Purse (SVG, Silhouette) and the A2 Strawberry Jam Jar Card (SVG, Silhouette). For this project, I also cut out a 3D Bow for the top of my purse. I used the bow from the Gable Box with Bow (SVGSilhouette).

Once all of my pieces were cut, I folded all of the tabs in a mountain fold. Then inked all the edges with a corresponding color to help cover the white core paper and add dimension to each piece.

Before gluing the sides together, I glued the white panel piece inside the purse to cover the heart holes. This would also be cute left open. I then folded the lid back out of the way and added glue to all the tab on one side of the purse. (I find less glue is best when using a wet glue.)  I started with the back of the purse. I pinched the first tab on the top to the flat edge to secure then moved along the side pinching each tab to ensure it was secured.

Then repeated for each side. Now with the edges all glued, I added the green leaves and lid. (Sorry I missed a picture.) I cut two handles one green and one with a pattern paper that matched my bow. I put the green one on the outside and pattern paper on the inside. I did glue the two handles together and added the handle to the purse with brads. I assembled the bow and glued it to the top of the purse. I also added the flower to the front of the purse. I used an enamel dot for the center of my flower.
The jam jar card is really quick and so cute. I inked the edges of all the colored pieces and around the outside edge of the tag. The strawberries are in three pieces. I added tiny amounts of glue to the back of the red pieces then attached the white pieces to the red. Then glued the green leaves into place. The small strawberry is for the tag and the large one is for the scalloped label. The paper ribbon slides through the tag hole and then glued to the dotted cover of the jar. I then glued the scalloped label to the middle of the jam jar.
I embellished the purse with a few stickers from the Here Comes the Sun sticker book. All of the papers and stickers came from the Here Comes the Sun collection by Echo Park Paper.

This little gift set is so sweet! It will be perfect for a mom, teacher, grandma, sister, or friend! Thanks for stopping by today and I hope you enjoy the rest of your week!

Brandie