Santa Divided Candy Box

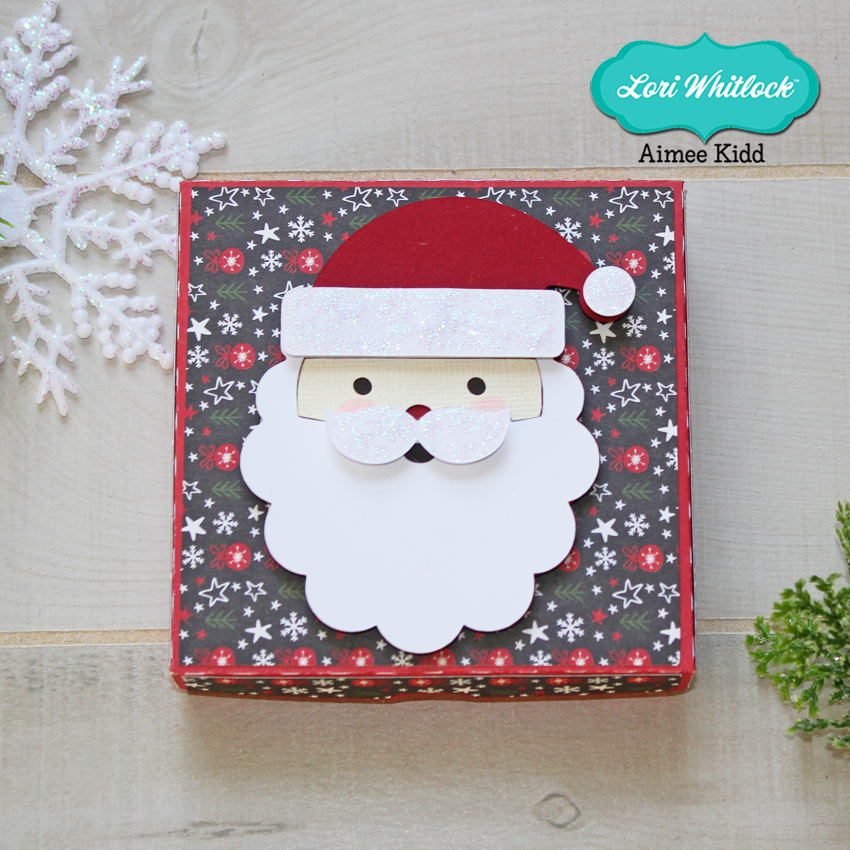
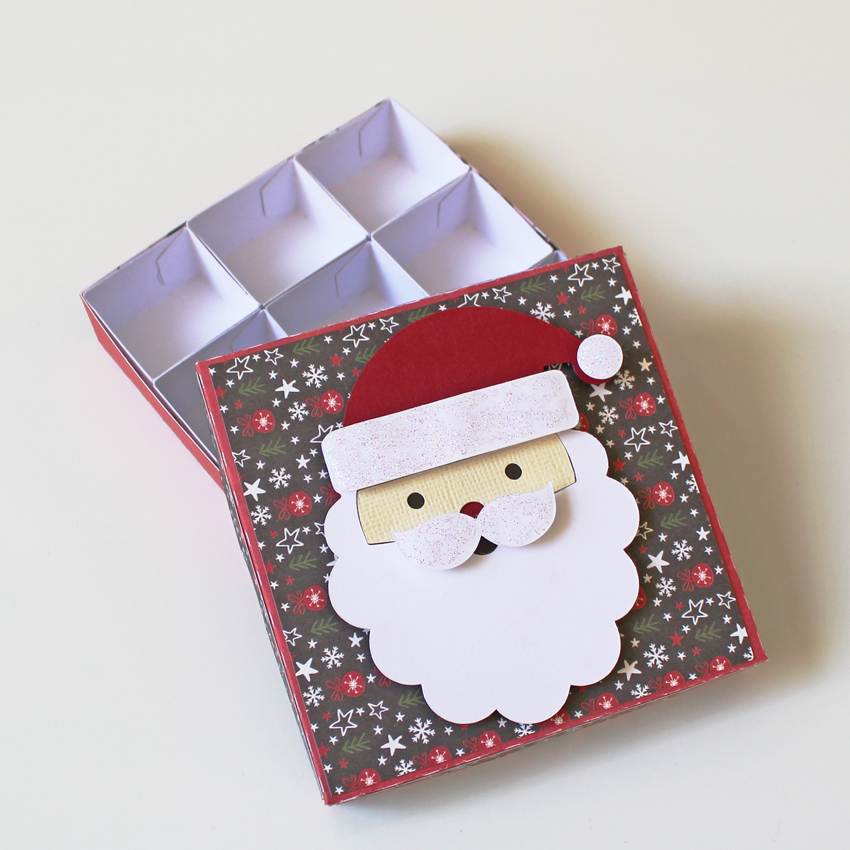
Hello crafty friends! Aimee here and I say it’s never too early to get a jump start on Christmas gifts so today I have a tutorial for a small gift box that’s filled with Christmas yummies that is perfect to give to a teacher, neighbor, or co-worker.  I’ve used one of Lori’s new Divided Candy Boxes that has this adorable little Santa Claus face on the top of the box (Lori’s SVG ShopSilhouete Store). Lori also has a bundled set of these fun little candy boxes found here if you want all 4 because you have a hard time choosing just 1.

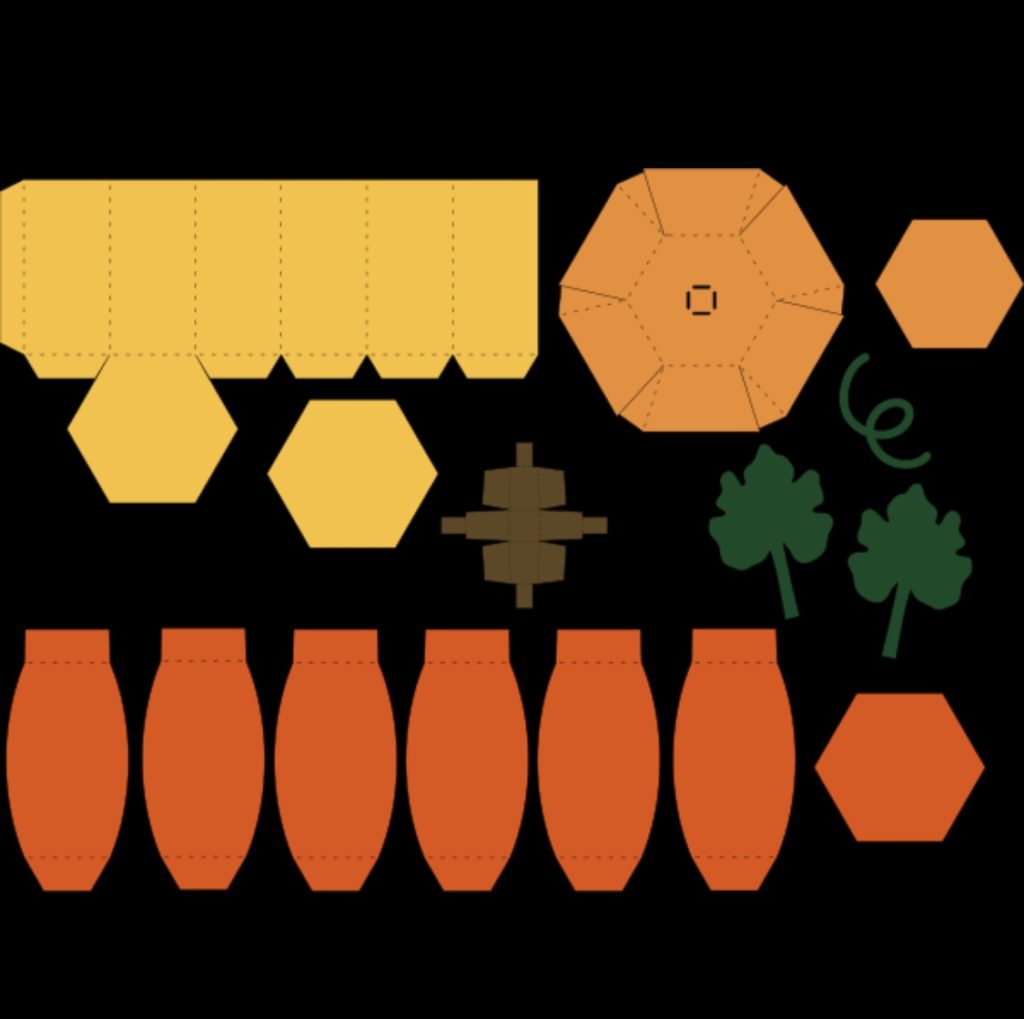
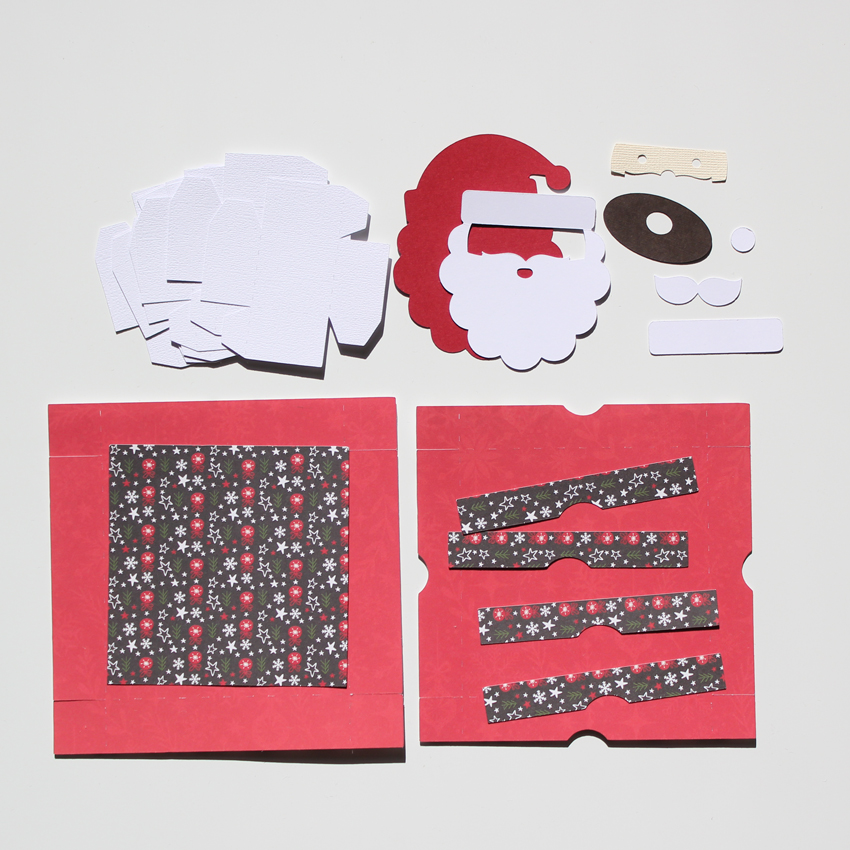
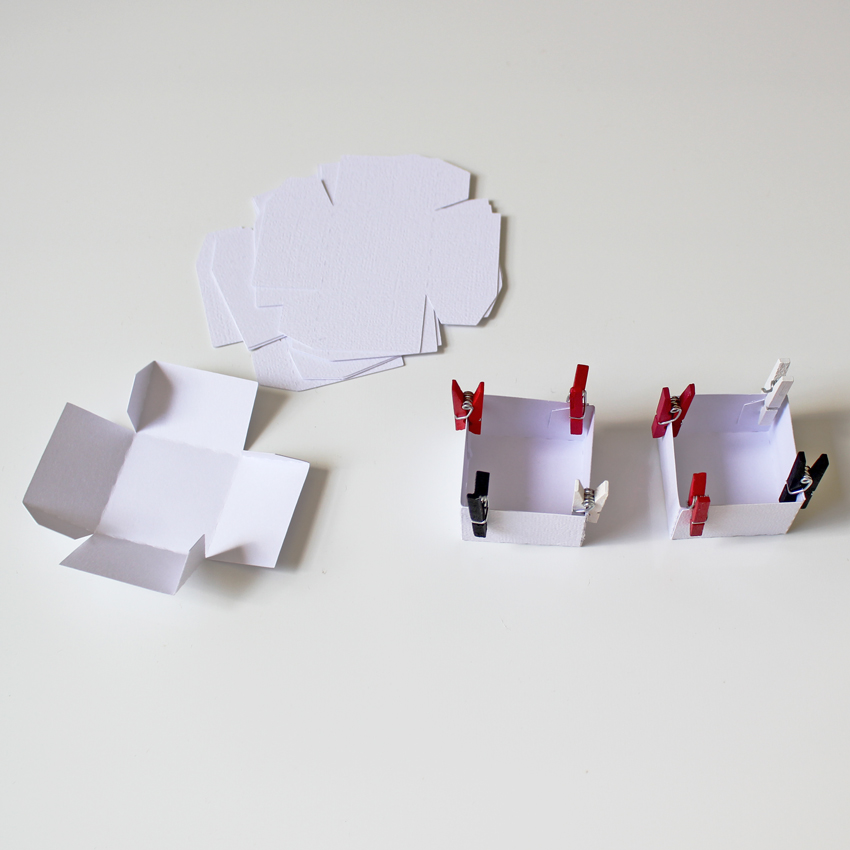
To get started, cut out all of your pieces from your chosen card stocks and patterned paper. You will need to cut out 9 of the little boxes that go inside the big box.

To get started, I glued all 9 boxes so they could dry while I was putting the main box together. A little tip to help you speed things up…use mini clothing pins to hold the sides together while the glue is drying.

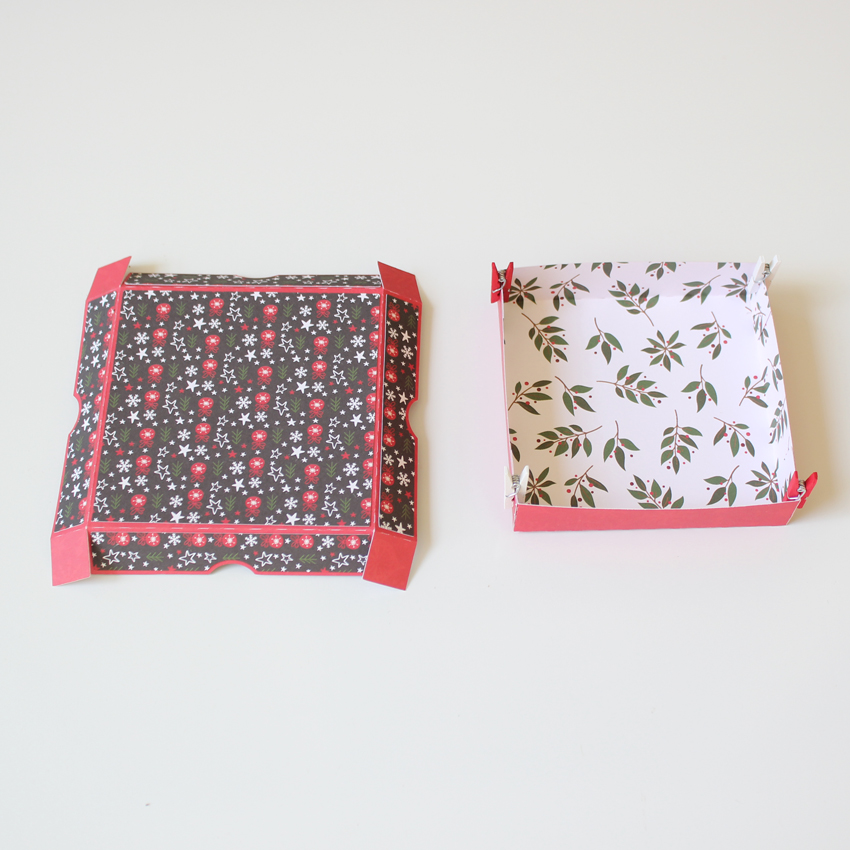
For the main box, I folded on the score lines for both the top and the bottom pieces and then adhered the panel pieces to the top lid. Next I glued the sides together on both pieces.

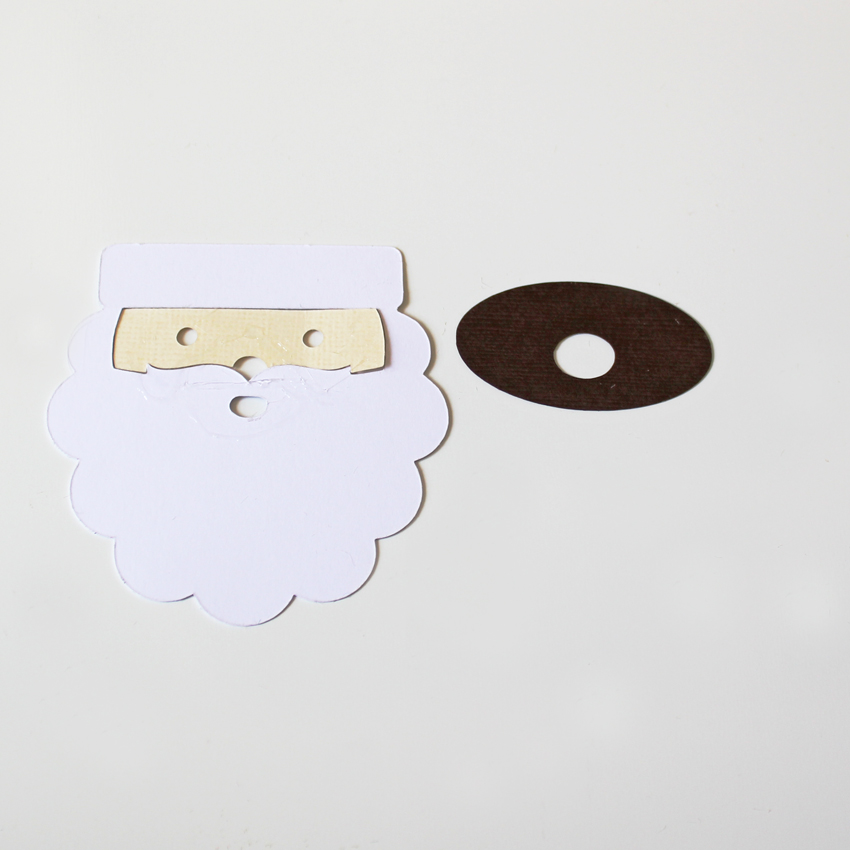
For the Santa piece, I flipped the beard and face pieces over so I could line up the dark brown/black piece so the hole doesn’t cover the nose. The red from the bottom piece of Santa will show through for his nose.

To add some dimension, I took the mustache, lining of the hat and the pom pom of his hat and used pop dots. I also added some glitter to those pieces to make him a fun and glitzy Santa.

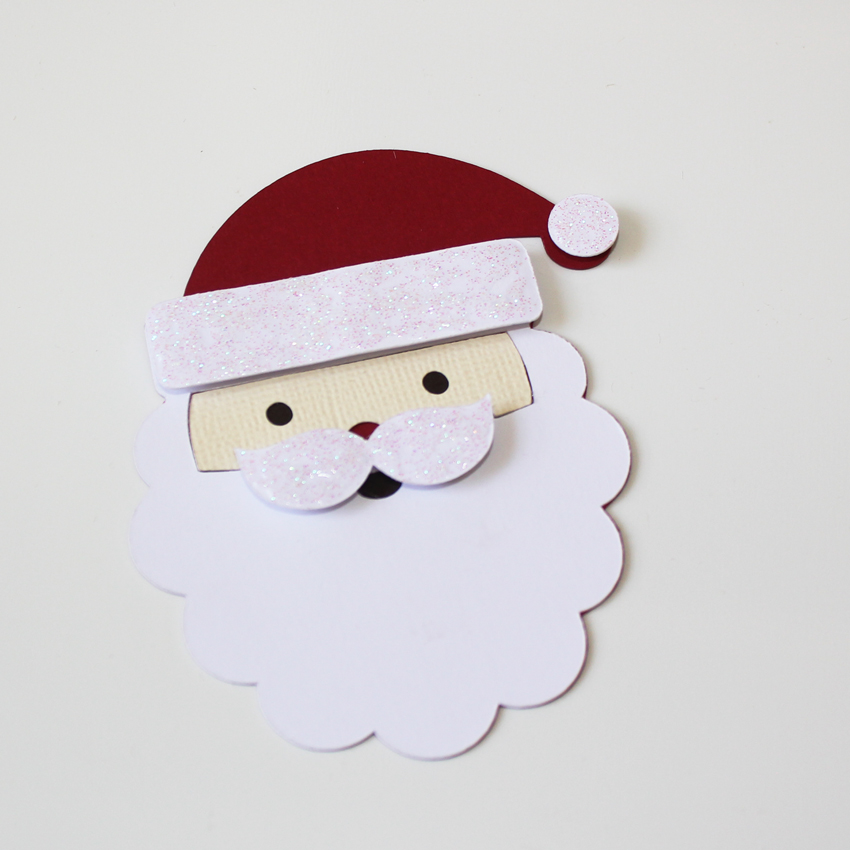
Lastly, I attached Santa to the top of the box, added the little boxes inside, and filled with some Christmas Rolos. The bite-sized pieces fit perfectly with 2 to each box.

These would be great to have on hand in case that unexpected Christmas guest stops by!

So why not get an early start on those Christmas gifts and make a few of these? They are so much fun!

Thanks for stopping by today!

Aimee

Fall Extreme Pop-up Card

As a young girl, I fell in love with origami. From folding paper, it was natural to love pop-up cards and books.  I just love that Lori has these fun Pop-Up Cards in her shop. I made the Fall pop-up card, and I changed the sentiment to be used as a Thank You Card.

The card file can be found in Lori’s SVG Shop and in the Silhouette Design Store.

For papers, I used the Echo Park’s My Favorite Fall Collection designed by Lori.  The inside pop-up part is done using the Print and Cut function of your cutting machine. Once cut, it all comes together easily.  For a tutorial head over to Lori’s YouTube Channel here.

Have a great day!

3D Pumpkin Tutorial

If you’re like me, you like to decorate your house for ALL THE HOLIDAYS!  Lori’s 3D Pumpkins would be so fun placed throughout your home or group several on your table for a fun centerpiece. They come in three sizes, Short (SVGSilhouette), Medium (SVGSilhouette), and Tall (SVGSilhouette). These are boxes as well, so they would make a great hostess gift with some candy inside.  I used Lori’s My Favorite Fall Paper Collection to make these pumpkins. I just love all the colors and patterns in this paper! Shown here are the 3D Pumpkin Medium and 3D Pumpkin Tall.  How fun are these?!

I’m using the 3D Pumpkin Medium for this tutorial.  First cut out all the pieces as shown.

To begin, assemble the base of the pumpkin by folding all score lines in.

Glue side tab to opposite side of base.

Add glue to bottom tabs…

and fold bottom of base onto tabs as shown.

Use your bone folder to curve the side panels of the pumpkin.  This will help give your pumpkin its curved shape.  For added interest, I sewed tulle to three of the side panels, added sequins and then sewed the bottom shut.

Next, glue the square end of the panels to the top of the pumpkin box.

Then glue the beveled tabs to the bottom of the pumpkin box.

Glue the hexagon piece to the pumpkin bottom to finish it off.

Next, fold all tabs on the pumpkin lid in, and adhere each tab to the panel next to it until the lid is formed.  Also, the leaves are very pretty as is, but for added interest you can drawn in or sew leaf veins.

Next, fold all tabs on stem inward and glue the tabs on the right to the middle tabs…

and repeat on the left side.

Add leaves and stem through the holes in the top of the lid…

and glue the vine to the top.

Turn lid over, fold leaves and stem tabs and glue down.

Next glue hexagon panel to inside of the lid to finish it off.

And we’re done!!!  Isn’t this beautiful?!

I had so much fun making these for my table centerpiece.  I filled them with caramels and they will be given out at the end of Thanksgiving as parting gifts for my friends and family. I hope you give this a try.

Thank you for stopping by!


xo,

Michelle H.

Pumpkin Spice 3D Coffee Cup

Hi everyone!  Corri here today sharing my version of Lori’s adorable new 3D Coffee Cup (SVG, Silhouette).    I love coffee, so I fell in love with this file as soon as I saw it.  This would be perfect for giving a gift card to a local coffee shop.    I used paper and ephemera Echo Park’s  “My Favorite Fall” collection.

I added a cute sentiment perfect for all the pumpkin spice fans out there.  There are so many fun puns that could go with this cute cup.  I just love it and I know I will be making this often!

Have a great day!

Halloween Favor Box Coffin Tutorial

Hi there friends! Brandie here with a quick tutorial for the Halloween Favor Box Coffin (SVG, Silhouette). I needed another cute Halloween treat and was inspired by Michelle’s coffins a few weeks ago.

I cut the coffin lid, coffin base, and skull head  from 80lbs cardstock and the decorative panels are cardstock from the Echo Park Bewitched Collection. I then folded all of the score lines in a valley fold.

I added glue to the tab on the end then adhered the tad to the opposite end with the tab on the inside of the coffin. For the bottom of the coffin I glued one tab at a time making sure to line my edges up. I started with the top (1) tab of the coffin and moved from side to side gluing the tabs until the bottom tab (6) was last. I then flipped the tab up and added glue to adhere the base to the edges. Once all of the tabs where secure I added more glue to inside of the coffin and added the second base to cover the glue and tabs. I then repeated the steps with the lid of the coffin.

After the lid was complete I added my decorative panels and glued the two skull pieces together.

To embellish I added a crepe paper rosette, sequins, and a few tickers from the Bewitched collection.

Thanks for stopping by today. I hope you are inspired by all of the projects here and have fun visiting with us!

Brandie