Adorable 4×6 Vertical Mini Album with Pockets and Tags

Hi there paper crafting friends!  It’s Michelle Starcher, aka the Bookish Designer, hopping onto the Lori Whitlock blog to share a mini-album I made using the Farmer’s Market collection that Lori designed for Echo Park Paper Co. I used the 4×6 Vertical Mini Album with Pockets & Tags (SVGSilhouette) to make the mini-album. The album was easy to put together and can be decorated with your favorite stickers and embellishments to make the project pop.


The project includes four pockets and tags as well as four rectangular pieces that can be used to frame your photos on the back of each pocket. You can easily include a picture on the front and back of each tag. I added an extra piece of cardstock to my tags for more color along with a few embellishments.
 

Until next time,

Michelle, aka the Bookish Designer


Grid Pop Up Card Tutorial

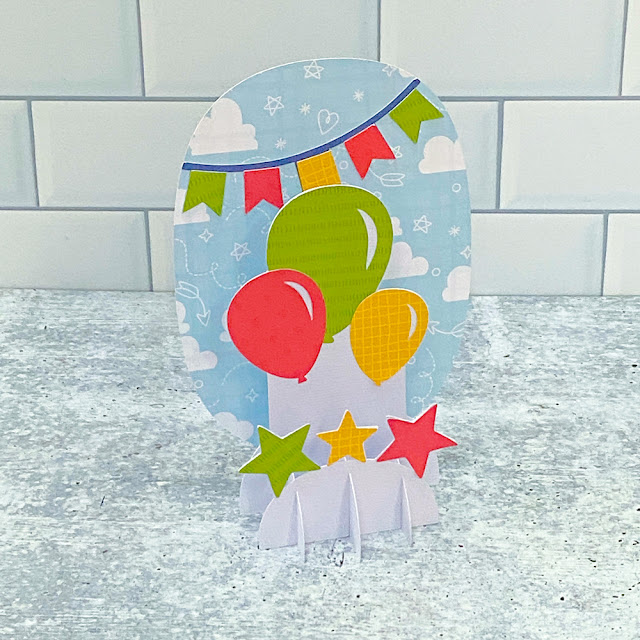
Hi Everyone!  I’m back with another fun 5×7 Grid Pop Up Card today!  In addition to the seasonal versions of this card type, Lori has a fun 5×7 Grid Pop Up Birthday Bundle.  I have a few January birthdays coming up so I decided to make the 5×7 Grid Pop Up Card Birthday Balloons version (SVGSilhouette).  I pieced it together with papers from Lori’s Pets Collection for Echo Park Paper.  Take a peek…

I put together a quick tutorial showing just how easy these cards are to assemble.
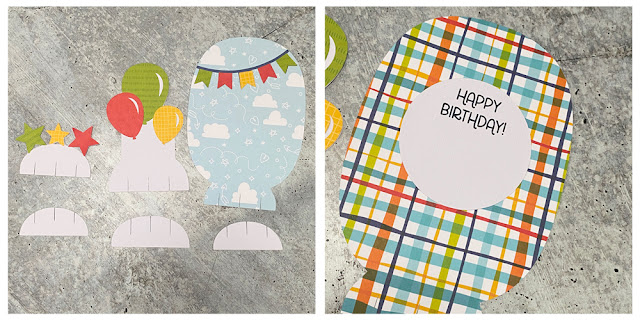
Start by cutting the pieces of your card.  You will have three plain bases (bottom) and three decorated inserts.  Next, add the different elements to the inserts.  I cut and added the stars, balloons, and banner to the front-facing pieces (the clouds are part of my patterned paper).  I also print and cut the sentiment piece using the print and cut feature of my Silhouette.  This piece goes on the back of the largest insert.


Next, you want to start assembling your “grid”.  Start with the three plain bases.  The two smaller bases go on the outer sides with the larger one in the middle.  Slide the front star insert into the front-most slits in each of the base pieces as shown.  The bottoms should be flush.  You may need to wiggle them a little to get them there.
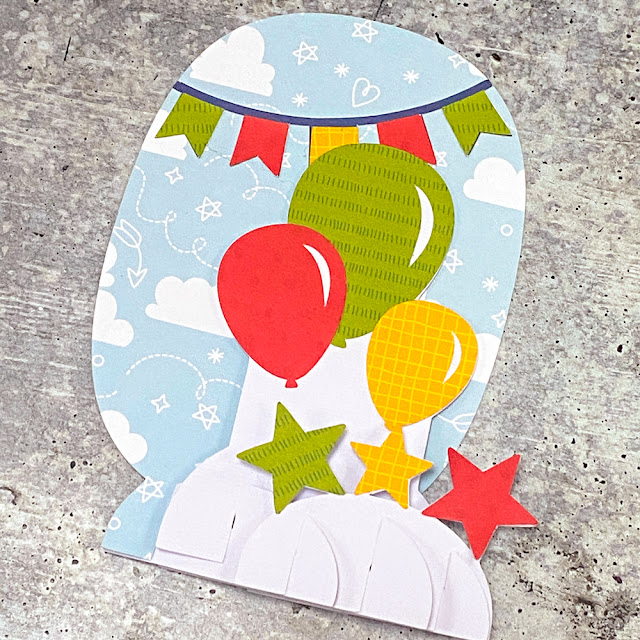
Next, add the second insert with the balloons.  You want to slide it into the second set of slits in the base pieces.


Lastly, repeat the process with the largest background insert.  Slide it into the last row of slits until the bottoms are all flush.
Once assembled this card folds flat to fit into a standard A7 (5.25″ x 7.25″) envelope.


That’s it for me today, thanks for stopping by to peek!
Kathy

Christmas Mini Album

Hi Friends! I hope you all had a lovely Christmas that was warm and safe! Today I am sharing one of the mini albums from the Fabulous Mini Album Bundle (SVGSilhouette). I haven’t made a December daily album for a few years because they are always so much work and I never seem to be done. So, I decided to scale it down a lot and just make a mini album. Less work, less pressure, but still so fun and cute! I just need to add my pictures and journaling.

 
All of the papers, stickers, and embellishments are from The Magic of Christmas collection by Echo Park Paper Co.
Thanks for stopping by today!
Brandie

Oh Deer, It’s Christmas Again

Hi everyone!  I have a fun card to share with you today, you can find the file here in Lori’s Shop or here in Silhouette Online Design Store.  It is Lori’s Reindeer Pop dot card.  Is he not the cutest?  There are a 6 different Christmas themed pop dot cards in Lori’s shop but I just fell in love with this little guy.  The card went together in no time and turned out so cute. The little tag is from Lori’s Echo Park The Magic Of Christmas Collection .

I hope you find time to create this week and give these cute pop dot cards a try!

~Cathy


3D Pumpkin Pie Tutorial

Hi Everyone,

I can’t believe that it is the week before Thanksgiving!  Today I have a tutorial showing how I assembled Lori’s 3D Pumpkin Pie (SVG, Silhouette).  I’m going to fill them with chocolates and put my pie on the dessert table on Thanksgiving.    To piece mine together, I used a few of Lori’s Echo Park Paper collections including  A Slice of Summer, Let’s Go Anywhere, All About a Girl and  Halloween Party.  This file is also a part of the November Kit of the Month in Lori’s SVG shop.  It’s a great bundle, be sure to check it out!

These are the pieces that come with the file, they make 2 slices.  If you want to make a full pie, you will need to cut enough for 8 slices.   I used some acetate for the hearts on the pumpkin pie box and some white and cream hearts for the other types of pie.

I glued the acetate or solid color heart onto the box’s top before I glued it together.  To assemble the tops and bottoms, fold all score lines in the same direction, shape into the triangle slice and glue the sides using the tabs.  Glue the pie crust piece onto the outer edge of the pie’s cover.

This photo shows the three box pieces ready for the pie crust to be glued onto the end of the pie.

Here is a side view of the pumpkin pie box assembled and ready for treats.

I like pumpkin pie but also like other kinds!  I decided to make blueberry, cherry, lemon and chocolate cream slices!  The sky is the limit for what kind of pie you want to make.

Hugs,

Anita