Make Your Own Sunshine Layout with Cathy

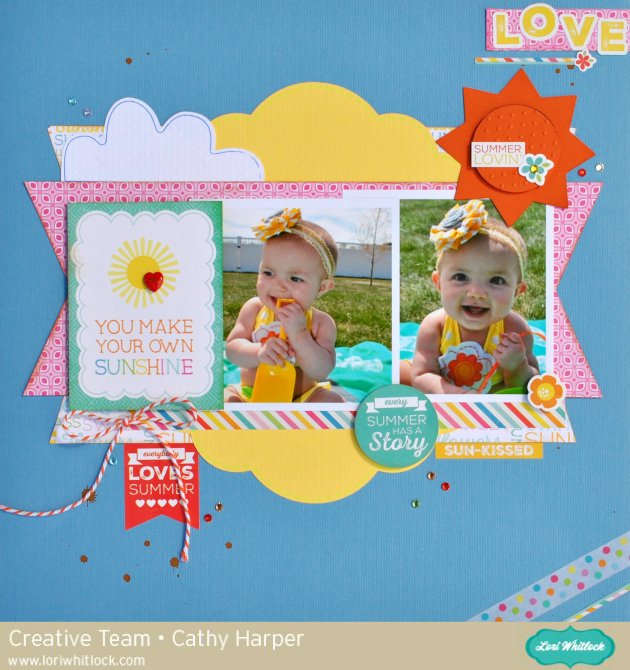
Hi everyone!  Cathy here with you today and I have a sweet summertime layout to share with you using the Echo Park I Love Sunshine collection designed by Lori and several of her SVG files.  This collection is perfect for scrapping all of your summer memories.  Fun bright colors with gorgeous patterns and lots of special little details with the ephemera pack and chipboard stickers.

The layout features our sweet grand baby and I just may be guilty of buying that adorable itsy, bitsy, teenie weenie yellow polka dot bikini to match this paper.  She is just too dang cute!

Lots of fun layers with Lori’s SVG files add fun and dimension to my layout.  A bit of polka dot washi tape from the collection and just a bit of twine add the perfect finishing touches!  Thanks for joining us today and make sure to stop by Lori’s shop for all of latest SVG files for summer scrapping!

You can find all the files at Lori’s SVG Shop.

5 Labels 2

Banner Set 2

Palm Trees (for the sun)

Clouds

3D Gazebo Tutorial by Traci

Happy Thursday everyone!

It’s Traci, from Artsy Albums, and I have a tutorial to share with you for creating Lori’s adorable new 3D Gazebo.  Sometimes cut files with several pieces can seem tricky, but don’t shy away!  They are actually really fun to put together and I took lots of photos to give you step by step instructions.

I always cut all of my pieces out first, and then start locating score lines.  I gently fold each piece along the scores so that I can get an idea of how the pieces will work together.

For the gazebo, I created the base first.  It folds up just like a box and has accent pieces for the sides.

The sides of the gazebo are cut in two parts.  Once you have the pieces folded along the score lines, adhere the sides together to form the structure.

Next, attach the bottom of the gazebo structure to the base and add the square “floor” piece to cover the bottom folds.

For the large roof piece, adhere it together at the tab, and then fold the sides down along the score lines.  There is a small tab on each corner to adhere the sides.

Once the roof is adhered together, add adhesive to the top of the gazebo structure’s top flaps.  Slide the roof down over the structure and press the flaps up along the inside of the roof.

The triangle pieces of the cut file are accent overlays.  You can cut them out to add another decorative pattern or color to your roof.  Finally, locate all of the folds and score lines on the steeple piece.  I missed a few of these the first time I started folding this, so note that there are multiple “levels” that fold to create the pillar section.  Once you have this piece together, adhere it to the top of the roof and your gazebo is complete!

I hope this has been helpful!  Visit Lori’s SVG shop or the Silhouette online store to purchase the gazebo.  Have fun!

Father’s Day Gift Idea

Hi everyone!  Corri here today sharing my take on Lori’s Tall Triangle Sides Box.

I love the look of this fun box!  It’s very easy to put together but has such a unique shape.

I used paper from the Echo Park -Jack and Jill Collection (Jack) and embellished with some stickers from the collection and a piece from the ephemera pack.

This would be a great way to give Dad a gift card or other small gift.

Be sure to visit Lori’s SVG Shop  for more great boxes and gift card holders to make your Father’s Day gift giving easy.

A Little Birthday Gift with Kathy

Hi Everyone!  It’s Kathy today with a sweet little birthday card & gift set!  I used two new files from Lori’s Shop, the A2 Sliding Candle Cupcake Card and the 2 Boxes on a letter sized page files.  Combined they make a such a nice gift.  Take a peek:

In the Silhouette Store:  card file, box file

The papers are from Lori’s new I Love Sunshine collection for Echo Park.  The colors are so bright and cheery!  I love how you can put your sentiment on the candle of the card; It slides up from the cupcake.  I used Lori’s Cheerful Sketch font and my Silhouette Sketch Pens to write Happy Birthday.  The box is just the right size  for a small gift.  I put 4 Hershey’s Treasures in mine!  And that little bow is the perfect finishing touch!   That’s it for me today, thanks for stopping by!

Octagon Teapot Tutorial by Corri

Hi everyone!  Corri here today sharing this beautiful new 3D Teapot 2 SVG (Silhouette file HERE) that Lori added this week.  This would make a great gift for Mother’s Day!  You could fill it with your Mom’s favorite tea bags or with a small gift and a gift card.

I used paper from the Lori’s Jack & Jill Collection for Echo Park Paper.  This large floral print is perfect for the teapot.

To assemble the teapot, first cut everything out from the papers of your choice.

If you choose a detailed pattern paper like this for your project, I suggest leaving all the pieces on your mat.  That way the pattern will match up easily as you glue the panels in place.

Next,  apply glue to the glue tabs of the two teapot pieces (white), glue them together and the glue the end tabs together to form a circle.

Now you are ready to start forming the octagon shape.


Apply glue to the glue tabs as show and line them up with the adjacent panel.  It helps to fold the panel with the glue tab out, apply the glue and then line up the panel as closely as possible to the score line.  Be patient on this portion of the assembly.  Wait a few seconds to allow the glue to dry slightly before moving on to the next tab to prevent shifting.

Continue all the way around glueing the tabs in place.  Follow the same steps with the base and lid.

Glue the base in place. Glue the two pieces of the handle together folding taps out and then glue in place.  Fold the spout in half, fold tabs out and glue in place.

Finally, glue the decorative panels in place. So cute!!

Be sure to check out all the new files added to the shop this week.