Shaped Card by Brigit and Desk Set by Corri

First off, I wanted to thank you all for participating in the Silhouette Giveaway! We have a winner: Entry #2092 Suzanne A. Congrats Suzanne! Please email your address to me at: info@loriwhitlock.com and I’ll get your prize sent out to you. Keep an eye out for more giveaway in the future : )

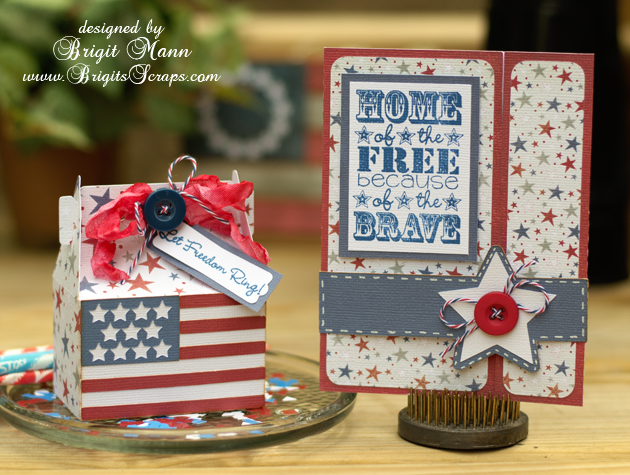
Today on the blog we have a few beautiful things to share with you. First is Brigit.

Shaped cards are so much fun to work with and Lori has many cute ones, just like this A2 watermelon shaped card.  So perfect for a thank you card, I just added  one of the flowers from the 5 layering flowers set and leaves from the 3D flower set 5.

I also used Lori’s digital paper Summer Fun, the pretty summer colors went perfect.  I finished the card with some stickles on the seeds, watermelon taffy Trendy Twine and stamp sentiment from Jaded Blossom’s feeling fruity.

.

Thanks for stopping by, you can visit me at http://www.brigitsscraps.com

Next up we have Corri with an adorable matching desk set

Corri here with a great project for keeping things organized.  I just got a new calendar on July 1st to keep my design team deadlines organized.  It’s a pretty cranberry color and I thought it would be fun to dress it up with some vinyl.

I created a offset for Lori’s Remember This Title.  You can find my tutorial on how to create an offset here.

I cut the offset and title in vinyl and layered them on the front of the calendar.

I also cut the Cute Flowers file and applied that under the title.  It turned out really cute!  This would also be a great way to personalize kids binder, folders, and notebooks for


To keep my notes and lists, I made this cute sticky note holder….

and this To Do List holder.  I love how these have a place for a pen.  They will be perfect to keep on my desk.  I used paper and sticker from the Echo Park Here and Now collection.


Silhouette Tutorial by Mendi Creating Decorative Photo Mats + SALE

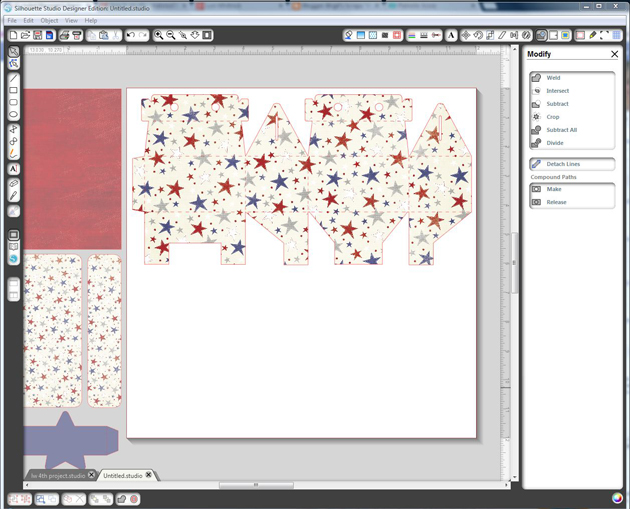
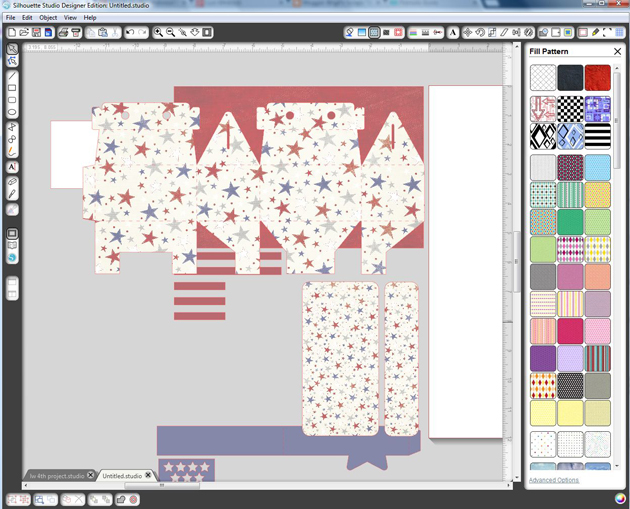
I hope you are all enjoying a wonderful 4th of July! It’s always been one of my favorite holidays! First off, let’s start this holiday right by having a 30% OFF SALE in the SVG shop. Now through July 7, you can take 30% OFF your entire order!! So, it’s time to stock up on all those cutting files you’ve been wanting to get! Simply use coupon code: JULY at checkout. SHOP HERE

I feel privileged to be able to share a festive layout and video tutorial today using fun papers from Pebbles Let Freedom Ring collection and a number of cutting files designed by Lori.
As I state below in my video, I have a bit of a confession… I created this 8×8 layout for my Mother-in-law as part of her Christmas gift last year and saved it until now to share. The only trouble is I didn’t know then that it would be my turn to create a tutorial so I’ve tried my best to pull from my project a few of my favorite tips and tricks that I’m hoping will still manage to teach a few of you something new. 😉
To create my layout I used the following cutting files designed by Lori Whitlock:
2 Borders (Silhouette Store only)
Dot Star (Silhouette Store only)

Also, remember the Silhouette Promotion this week:

If you do upgrade your software (or buy a machine+software) using code: LORI you can earn this free SVG file. Just send me a your order number to info@loriwhitlock.com.
And, we’re still taking entries for this fantastic GIVEAWAY!!

a Rafflecopter giveaway

Tuesday Freebie Fireworks

TODAY ONLY, this FIREWORKS SVG file is FREE with any purchase.

Before coupon code total should be $1.98 or higher. Just add coupon code: PATRIOTIC at checkout and the cost will be deducted from your purchase. This freebie is good until tonight at midnight.


Here are some of Lori’s newest shapes added to the SVG shop and her Silhouette Portfolio! Thanks for stopping by… Lisa

Only a purchase in Lori’s SVG shop will qualify for the free shape.

4th of July Pinwheels with Traci and Christine

Can you believe we are already 1/3 of the way through Summer? Not me. This week we celebrate 2 birthdays in our family. I LOVE what Traci and Christine have created today. These would be great additions to our birthday parties or decorations around my house… Lisa
First up is Traci. July??  You must be kidding!  I can’t believe that the kids have been out of school for a month and we are well into summer!  July 4th is only a few days away and I’m getting ready for a fun family BBQ.  I thought I would be extra festive this year and have fun with a few table decorations.  I love Lori’s popcorn boxes and the red and white stripes immediately reminded me of this special holiday.  Filled with popcorn and a few of Lori’s 3D spiral stars, these boxes will look super cute on my table.
To add to the red, white, and blue theme, I decided to also add some fun firework place cards to my table.
These are easy and fun to make — I just cut some white card stock to 4×6, folded them in half, and added Lori’s adorable firework set
I can’t wait to finish my guest list and make some more!

Please stop by my blog, Artsy Albums, and let me know what fun plans you have for the 4th!   If you do,
I might just celebrate the 4th with a giveaway!
Celebrating freedom,
Traci
Next is Christine.
If it’s time to do some last minute Fourth of July decorating, I have a easy table center piece for you. It takes minutes to cut and assemble.   I used a bucket that I had picked up at the Dollar store and filled it with pinwheels and crepe paper.  Here’s how I did it.
I used some of Lori’s digital paper for my pinwheels.  I imported them into the Silhouette Studio program and filled my pinwheel shapes with different patterns of the paper.  I turned off all my cut lines and printed everything on my white paper.  But I needed some printed paper on the back too because when you pull the flaps of the pinwheel forward, you want to see more color.  So I switched out my patterned paper fills, put my paper back in my printer upside down and printed again.  Then I put that paper on my Silhouette mat , turned my cut settings back on and cut out all of my pinwheels.  I would think that if you needed to, an 81/2 x 11 piece of paper would hold at least 10 pinwheels so an easy way to mass produce.  Then I assembled my pinwheels, using some Echo Park brads for the centers.
Then I cut them to the lengths that I wanted and covered the wooden skewers with washi tape.  Then it was just a matter of gluing the pinwheels to the sticks.  I used hot glue and covered the glued area with a scalloped circle punched out of red cardstock.  I stuck them in the can with pop glue dots on the bottom so that they would stay still and pushed red crepe paper to further secure them.
Then I had some fun decorating the front of my can.  Lori has recently added these fun spiral shapes to her store.  I can’t tell you how cool they look in real life.  I think this is my favorite part of my project.  I could sit and put these together for hours.  🙂  There is a large flat piece for the bottom and then seven little pieces for the petals.  They fold up on both sides and then you glue them to the bottom and then to each other.  I can see making these really big and then attaching some back to back and hanging them as decorations as well.
Well, I hope everyone has a happy Fourth of July!  We’ll be celebrating with family and having a great big picnic!
Lori Whitlock supplies: 9 Starburst Seal SetSpiral StarsPatriotic Picnic Paper digital papers @ Jessica Sprague, Echo Park, Decorative brads from the Hello Summer collection, Echo Park, Little Boy paper collection

Working With Silhouette Files Tutorial by Brigit

Hi Everyone, I have a couple of helpful hints today, things I do in Silhouette Studio Desiger Edition to help me prepare my files before I cut them out.  I’ll be using Lori’s 2 boxes on a 12 x 12 file and one of the cards from the belly band set.

The flag on the box is from the patriotic icon set, I resized both of these to make a smaller treat box.  The ungrouped box measures 10.170w x 5.840h and the flag pieces ungrouped measures, stars – 1.580w x 1.060, stripes – 3.015w x 1.905h and the flag box – 3.015w x 1.905h.

When I added the card the pieces are bigger than the mat, so I select all and ungroup.  Notice the score lines, they are ungrouped also, so I click and drag around the card and score lines to select, go to the modify window and select make compound path (or group), you can also right click and select make compound path. You are going to do the same thing to the belly band so it’s easier to have the modify window open so you can select make compound path or group again.

I like to fill with the color or pattern paper I’m going to use and arrange my project to see how it will look.

Here is a picture of the flag, I ungrouped but it also ungrouped the stars. If you go to move it and this happens just go to edit and undo move, then click and drag and select over the stars and box and make a compound path.

Here’s a picture of the make compound path and group, they both will cut the stars out, but I like to see exactly how it will look with the make compound path.

There are two boxes with this file, so I ungrouped and deleted the other box then resized, (I also did another ungroup and make compound path on this box so I would see the lines when resized and fit the flag.)

I group my pieces together by color or pattern paper.  Keeping your groups to the left side, moving to the mat to cut, then to the right side helps you keep track of what’s been cut.

For this project though I did a print-n- cut on two 12 x 12 pieces of white textured cardstock, (American Crafts 80lb), I arranged and grouped the pieces together.  I then selected my group and go to the line color window and select none.  Now print-n- cut. Next, move those shapes to the right and place the next group on your mat and finish cutting those out.

I used Echo Park’s 4th of July Mini Theme digital paper, Stars & Stripes Trendy Twine and Jaded Blossom’s Celebrate America stamp set.

Thanks for stopping by, I hope these tips help, I have a couple more project photos on my blog.

Hopefully this is a helpful tutorial. Thank you for dropping by!