New in Shop + Tuesday Freebie

TODAY ONLY, the HALLOWEEN KEYS SVG file is FREE with purchase.

Before coupon code total should be $5.00 or higher. Just add coupon code: HALLOWEEN at checkout and the cost will be deducted from your purchase. This freebie is good until midnight tonight!

Here are some of Lori’s newest shapes added to the SVG shop and her Silhouette Portfolio! Thanks for stopping by… Lisa

Only a purchase in Lori’s SVG shop will qualify for the free cutting file.

Cards by Christine

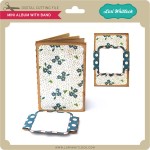
Today I want to show you how you can make a card using the same die cut shape and the same paper collection and have it turn out completely different.  For both of my cards, I used  the banner shaped card from Lori Whitlock’s die cut card file, A2 Card Base Set 1. This simply shaped card can be used vertically or horizontally, though vertically it needed a little coaxing to get it to stand up straight for pictures.  To decorate the pictures, I used Lori Whitlock’s new Reflections paper and embellishment collection created for Echo Park.

My first card is a little more masculine.  There are so many papers and elements in this collection to choose from, I was able to pick colors and shapes that were better suited for a card for a woman or a man.  I used the card base horizontally for this card and decorated it with cardstock stickers that I popped up with foam adhesive.

I also adhered a bit of stickers to the inside of the card that shows when closed to add an interesting element.  The gem, in this space, is also from the collection. On my cards, I like to use the brads a little bit differently.  I really don’t like to see the prongs, so I will bend and break them off and then adhere them to the card with a little foam adhesive.  Works great every time!
My second card is definitely more feminine.  I took advantage of the floral papers and the yellow monochromatic color scheme to change the look entirely.  This time I rotated the card so that it is opened vertically.  I used the beautiful floral arrangement sticker as my focal point and topped it off with a Layered Chipboard sentiment.  The brad in this card was adhered again with foam adhesive.
Thank you for stopping by today and I want to challenge you to use card bases in different ways with just a few flips and paper changes.  You’ll find a whole bunch of die cut card base files in Lori’s store, I bet!
Lori Whitlock Supplies:
Reflections  paper collection and embellishments by Lori Whitlock for Echo Park

Blog Hop + Promo + Giveaway + $1 Wednesday

Welcome to our Creative Team Blog Hop, today! Our FABULOUS Creative Team is at it again and has some amazing projects to share with you. Keep reading because we have a Silhouette Promo and GIVEAWAY below. Check out their fun projects by following the links here:

Lori Whitlock
Brigit Mann 
Christine Ousley 
Corri Garza 
Mendi Yoshikawa 
Traci Penrod 
Chrissy Guido
Haley Ney
Kim Lund 

Have you seen the new stamp material from Silhouette? Yep, that’s right I said STAMP MATERIAL!!! With this amazing product you can cut your own stamps with your Silhouette machine! This is a brand new product and it’s AWESOME! I had a chance to play with it this week and I have to say… I’m in LOVE!! Up until now, there was not a great way to create your own rubber stamps… well, now there is! I created this apple tag with stamping in mind. I was able to create a custom shaped tag and apple with coordinating stamp images! How fun is that? Keep reading because I’m giving away this apple tag set with a stamp material purchase below. 

Here are a couple of informative videos that that show you a little more about the stamping material and how to use it:

http://www.youtube.com/watch?v=dwRl9B8x-pw
http://youtu.be/hkvDkvDZ-hY

Right now Silhouette is offering my readers some incredible prices on stamping products, both with and without a machine. And, to top it off, here’s my special offer to you…  Anyone who purchases one of the deals below I’ll send you the Apple Tag Stamping Set FREE (SVG & Studio files). Simply email your order # to me at info@loriwhitlock.com and I’ll email you a link to download this cute set.

To shop be sure you follow THIS LINK (www.silhouetteamerica.com/stamping) and use code LORI at checkout to get these great prices and the FREEBIE offer.

And, don’t forget it about our $1 Wednesday at Jessica Sprague… (keep reading… there’s a Silhouette Portrait Giveaway at the bottom you won’t want to miss!)

One Dollar Wednesday at JessicaSprague.com!

It’s Wednesday again and that means TODAY ONLY you can snag two digital kits for an amazing deal…
TODAY for JUST $1 you can grab this awesome set: Everyday Stamps

EVERYDAY STAMPS

And, you can get the following awesome product for HALF OFF, 4×6 and 3×4 Template Set 2

4×6 AND 3X4 TEMPLATE SET 2

While you are at jessicasprague.com getting your kits, be sure to check out the samples made with each of these kits at the bottom of each listing.

And, last but least… we have a Silhouette Portrait to GIVE AWAY!!! One lucky winner will be announced on Monday, September 9, 2013! Enter through the form below. Good luck everyone!!!


a Rafflecopter giveaway

And, don’t forget to finish the blog hop!


New in Shop + Tuesday Freebie

TODAY ONLY, the BUGS SVG file is FREE with purchase.

Before coupon code total should be $5.00 or higher. Just add coupon code: BUGS at checkout and the cost ($2.99) will be deducted from your purchase making your purchase price $2.01. This freebie is good until midnight tonight!

Here are some of Lori’s newest shapes added to the SVG shop and her Silhouette Portfolio! Thanks for stopping by… Lisa

Only a purchase in Lori’s SVG shop will qualify for the free cutting file.

Creating Titles Using the Flip and Weld Features with Traci

Please welcome Traci to the blog today sharing this adorable layout with us.

Happy Thursday Lori fans!

I’m so glad to be here sharing a tutorial with you today!  This one is pretty easy, but I often forget that I can do this so I thought I would share a creative way to have fun with your titles. 

I’ve been saving a photo of my son for just the right layout idea.  I wanted to focus on the photo, but have a really nice element in the title or embellishment.  I decided to use a few of Lori’s wonderful files to create a really neat title for this picture.  Plus, fall is my favorite time of year, and it will be here before we know it!

1.  First, pull up Lori’s wonderful fall designs…the autumn leaves title, and the fall flourish.

 2. Next, move the title off to the side so you can focus on the flourish. Size the flourish to 6″ in the ‘scale’ window and click Lock Aspect Ratio and apply.

3.  Click on the ‘duplicate’ icon and then ‘duplicate right’.

4.  Both of the shapes are facing the same way…which will look a bit funny under the title, so highlight the left shape, right click, and flip
horizontally.

5.  Next, move the left shape over just enough to overlap the right one slightly.  Highlight both shapes, and then right click and hit weld.


6. Now, right click and flip vertically so the image is upside down.   This allows for a straighter line across the top of the shape for adding the title.

Next move the “autumn leaves” title back over onto the mat.  Ungroup both words by highlighting the whole title, right click and hit ungroup.

7.  To add an internal offset on top of the full title, first duplicate the title and temporarily move one off to the side. 

8.  Next, line up your title and flourish pieces so that they overlap slightly.

9.  Right click and hit weld to connect your border and title pieces all together.  Cut this piece out.

10.  To cut a smaller, overlapping title to cover the ‘autumn leaves’ portion,  highlight those pieces and click on the offset icon, and then ‘internal offset’. Zoom into the shapes to make sure that you can pull away the correct portion, and move the outer pieces off the mat. Finally, cut the internal offset portion in a different color.

And here is my final layout!
In addition to Lori’s flourish and title pieces, I also used the brand new paper and embellishments she designed for Echo Park, Reflections Fall.
Thanks so much for letting me share! Please stop by my blog at Artsy Albums to say hello!
Traci