Ferris Wheel Card Tutorial

Hello everyone, Marcia here today. With it being State Fair time, I wanted to make this fun Ferris Wheel Card (SVGSilhouette). This shaped card is perfect for your Midway or Theme Park-loving friends. I used the Echo Park Paper A Magical Place collection by Lori Whitlock to create mine.

This is an easy card to make. Let me show you how.

1. Choose your papers and cut out all the pieces. I like to ink the edges of my pattern papers to add more definition

2. Adhere the black ferris wheel base to the shaped card base. Then glue the star and layered heart in the middle of the wheel. Adhere the roof of the passenger cars to the bottom of the cars.

3. Use foam tape to adhere each passenger car to the wheel and embellish as you wish. I added a sentiment to the front of my wheel as well as some crystal gems for the sparkling lights.

I know this card will put a smile on someone’s face! Lori has lots of other fun theme park cards in her shop. Take a look.

Thanks so much for stopping by today.
~Marcia

NEW SVG Files! NEW Freebie!

All New Release SVG Files are 25% OFF this week!

Happy Tuesday, everyone! Who loves making planners? This week I have a super cute and useful set of A5 Planner SVG files. This set has over 50 designs and includes everything from tabs in several configurations to shaped pages and even printable monthly and weekly print and cut pages. We also have some great NEW SVG files from Jillibean, Pebbles, and Quietfire that are ON SALE 25% OFF through Sunday at midnight in the Lori Whitlock SVG Shop.  There is a new freebie for the week that you’ll want to grab as well. Take a peek…

These downloads include SVG files that may be used with Cricut Explore, Silhouette (Designer Edition upgrade required), Eclips, Brother Scan and Cut, and any other software that will open SVG files. Be sure to go get them while they are on SALE this week.

ALL WEEK, this SVG file is FREE with any $1.99 purchase!

Hi Everyone! We have a new FREE file with purchase this week! To get it, simply place an order of $1.99+ in the Lori Whiltock SVG Shop and this Sunflower Card in a Box file will automatically be added to your cart for FREE!  No coupon code necessary! This offer is good through next Monday.


(Your cart must reach $1.99+ before the FREE file will automatically be added. The files will be available for immediate download after you pay for your order by visiting ORDERS > ORDER # > RED DOWNLOAD ARROW)

Another deal we have going for just a few more days (until the end of the month) is the FREE 2023 August Kit of the Month with any $20+ purchase (purchase must be in one transaction). Simply place your qualifying order in the Lori Whitlock SVG Shop and this file will be automatically added to your cart for FREE. No coupon code necessary. This offer is good through August 31, 2023. Grab this one while you can.

(Your cart must reach $20+ before the FREE file will automatically be added. The files will be available for immediate download after you pay for your order by visiting ORDERS > ORDER # > RED DOWNLOAD ARROW)

Thanks for checking out the NEW FILES and be sure to go grab the freebies of the week/month with your purchase.

Have a great day!

Lori

Flowers and Borders Layout

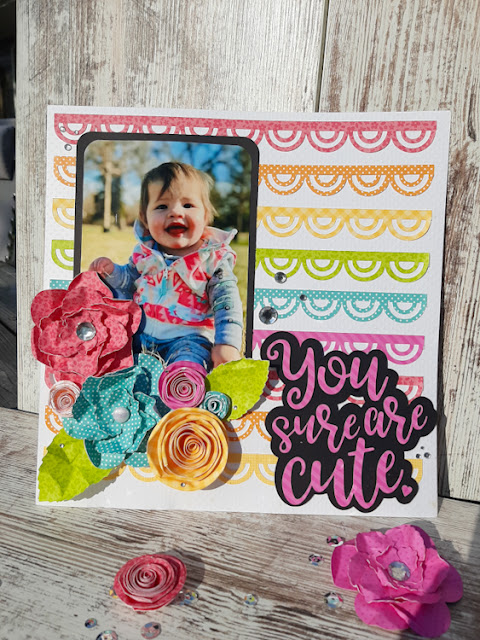
Happy Monday creative friends! Today, I’m sharing a layout I made of my adorable granddaughter using some borders, flowers and a title, all cut from Lori’s files. I will link below. I used some petite patterns from Doodlebug Designs for my project and cut all my elements on my Cricut.

I cut all my flowers and assembled them. They are very easy to make. I used the Rolled Flower 47 (SVG, Silhouette) and 3D Flower (SVG, Silhouette).
My title was the You Sure Are Cute (SVG, Silhouette) file that I offset to give it a little pop. The borders were cut from the Mega Border Bundle (SVG, Silhouette). I welded and sliced them to get the borders the size that I wanted.

I love how bright and fun this page turned out. Thanks for stopping by today and happy crafting!

Chelsea

Dino-mite 4×6 Pocket Page Mini Album Tutorial

Hi everyone!  I just fell in love with Lori’s Echo Park collection, Dino-Mite.  It is just so dang cute with the sweetest images and the colors are just so fun.  I have a coworker who has this little guy who is all about dinosaurs and he just turned two, so I thought I would make a mini for her to document some of their adventures over his Birthday weekend.  I used Lori’s 4×6 pocket page mini album here in the Silhouette Online Design Store or you can find it here in Lori’s Store.  I also didn’t realize Lori already had a tutorial on it, so I’m putting the link here for it also.  I put mine together a little differently, lol.

Lori’s Tutorial

I started by using Echo Park’s Dino Mite Card Stock Pack and cut all of my pages first, two of each color.  Using the cardstock pack gives you two colors, so it works out perfectly when you fold your pages over to create the pockets for a nice contrast.  Just fold on the score-lines, add your adhesive and you have your four pocket pages.  Next, I cut my four smaller pockets from the 6×6 Dino-Mite paper pad, fold on the score-line and add adhesive.  Here’s where I did mine differently, I added these smaller pockets to the back side of each of these pages with the pre-attached pockets.  No biggie there.  Turned out just as cute. Each of these pockets also has an insert that Lori’s has designed to go inside, you can matt your photos on these or add your journaling.  You’ll see those in the finished pictures.  I used the Echo Park matching Dino-Mite Card Stock again for those.

I cut my cover next, again from the Dino-Mite matching Card Stock and then just used book rings to put it all together.  Easy peasy.  On two pages, I added little flaps (like you see below with a photo matt under neath) these are just 4×4 element cards from the Dino-Mite paper pack that I scored at 1/4 inch and added adhesive to create the little flap.  I just dug into the paper pack and used all the goodies from the pack and Dino-Mite frames and tags, Ephemera to embellish my album.


I Love It!
This little flap folds up too!
The little borders you see added here and there are Lori’s, you can find them


Thanks for stomping by!
Cathy

5×5 Card Happy Birthday Words and Box with Handle and Wrap

Happy Monday friends!  I needed a birthday card and small gift box for a little boy last week, so what better place to look than Lori’s site for some fun cutting files!? 

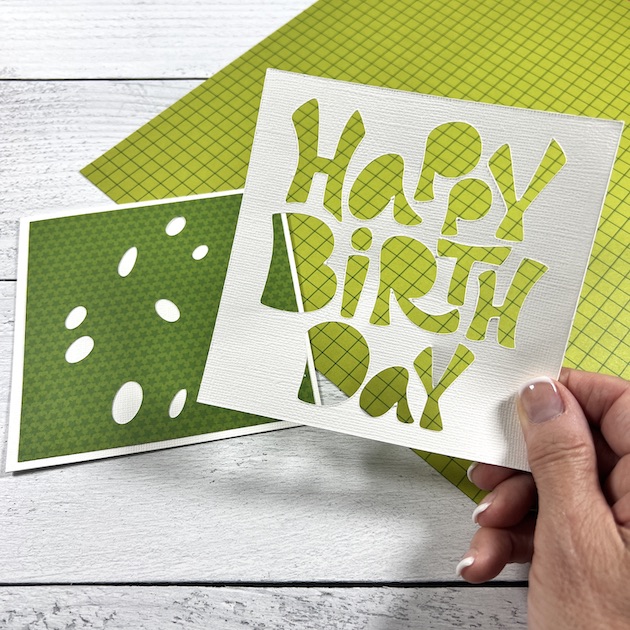
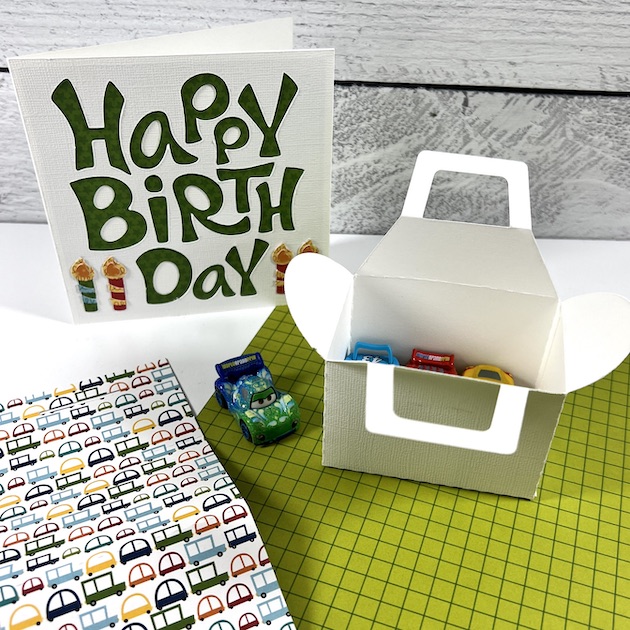
I love this super easy 5″ x 5″ birthday card because all the hard work is already done for you!  Placing individual letters like the sentiment above can take some time to get it right, but Lori has made this one easy! 

The green pattern has the cut outs for the letter centers, and then the Happy Birthday actually uses the negative space (save the letters that get cut out for a future project)!  

The box is made from two pieces of paper.  The base of the box folds up, and then there a a pattern piece that wraps around the box — almost like wrapping paper.  Isn’t that cute?  And so simple!


The box is the perfect size for a small gift, a gift card, or candy.  I know this car-loving birthday boy will love the surprise tucked into this gift.


To create a gift set like this, visit Lori’s SVG shop with the links below.  For the Silhouette shop, click here and here. Happy crafting!