Hi friends! Traci here and today, I’m sharing a fun vacation mini album I made with Lori’s cutting file called 4×6 Horizontal Pocket Mini Album Tabbed Pages (SVG, Silhouette). It’s filled with pretty shaped pocket pages and tabbed cards that are perfect for saving your favorite memories. I added pictures of our trip to Hawaii and it made the cutest little keepsake! 🌴🦩🌞
I decorated the album with the Doodlebug Design, Fun in the Sun Collection, but … this file could be made with ANY theme for photos of a holiday, family, friends,
new baby, school, your pet, or a season. It’s 4×6 inches and has a flap that folds over onto the front cover to keep the pages secure.
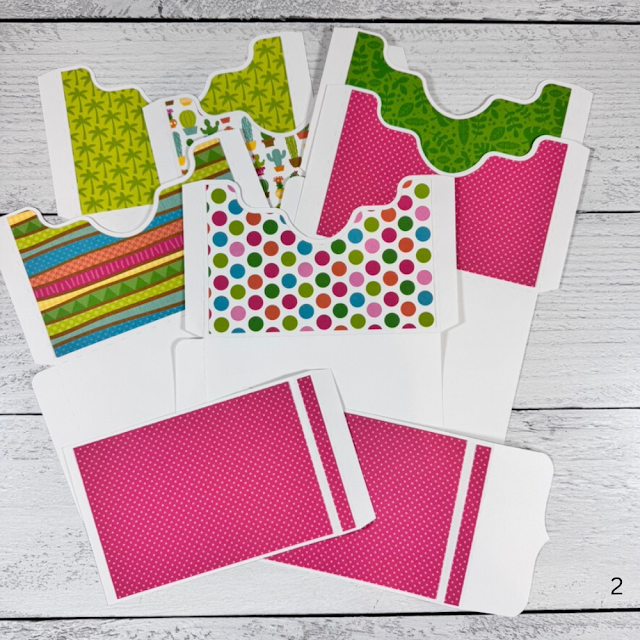
Above, you can see there are 6 pocket pages with a tabbed card / photo mat tucked inside each one. Let’s take a quick look inside, then I’ll share the tutorial …
The front of the pockets have a cute cut-out shape and plenty of space for embellishments. And inside, the tabbed card can hold 2 photos (front and back) or be used for journaling.
The back side of the pocket pages are blank so I added more photo mats and cute tropical embellies!
This mini is so fun! I love the interactive pages in this album. To see more photos and all of the pages in this project, visit my blog here.
Now, for the tutorial …
1. I cut out all of the pieces, including 6 pages, the covers, 6 tabbed photos mats, pattern paper for the pockets and a binding piece.
2. I adhered the patterns to the front of each pocket, and the covers, before gluing everything together.
3. To create the pockets, I fold the right and left tabs inward and glued them against the back, leaving the tab on the left free.
4. To assemble the front cover, I adhered the remaining tab on the first pocket just to the left of the score line on the cover piece. This score line will eventually be the album’s binding.
5. Next I continued to adhered each of the pocket’s tabs to the back of the page in front of it.
6. The pockets created a stack of pages to the left of the spine. At this point, I also adhered the back cover piece to the tab on the front cover.
7. To adhere the last pocket to the back cover, I used the binding piece that comes in the cut file to adhere them together.
Once I finished assembling the album, I decorated it and added my photos.
I hope enjoyed this project made with Lori’s 4×6 Horizontal Pocket Mini Album Tabbed Pages File (SVG, Silhouette). It’s not only great for your own photos, but … it also makes a wonderful gift idea. Happy scrapping! 😊
Blog * Shop * Facebook* Instagram * Pinterest


.png)
.png)
.png)
.png)
.png)
.png)
.png)
.png)
.png)
.png)
.png)
.png)