Adding Layers with Sketch Pens with Cathy

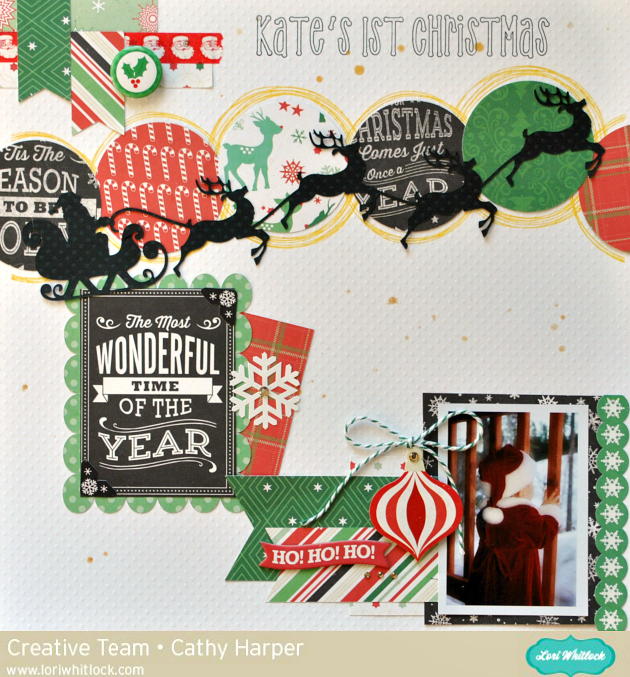
Hi everyone!  Cathy here with you today and I have a Christmas layout to share with you using Silhouette Sketch pens for an added layer. I used Lori’s Echo Park Christmas Cheer Collection and and a gold Silhouette Sketch Pen!

First, I cut Lori’s Santa’s Sleigh and Reindeer file out of black dotted card stock.  I sized it down just a bit and when cutting a detailed file like this it is best to use a new blade and a double cut!

Next, I punched 6, 2 1/2 inch circles from various papers in the collection.  I played around a bit with how I wanted them arranged on my background paper with the cut out Santa and reindeer.  Then, I created 6, 2 1/2 inch circles on the Silhouette, staggering and overlapping them to create the image you see below.

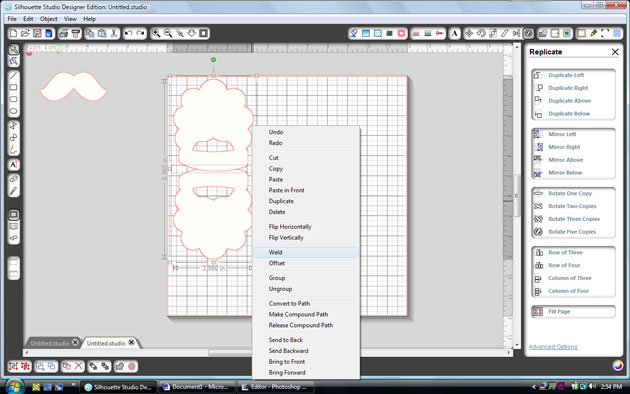
Now you want to go in and offset every circle and add a second offset circle to every other circle like the image you see below.

Now go in and remove the original circle from each set of circles and then the fun begins….highlight each circle and open the Sketch window on the Silhouette Cameo and click on the continuous sketch as shown below.  This creates layers of pen work around those punched circles.  Take out your blade and insert your sketch pen, this takes a few minutes for the Cameo to do, but the effect is worth the wait!

I added my title next with Lori’s Simple Text using a black Silhouette Sketch pen.  Then you are all set to add those punched circles and Santa & his reindeer.  A few more details and more embellishments from the Echo Park Christmas Cheer collection and you are finished!  Easy Peasy!

Thanks for joining us today here on Lori Whitlock’s blog!

Santa’s Sleigh and Reindeer file

Banner Set 2

LW Simple Font

Merry and Bright Shadowbox with Cathy

Hi Lori Whitlock fans…Cathy here with you today and I have a quick last minute gift idea to share with you!  I created a shadow box with one of Lori’s Christmas Phrase Set 1!  I know that this isn’t the most original idea out there but they are really quick and easy to make.  Lori Whitlock has so many wonderful phrase sets that the possibilities are endless for creating these shadowboxes.

I started with and 8×8 white shadow box and added an 8×8 piece of black chalkboard paper from Lori’s Echo Park Christmas Cheer collection.  Just adhere this piece to the back of your frame.  Next, fill your frame with tiny ornaments or jingle bells.

I cut the Merry and Bright out of gold metallic Oracle 631 vinyl.  I scaled it down to the size you can see below.  The preset vinyl setting on the Silhouette cuts is beautifully with a nice sharp blade.  Weed your vinyl and transfer the saying onto the transfer paper.    Then just adhere it where you want it to be and just like that you are done!  Easy Peasy!

Such a super cute set!  If I need another last minute gift, I will use the Jingle all the Way and fill it full of multi colored jingle bells!

And as I mentioned earlier, that Lori has so many phrases that the possibilities are endless for these shadowboxes!

Christmas Phrases Set 1 link  or the Silhouette Store Merry and Bright link!

Corri Garza- Poinsettia Flower Pot

Hi everyone!  Corri here today sharing my version of Lori’s Poinsettia Flower Pot Card.

I love the dimensional look of the flowers.  This would be a great way to gift a gift card…you could should use a glue dot to attach the card to the pull out portion of the card.

I used paper from the Christmas Cheer Collection from Echo Park.  I love the addition of black to the traditional Christmas colors.  The tag is from the element sticker sheet.  I sprinkled the back with baby powder so it wouldn’t stick to the front of the card.

Check out all the beautiful new Christmas files that Lori added to the shop.

Christmas Gift Link Up with Corri Garza

Hi everyone!  Corri here today with a new link up party for you guys.  Since this time of the year is all about gift giving, I thought it would be fun to have our link party be all about “Gift Ideas.” Lori has recently added so many great gift files to her shop….check out these cute ideas.

Link up your projects using any of Lori’s files for a chance to win a $15 gift card.

Here’s my project for today.

This box would be so cute filled with candy, a gift card or a small gift.  I used paper from the Christmas Cheer Collection from Echo Park.

We love seeing all your projects…you can also share them on Instagram using the hashtag #loriwhitlock and tag @loriwhitlock.


Santa Shaped Card with Corri

Happy Thanksgiving, everyone!  Corri here today sharing a fun shaped card made with Lori’s Santa Face file. Here’s how I made it.

First, ungroup the pieces and drag them off your mat.    Drag the beard portion onto your mat and then click on the replicate menu along the top. Click on mirror above.

Next, select the top beard and move it down slightly.  Select both pieces and the right click and select weld.

Now you have your card base. Next, cut all the layers including an additional white beard piece.   To add some texture to the card, I embossed this layer.

I used paper from the Christmas Cheer Collection from Echo Park Paper.  Such a fun card and it goes together really quickly.

Be sure to check out all the new Christmas files in Lori’s SVG shop and Silhouette Shop.

Also, be sure to check out the Silhouette Black Friday Sale from last night’s post. To get these deals be sure to shop HERE. And use code LORI at checkout. Sale ends December 8.

Already a Silhouette user?
Use code: LORI to receive 40% OFF at SilhouetteAmerica.com (*excluding machines, design downloads, download cards, subscriptions and gift cards) PLUS Free Shipping on orders over $25 for the lower 48 states
50% OFF all designs at SilhouetteDesignStore.com – no code needed!