Link Up with Corri – Love

Hi everyone!  Corri here today with a fun new Link Up Party!  I’ve chosen “Love” as our theme this time.  My projects are for Valentine’s Day but you could link up a wedding themed project, an anniversary card or a layout about something or someone you love.    Just make sure to use one of Lori’s files on your project.

Here’s what I made…

I used paper from the Echo Park – Lucky in Love Collection for my projects.    I love the addition of the teal on this pattern paper.

This adorable Heart Cracker box would make a perfect gift.  Just filled with some candy and it’s ready to go.


And who wouldn’t love this pretty Heart Pocket? You can tuck a couple of mini candy bars inside and a note.  I reduced the file to 75% and it’s still a nice size.  These would also be great for class room treats.  You could reduce them and fit four to a sheet of 12 x 12 paper.

We can’t wait to see what you make!  Link up for a chance to win a $15 gift card to Lori’s SVG shop!


Vintage Screen Card with Cathy

Hi Everyone!  Cathy here with you today sharing a couple of cards created with Lori’s Carta Bella Yesterday Collection.  The first one features her new Screen Card with Flowers.  I am loving these new screen cards, there are 3 different ones to choose from; a wedding and baby cards along with this flower one.  Lots of fun layers with the Carta Bella Yesterday papers and embellishments.  You have four different screens to decorate….I chose to decorate three and will write my sentiment of the fourth screen.  I also chose to add the flowers included in the file on the third screen instead of the front.    The fun border on the bottom of the entire card was cut using a Designer Die from Carta Bella called Yesterday Edges.

And while I was in the vintage mood, I created on more card using A2 Tabbed Card & Sleeve Scalloped.  How cute is this file?!  Love the scallops and fun little envelope….perfect for turning the journaling cards in the collection into cute cards!

Thanks for joining us today!

You can find these files also in the

Flower Screen Card

a2 tabbed card with scallopped sleeve

EOS Lip Balm Holders with Kathy

Hi Everyone!  It’s Kathy today with some ADORABLE Lip Balm holders!  I don’t know about where you live, but here in MA, EOS Lip Balms are all the rage, so when I saw Lori’s sweet card holders in the shop  (or here in the Silhouette Store) I couldn’t resist!  These will be perfect for my daughter and her friends for Valentine’s Day!  Take a peek:

There are eight different designs, but I chose the Butterfly, the Cupcake and the Flower.  I added some foam tape between the layers for dimension and embellished them with some stickers and gems.  So easy to put together and so cute!!!  Here are some close-ups…


Can’t wait to try the others!!!  That’s it for me today, thanks for stopping by !

Pocket Scrapbook Page with Corri

First off, we have a winner to announce. Sandra L. you have won the $30 gift card to Lori Whitlock’s SVG Shop!! Please check your email for instructions on how to claim your prize! Congrats!! Thanks to everyone for entering. Watch for more fun giveaways.

Hi everyone! Corri here today.  One of my goals for 2015 is to get more of my kids’ photos out of the computer and into albums.  I decided to try my hand a pocket page.  I love how easy these pages go together and that I can add die cuts to embellish for any subject or season.

I used some paper from Webster’s Pages – Hall Pass Collection added some of Lori’s school themed die cuts.

I cut this apple and grade title to fill one of the 4 x 6 slots.

I used my sketch pens to add some journaling to this globe life card. This is how.

1. Reduce the size of the card to 75%.

2. Place the top layer on your mat and type your journaling.  Scale the text to fit.

3.  Align the text on top of the card.  Select the card and select “no cut” from the cut menu.

4. Replace the blade with a sketch pen and select cut.  Do not unload the mat.

5. Select the text and then set it to “no cut”.  Select the card and set to “cut”.

6.  Replace the pen with the blade and select cut.

Lori has so many great fonts in the shop!  You can really change up the look of your page just by changing the font.  I used the Dot Sketch Font in my example.

Don’t forget you can save 30% off your entire purchase at Lori’s SVG Shop with the code “JANUARY” through 1/19/15.

From Embellishment to Mini Album with Kathy

Hi Everyone!  It’s Kathy,  with my very first post as a member of Lori’s Team!!  I’m very excited to be here!  Today I wanted to show you how I transformed Lori’s Adorable Shaker Camera embellishment into a fun mini album celebrating my cousin’s sweet new baby boy!

I started by loading the Shaker Camera file into my Silhouette.  Keeping everything grouped together, I resized the camera shape to be about 4.5″ x 6.5″ so that it could accommodate 4″x6″ photo sleeves.  By keeping all the shapes together, everything was uniformly resized.

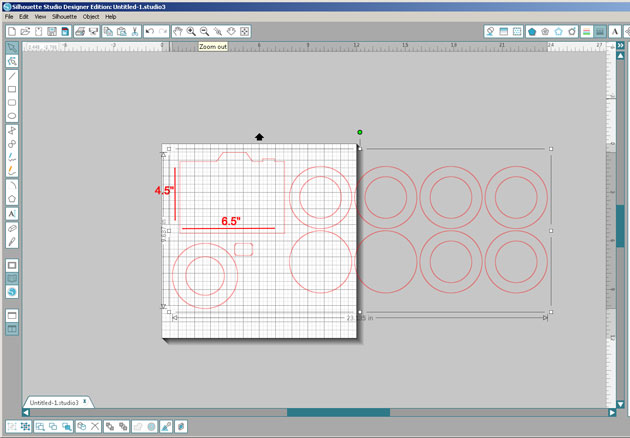
After ungrouping everything, I cut two of the camera shapes and the six “thinner” rings from some Silhouette Chipboard.

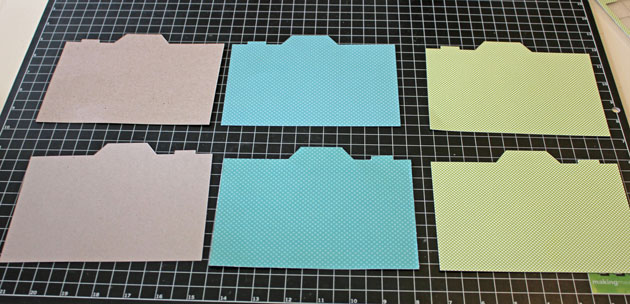
I then cut some patterned papers to cover both the outside and the inside covers.  When doing this, make sure to flip the camera shape horizontally for one of the covers.  This will make sure that everything lines up properly.


Now I started assembling all of the pieces to make my album covers.  I started by gluing both the outside & inside covers to the chipboard camera pieces.  I then glued the chipboard rings together in a pile.  This builds the “shaker” part of the card.

To finish the “lens” I first glued the ring stack to the background circle I cut from a coordinating piece of paper.

Next, I filled my shaker with a cute Teddy Bear Sticker and some sequins.

Finally, I finished it off by adding a circle of clear plastic to hold all the shaker elements inside, and then added the “fatter” ring that I cut from another piece of patterned paper.

 I added the completed lens, and the viewfinder piece to the front cover.  I used Lori’s Perfect Type Font to cut out the Baby’s name and added that to the lens.

I didn’t have the 4″x6″ photo sleeve when I started this project, so after the covers were complete, I used one of the sleeves to measure where to punch holes for the binder  rings.  On the inside cover, I again used the Perfect Type Font to print the baby’s birth information on a cute little label!

Lastly, I filled the pages!  I wanted to keep it simple, and leave some room for my cousin to add her own writing, so for each page, I simply added one of Lori’s 7 Shapes Labels where I put the date.  Here are the rest of the pages…

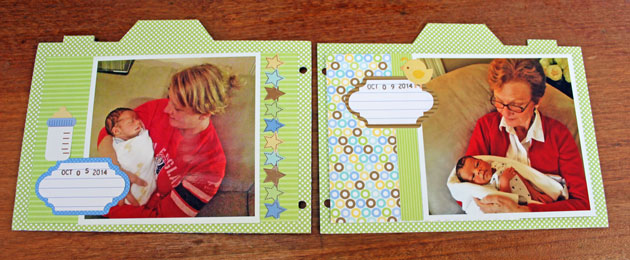
I left her some blank pages and labels to add to the album!

That’s it for me today!  Thanks so much for stopping by!