Box Card Spring Flower Pot Tutorial

Hello crafty friends! Today I have a quick assembly tutorial for one of the new Flowerpot box cards. I used the Box Card Spring Flower Pot file (SVG, Silhouette). This file is so bright and cheerful. It has several print and cut sentiments so that it can be used for any occasion. I used the Happy Birthday sentiment, and the papers are from the Our Happy Place paper collection by Echo Park Paper Co.

The box part of this card comes in two separate sections with two decretive panels on each. These two sections are glued together side by side. It also has two rim pieces that will be glued on the front and back of the card. The rim pieces hang over the edge of the pot a little so be sure not to add glue all the way to the edge of the paper. I glued the pot all together forming the square before adding the inserts this time as well.

Before the inserts are added to the box card the flowers need to be assembled. All of the flowers have multiple layers for added dimension. The file does come with centers for the flowers, but I used enamel dots for mine. After all of the flowers are assembled I added them to the inserts. Inserts one and two are the only ones with flowers. The third insert is plain green.

The tabs on all of the inserts are folded into valley folds and glue added to the backs of the tabs. I held the tabs folded down and slid the insert into the box, made sure the top of the tabs was flush with the top of box and front of the tabs was flush with the front of the box. After I had the tabs lined up, I folded the box card flat in both directions to make sure everything would lay flat. I then added the remaining inserts the same way but using the insert in front as the guide.

With the inserts all in place I then glued the flower and sentiment to the front of the box.

I love how versatile this box card can be. I hope you give it a try. Thanks for stopping by today!
Brandie

Box Card Easter Bunny and Chick Carrot Car Tutorial

Hi! Are you ready for spring yet? Here in Utah, the weather is undecided. We’ve had beautiful spring like weather and then the next day, snow. Fortunately, for us, it melted quickly! For me, spring and Easter are synonymous and with that I want to show you how to put together Lori’s adorable Box Card Easter Bunny and Chick Carrot Cars. Here are the Silhouette links: Box Car Easter Bunny Carrot Car and Box Car Easter Chick Carrot Car

To start with, I cut out all my pieces. I’m making multiples to send to my grandkids so there are many pieces.

I then inked a few of the pieces. I wanted my yellow accents on the chick to stand out a little. I also like to add a light gray to the white edges of the eggshell. And of course, orange and green to make the carrot pop.

I then glued the main base piece together. With making multiples, I didn’t want the seam to open up while I was working on the next piece so I clamped them together with a binder clip.

Then I added the layered pieces of the front and the back to the main base.

Next are the cute little drivers. I started with the eyes on the chick and then flipped it over to add the other pieces. With the bunny, I started with the ears and then the eyes.

Next, glue the character to the insert and then add the insert to the base with the tabs bent to the back. I like to flatten the card after adding the insert to make sure that the card will lay flat for mailing.

And that’s it! You have an adorable carrot car box card.

Teri


3D Leprechaun Hat Box Tutorial

Hi there friends! Today I am sharing an assembly tutorial for the 3D Leprechaun Hat (SVGSilhouette). As soon as this paper collection came out, I knew I wanted to craft with it. It is the Happy St. Patrick’s Day collection by Echo Park Paper Co. This little hat is the perfect size for a tiered tray or to hold a little treat for someone special.

This cut file has five circles, two long strips with tabs, and two buckle pieces. The tabs are all mountain folds.


I started with the narrow strip first. This will be the hats brim. I added glue to the end tab and attached to the other end creating a circle. I then folded over all the tabs and added glue to each tab on the inside of the cup. Then I put one of the same-colored circles inside the cup and pressed down on each tab against my work surface making sure to shape and secure each one. I flipped the cup over and glued the second same colored circle on the top covering the tabs. With the wide strip and the two smaller remaining circles I repeated the steps making a taller cup.

To help give a little dimension and to hide the white core paper I inked all of the remaining pieces and the two cups.
I glued the two buckle pieces together. Then glued the shorter cup to the center of the largest circle. The taller cup is turned over and fits inside the smaller cup creating the hat. I glued the buckle into place only adding glue to the bottom half of the back of the buckle so that the hat can still open.
I added a few stickers from the collection to glam my hat up a little as well as a jewel brad from my stash.

I really like how it turned out and will be adding it to my tiered tray decor next month. Thanks for stopping by today!


Brandie

Side Step Card Tutorial

Hi everyone!  I have a classic card of Lori’s to show you today and I wanted to show you what an amazing blank canvas these cards are….you can build a scene in just no time with all the goodies from Lori’s collections.  This is Lori’s Side Step Card (Lori’s Shop)  or  Side Step Card (Silhouette Store).  I used Lori’s new Echo Park Little Lady Bug collection.


First, cut your card base.  You will have lots of score lines.  Carefully fold on the score line which is on the small section on the left.  This is the one that folds the card in half.
Then with next five score lines, you want to create mountains and valleys.
It should look like this from the side now.
Next, adhere your patterned papers to the side and the steps!
I chose a sentiment from the 6×6 Little Ladybug paper pad to add to my back step.
And from there, it’s just so easy to pull from the stickers and tags to create these little cards that fold flat for mailing and fit it a regular A2 envelope.  I love this bright, fun little card!


Valentine Gift Set SVG Files

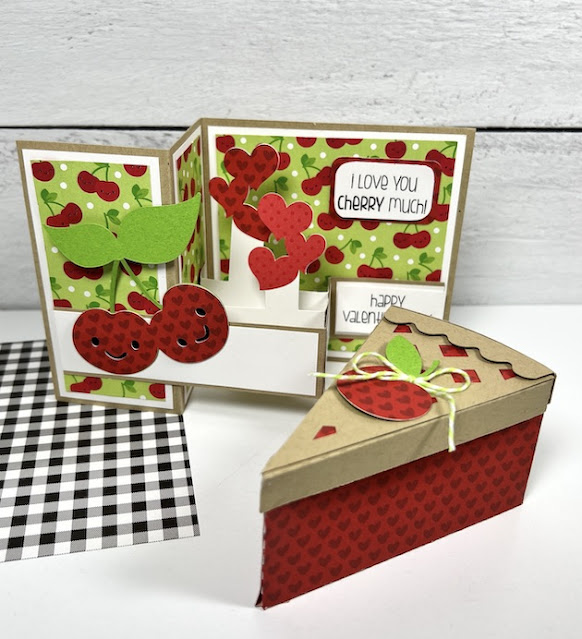
Hello crafters! Valentine’s Day is right around the corner and this past Tuesday was National Pie Day, so … I found a little inspiration for today’s project by combining the two! I created a cute cherry-themed card and a pie-shaped gift box using a couple of Lori’s fun cutting files.Valentine's Day Cherry Card & Gift Box Tutorial

These would make the “sweetest” gift. You could fill the box with candy, a gift certificate, jewelry, a small toy, money, love notes, or clues to a treasure hunt.

First, here’s how I made the pie slice box …

Valentine's Day Cherry Pie Gift Box Tutorial

used the cutting file called 3D Cherry Pie Slice (SVGSilhouette). I cut out all of my pieces and then folded them along the score lines. The small notches on the pieces allow the shapes to bend easily to create the pie’s shape. I chose a red paper with hearts (Bella Blvd’s Bestie Hearts & Ombre in McIntosh).

Valentine's Day Cherry Pie Gift Box Tutorial

I used a liquid glue to adhere the red “cherry” portion of the pie-shaped box together. Then, I added a base inside made out of Bazzill Kraft card stock.

Valentine's Day Cherry Pie Gift Box Tutorial

For the lid, I repeated the process that I did for the base. Then, I layered the red “cherry” filling piece, the kraft lattice piece, and finally … the scalloped crust piece. I used a piece of foam tape under that for some dimension. I added the cute cherry and some lime twine and the box was complete!

Next up, is the cherry card …

Valentine's Day Cherry Themed Card and Pie Gift Box Tutorial

For this one, I used the cutting file called Pop Up Box Card Valentine Cherry (SVGSilhouette). I cut out my pieces and layered all of the pattern pieces before assembling the card. I used Bazzill Kraft card stock, white card stock, and a cherry-patterned paper from Doodlebug’s Bar-B-Cute Collection.

Valentine's Day Cherry Card Tutorial

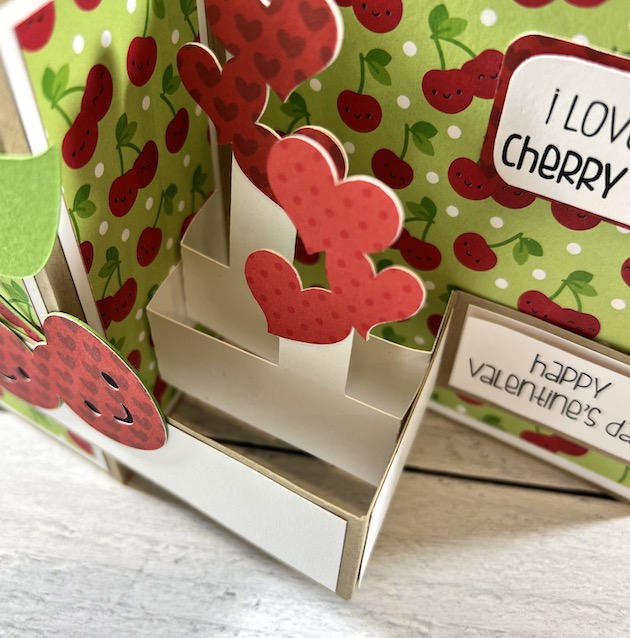
As you can see above … the band of the card attaches to the left and right sides only, leaving the center of the band free of adhesive. This allows the card to fold and pop open easily.

Valentine's Day Cherry Card Tutorial

Next, I glued the two remaining pop-up elements inside the band as shown above. I used a cute red polka dot paper from Doodlebug’s petite print dot & stripe for the hearts.

Valentine's Day Cherry Card & Cherry Pie Gift Box Tutorial

And … they’re done! My cute cherry-themed Valentine’s Day card and Cherry Pie Slice Gift Box are ready for gifting. Well, that was easy! I just love Lori’s cutting files.


Thanks for stopping by. I hope these inspire your next Valentine’s Day craft project. Have a great day!

Blog * Shop * Facebook * Instagram * Pinterest