Lip Balm Pumpkin Tutorial with Anita

Anita here with a fun tutorial to combine two cut files to make a lip balm pumpkin.  I came across this orange EOS lip balm when shopping recently and wanted to make a fall holder for it.  I used Lori Whitlock’s Flourish Pumpkin cut file which you can find here in the Silhouette Store and here in the Lori Whitlock store.  I also used the Lip Balm Monsters Cut file which you can buy in the Silhouette Store  and in Lori’s store and adapted it to make it work with my orange EOS.  How did I do this?  Well let me tell you just how easy it is.  I also used one of Lori’s new Echo Park collections called I Love Family.

You are going to want to open the Flourish Pumpkin cut file and put it on your mat.

You then want to ungroup the pumpkin so that you can move the parts around.  Move the stem off your mat for now.

Add the monster cut file to the same mat.

Now you are going to want to make sure the monster cut files are selected and then you want to ungroup them.

Once you have ungrouped the files you should move all but the orange or green body piece off of the mat.  I chose to use the orange, but you can use either for our purposes.  Next you will select the body from the monster and release compound path.  This will allow you to have the center circle be a separate piece from the body of the monster so that you can move it over onto the pumpkin.

Before you move the circle you want to remove color from the circle.  Click on fill color and select the cross hatch design I have highlighted as that will remove the color.  Move the circle from the center of the monster body to the center of the pumpkin.  Cut your file and you will have a beautifully sized circle ready for any EOS lip balm.

I took some twine and curled it around a round tool after wetting it with some Stiffy, fabric stiffener and added that as an accent.

Lastly, open your EOS lip balm and carefully place the pumpkin center over the lip balm.  I find that if you line up the indentation on the lip balm in the front of your design and hold it in place then it will come out perfectly lined up when you screw the cap on.  This is a great little gift and you can make these out of any of your favorite cut files following these simple instructions.

Hugs, Anita


Onesie Love with Anita

Hi Everyone:

Anita here with a fun and easy tutorial for making an adorable baby gift.  My cousin is going to have a baby girl next month and I used Lori’s Whitlock’s cut filed called Baby T-shirt Loved which you can find in  her SVG Shop as well as in the Silhouette Store.

I opened the file on my computer and saw that the design was going to be way too big for the small onesie that I had.  I resized it,  before I ungrouped it to cut the different colors that I wanted to use.

The materials for this project are so simple.  Iron-on vinyl color of your choice from Cricut and the onesie.  I used the double cut function to cut neatly through the glitter iron-on vinyl.  Make sure that you peel off the top glossy layer before ironing on or you will have a mess.

That’s it for me today.  Lori has so many cute and fun baby sayings which will look so cute on bibs, burp cloths or onesies.  Hope you have a chance to make a special gift like this for someone in your life.

Hugs,

Anita


Oven Cookie Box Assembly

Hi everyone!  Corri here today with a quick assembly tutorial for Lori’s adorable oven cookie box.   This cute box can hold a stack of cookies plus something else in the drawer.  So fun!

Let’s get started.

The pieces in the file are sorted by color.  These are the light pink pieces which form the base of the oven box.

Fold along all the score lines, apply glue to the  tabs to make the individual boxes that form the oven.

You will end up with the lid, the oven, the two pieces that make up drawer and the little part where the oven dials go.   You can add some brads or enamel dots where the little holes are before closing up the tabs.

Glue the oven portion on top of the drawer part.  You will use cover panels to hide the seams in the next step.

Next you can cut the cover pieces (they are dark pink in the file). These can be from patterned paper.  You can cut them all on one 12 x 12 sheet.    I used this cute polka dot print from the Echo Park’s Happy Summer Collection.

Match the cover pieces up to the base layer and glue in place.

These extra panels give the box a nice finished look.

There you have it!  I hope you’ll give this fun box a try.  Be sure to stop by Lori’s SVG Shop to check out all the newly added files.


Four Compartment Cookie Box Tutorial with Tya

Hi Everybody! It’s Tya Smith here with a tutorial on how to assemble the new Four Compartment Cookie Box that Lori recently came out with. I love her boxes and this box was just what I needed to take a yummy treat to my Mom for her birthday.Let me show you the steps it takes to put this box together.

Open up the file. It is found here on the Silhouette and here on the LW SVG Shop.

Now, it may look like a lot of pieces – but this really is quite easy to cut out and put together. The tan pieces are for the box base and lid and the aqua pieces are the pattern papers for the lid and sides of the box.

I went ahead and cut out all the box pieces out of kraft cardstock.

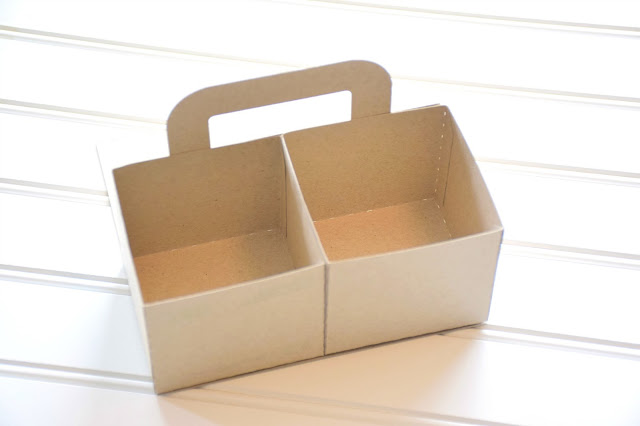
Then I started assembling the pieces. I took the 2 square pieces and layed them on top of one another. This is the box base.

Next take the 4 box pieces and fold on all the scored lines. Add adhesive as shown and glue the box together.

Add 2 of the boxes to one end. Then add the handle piece as shown.

Now add the other 2 box pieces.

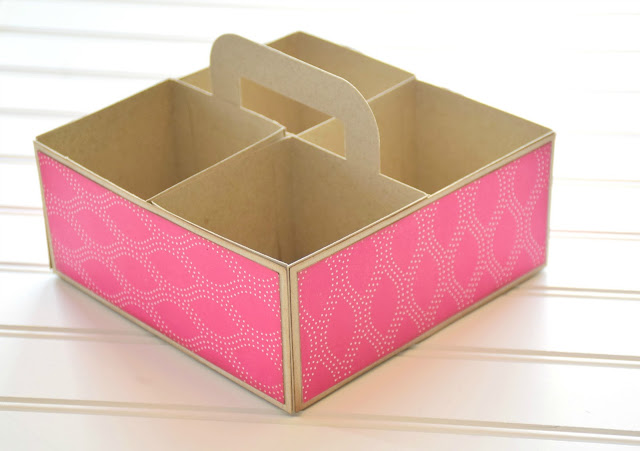
Add the pattern papers to the 4 rectangle pieces. These will be glued all along the edges of the box.

Now put together the lid. Add the pattern paper to the top and edges.

Here’s the box all put together.

 I added some yummy cupcakes to the boxes, but you could add cookies, candy or other small gifts.

To finish off the box I cut out a tag from the 5 Hang Tags cut file. I added some pretty ribbons and some stickers and other embellishments from Lori’s Petticoats Line for Echo Park Paper. So pretty and feminine.

That’s all there is to it! Hopefully I have inspired you to create this box for your special someone! Have a great day!

*** For a video tutorial on the 4 x 6 Compartment Candy Box which is very similar to this box, watch this video! ***

Swing Through Assembly Tutorial with Corri

Hi everyone! Corri here today sharing an assembly tutuorial for the new swing through cards. These cards feature a cool swing through motion when opened….your friends and family would love to receive one.

When you cut the file this is what you will have.

I decided to cut an extra one of the red panels so I could have a different pattern paper on the front of my card.

First, apply your panels to the interior of the card.

 Apply the tree cut outs to the interior of the card.  Everything is laying flat on your desk right now.  Do not twist anything yet.

Next, apply the panel on the front of your card.  You’ll notice you can’t see the die cut tree that you adhered.

Now you’re ready to flip your trees.  You can see that they are scored.  With your card open flip the tree on the left side of the card to the left.

Flip the tree on the right to the right.

There is small glue tab on the left side tree.  Fold on the score line and apply glue.   Adhere the tab to the back side of tree on the right.

There you have it! Such a fun and interactive card!

Be sure to check out the big sale happening now in Lori’s SVG Shop.  Save 50% off your order of $20 or more!  What a great deal!