
I’m so excited to be sharing one of my all time favorite ways to use Lori’s adorable cutting files: Shaped Cards!!!
There are so many different ways to approach shaped cards. For my first card I took Lori’s Santa Tote and cut off the flaps that formed the box and removed the hole in his hat (which formed the handle) to transform it into a cute card instead.

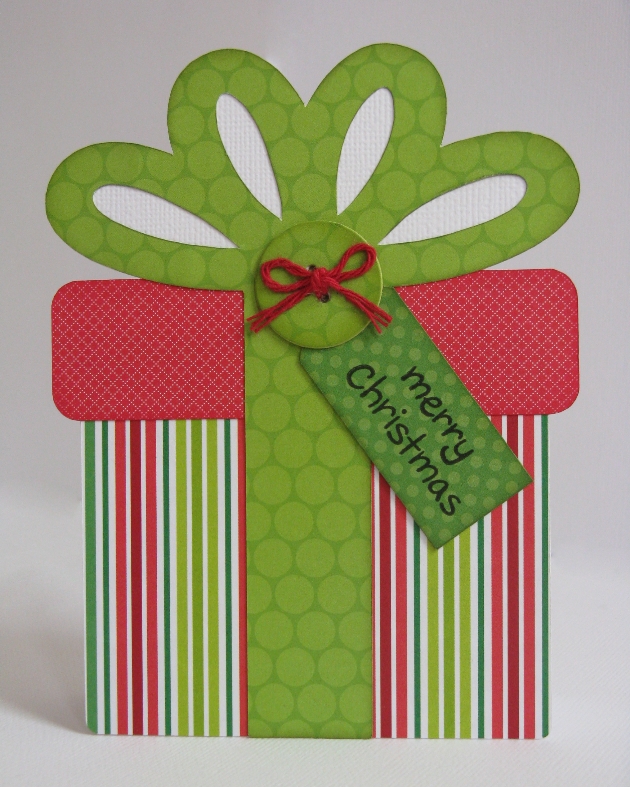
For my second card I used Lori’s Present cutting file into a card, pairing it with her button cutting file to form the knot on the bow. I also elongated the bow and bottom portion of the gift to so that the overall dimensions of the card would be 4.25 x 5.5 inches to perfectly fill an A2 sized envelope. To form my card base I cut 2 of the overall outline of the gift from white cardstock by welding all the shapes together.
For my snowman card I transformed another one of Lori’s treat box using the 3D Snowman Tote cutting file. Once again I removed the circle handle in the top and instead cut a bigger circle to form a pom-pom for my snowman’s hat. Rather than cutting two to form my card base, I mirrored my base shape and overlapped the two ever so slightly and welded them together, using a bone folder to create my crease and fold the card after cutting. To give a little shine to the eyes and mouth, I added glossy accents.

For my Nativity card I cut two of my background shape from the blue cardstock to form my card base and scored the back piece along the top so that my score line was parallel to the bottom of the card. Martha Stewart’s Score Board is an awesome tool for this. I then just added adhesive above the score line and adhered it to the other card base piece.
I printed my sentiment on the computer using iridescent gold paper and popped the top portion up with foam tape. I finished off my card with random dots of Stickles “stardust” glitter glue to give the look of a star filled sky.

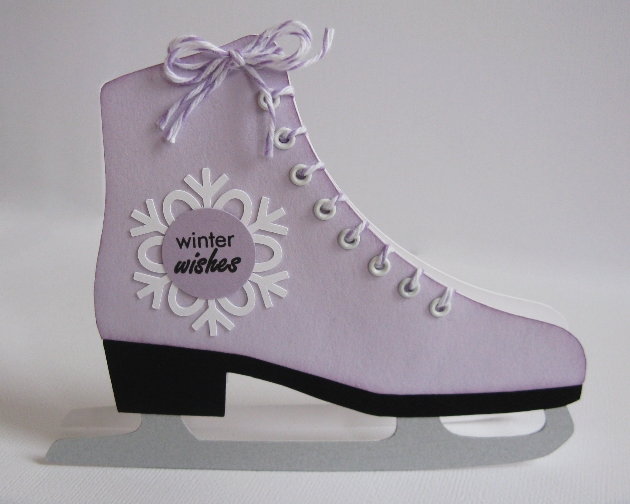
This last card is a favorite of mine using Lori’s Ice Skate diecut from her Christmas Winter Set (available in the Silhouette store). To create my card base I used the same method as I did on my nativity card. To give my skate a more realistic look I also chose to cut the blade from iridescent silver paper.
I had so much fun embellishing the skate! I chose to discard the curly cutout for the laces and instead used my We R Memory Keepers Crop-A-Dile to set a row of eyelets along the edge. I then ran bakers twine through them and added a bow to the top. To ground my sentiment I slipped one of Lori’s snowflakes behind a basic circle.
If you’re like me I do better with a visual example so I’ve created a video tutorial showcasing a couple different techniques I’ve utilized to create my shaped card bases. 🙂
Just to recap, today I’ve used the following cutting files designed by Lori which are available to purchase in her shop:
- Santa Tote
- Present
- 4 Buttons
- Snowman Tote
- Tall Nativity
- Christmas Winter Set (Silhouette Store Only)
- Snowflake Set
I hope you’ll give shaped cards a try! They’re so much fun! 🙂