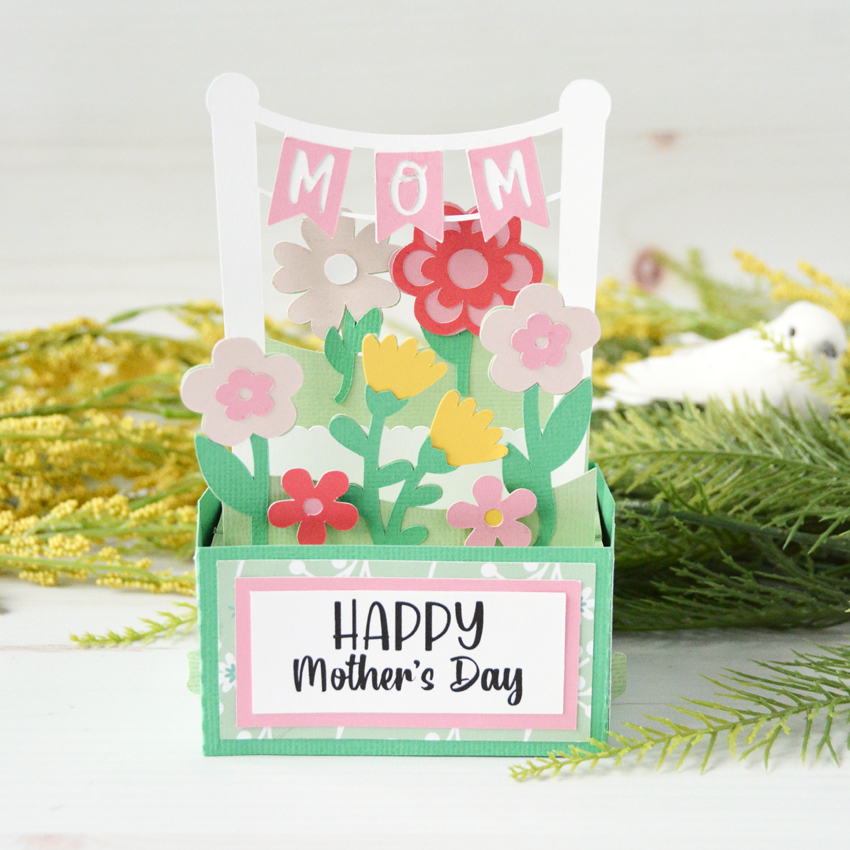
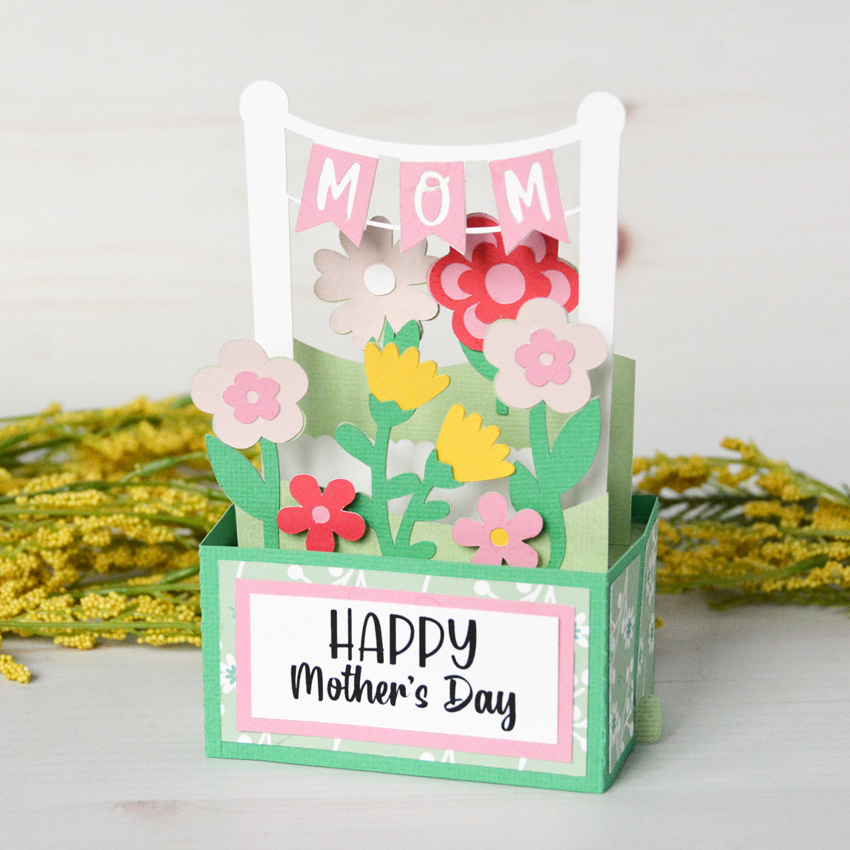
Button Card Tutorial

Lori has some fun new button cards in her shop.  The whole collection can be found here. They are also available individually in the Silhouette Design Store.


This card is called the Flower Card Button (SVG, Silhouette).  I’m going to share a quick tutorial using Cricut Design Space.  You can create this card with the Silhouette as well.  When you upload and open the image in Design Space, it looks like this:

Ungroup the pieces of the card.  Now let’s look at the button sentiment.  Lori has included a circle that is the size of  the medium We R Memory Keepers button (37 mm).  A smaller circle is also included that could be used instead of a button if you did not have a button maker.  Both Mom and Mum are included in the file.


If you want to change any of the colors on the button, this is the time to do that.  Once you have the colors, it is time to flatten the image for Print then Cut.  Select one of the circles and all the pieces in it like shown, and click Flatten (bottom right of screen).

You know you have the file flattened correctly when it looks like this on your screen:

And in your layers, the image looks like this.

Sometimes when flattening files, you might need to ungroup before you flatten. This file is ready to print then cut.  After printing and cutting, you have all your pieces:

The flower parts are easy to assemble on the card.   If you have a Button press, make a button.

You can make the button with the pin in the back so it can be worn or attached to something else.  Or you can take the pin out, so it will just be an embellishment on the card. I made both to show you.

I decided to use the button without the pin back for the card.  I love the dimension it adds.  If you don’t have a button press, you can use the included smaller circle and mount it to chipboard and/or a pop dot.

I used papers from Lori’s Our Wedding Collection. I hope you enjoy this tutorial for the Button card.  The real question is, Do you call the item in this file a button or badge? Or something else?

Have a great day!

Mother’s Day Explosion Box Teacup Tutorial


Hi Everyone:

Anita here with a tutorial for Lori’s Explosion Box Teacup for Mother’s Day.  You can find this file here in Lori’s SVG shop and here in the Silhouette Design store.  I used Lori’s new Echo Park collection called All Girl.  This card makes such a stunning statement and Lori has several other explosion box designs as well.

I made extra flowers and used two to put on top of my box.

Here is a photo of the box when it has exploded open.  It’s just so pretty.

Here are the pieces that I cut out.  I ended up cutting out extra flowers and cut two more extra square panels, one I put under the tea cup and one in the box lid.

I put the inside of the box together and the cover as well.  I would recommend that if you are planning to put gift cards in the pockets that you put the card in and then put the pocket where you need it to be so that it will close nicely.  I popped  up the hearts and the messages for Mom.

These are the pieces for the saucer for the teacup.

These are the pieces for the teacup itself.

These are the handle pieces for the teacup.

Starting at the top left I took photos of the process of putting together the teacup.  There is a tab on one end of the cup piece and you glue just up to the tab.  I used wet glue for the best hold.  I then took the smaller perforated circle and glued it inside the bottom of the teacup.  Next, I glued on the handle to the teacup.  Bending both tabs and using wet glue again for the best hold.  Similarly there is a tab on one end of the saucer which you need to glue together.  Then I attached the larger perforated circle to the bottom of the saucer.   Once everything was good and dry I glued the teacup to the center of the saucer.

I then set about to rolling my flowers.  I just love doing this and had fun.  There are so many different ways to roll the flowers.  I have photos where I started rolling one flower with a skewer to get it going in a round shape and another one where I used a flower roller which I bought a long time ago.  My fellow Creative Team member, Corri Garza has a tutorial and how she rolls her flowers that is on Lori’s Blog and can be found here.  I used leftover Easter grass to fill my cup so that the flowers would stay in. You could also add a small styrofoam ball in the bottom and attach the flowers to it.   Thank you so much for looking and have a great day. Happy Mother’s Day to all the Mothers out there and very special wishes to a certain mom to be.

Hugs,

Anita

Put Mom’s Name in Lights!

Mother’s Day is just around the corner. In fact, it’s just a week and a half away! Are you thinking of using your Silhouette to make something unique for your mom? I’ve got a project idea for you today. This week I’ve been working on some cute new 3D Marquee Letters! (Letters A-O are currently available, the remaining alphabet will be coming soon!)  These fun letters have a sturdy double-thick wall on the sides and have pre-cut holes for marquee lights to be inserted. These cute letters can be used to spell a myriad of words and names and are sure to brighten anyone’s day. These could be used for shower or wedding decorations, dorm room decorations… almost anything!  I decided to start up my Silhouette and make something fun for Mom!

The letters are approximately 6.9″ x 4″ (the width varies slightly from letter to letter) and come with decorative panels so you can make them to coordinate with any color scheme!

These Marquee Letters are fun to put together and they turn out so CUTE!  I have a video assembly tutorial for the Marquee Letters HERE.

Here’s a recommended list of materials including the cutting files:

Silhouette Marquee Letter Cutting Files
SVG Marquee Letter Cutting Files
Marquee Lights
80# Cover White Cardstock
Clips
Batteries

Another great gift idea for mom would be a new Silhouette!

The Silhouette’s Mother’s Day Bundle is still available! You can use code LORI to get $520 worth of Silhouette product for only $249.99. Yes, you read that correctly; that’s over 50% OFF! This will be the best Mother’s Day gift ever for someone you love (or yourself). See below for details… but let me point out that this bundle includes the business edition software!! This offer goes through May 12, 2019. But, don’t wait as these bundles tend to sell out fast!!


Bundle includes: Aqua Blue CAMEO 3, Heat Transfer Starter Kit, Vinyl Starter Kit, Sketch Pen Starter Kit, Tool Kit, and Silhouette Studio® Business Edition!

The bundle is available HERE. Be sure to use code LORI at checkout to get this awesome pricing!

Have a great day!

Creative Team Projects by Mendi and Brigit

Today we have a special treat by having 2 of our talented Creative Team Members sharing projects with us. First we have Mendi, her blog is here if you want more info…

Today I have a new layout up on Lori Whitlock’s blog using her adorable Sweet Girl Collectionshe designed for Echo Park.  I thought for a slight change of pace I would try a layout where diecutting would take on more of a complimentary role to all the cute embellishments that come with this fun collection.


With my addiction to diecuts I must admit that sometimes I have an adversion to stickers (particularly ones with a white border), but with a little fussy cutting I was able to trim the banner border and one of the pinwheels to fit my style perfectly.  This line has so many adorable images.  Love the dimensional hot air balloon!

For my title I cut out the word “happy” from the patterned paper, inked the edges and popped the squares up with foam tape to carry out the Scrabble tile feel.  The word “girl” was diecut using Lori’s My Girl Titles cutting file.

I also used her Banner Flag Set which I elongated by welding the pennant to a rectangle of the same width.   To anchor my title I used an enlarged label from her 14 Labels set paired with a couple of darling brads from the collection.

Next we have Brigit sharing her first project on the blog.

Mother’s Day is right around the corner and I thought this cute card and box from Lori’s shop would make a wonderful gift set.

I chose digital paper and elements from Echo Park’s For The Record 2 Tailored, I love the flower pattern, the colors are beautiful.

For the Mom Shaped Card I used some elements from the paper collection and one of the flowers from the Layered Flowers Set 2.  The pretty pink and cream bow is Trendy Twine’s Posy.  This card also comes with an envelope.

Love this Window Treat Box, it comes with the matching bracket tag.  I added the internal offset shadow layer and did a print and cut on my Cameo for the Happy Mother’s Day sentiment.  The same flower was used from the Layered Flower Set 2 on the tag.  The box is tied closed with some homemade pink crinkle ribbon.

You can check out Brigits blog here