Baby Boy Layered Mini Album


Hi everyone!  I chose one of Lori’s older files today for a gift for a friend who has a new grandson.  This Layered Mini Album or here In Silhouette Online Design Store, has always been one of my favorite mini’s.  It’s just simply fabulous and like it says, full of layers!  I hope you enjoy looking at all the pages. I had so much fun creating this darling little mini!  All the little flaps fold up to add photos underneath and tags pull out to add photos there also!


Thank you for stopping by!


Tiered Bracket Mini Album

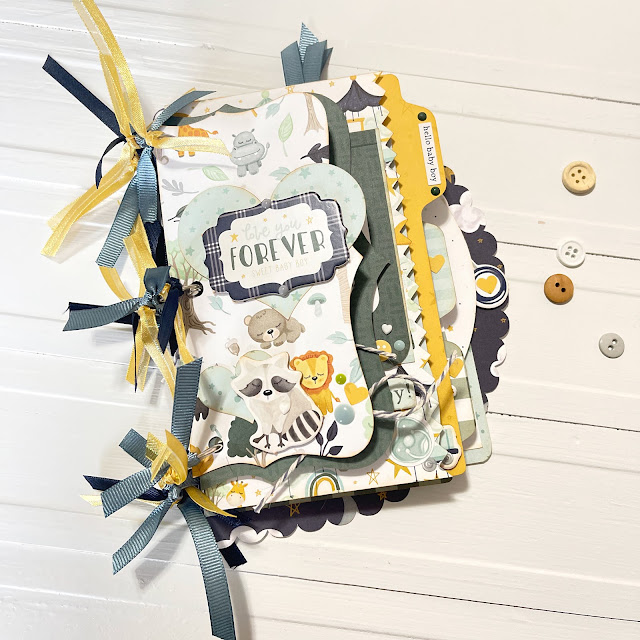
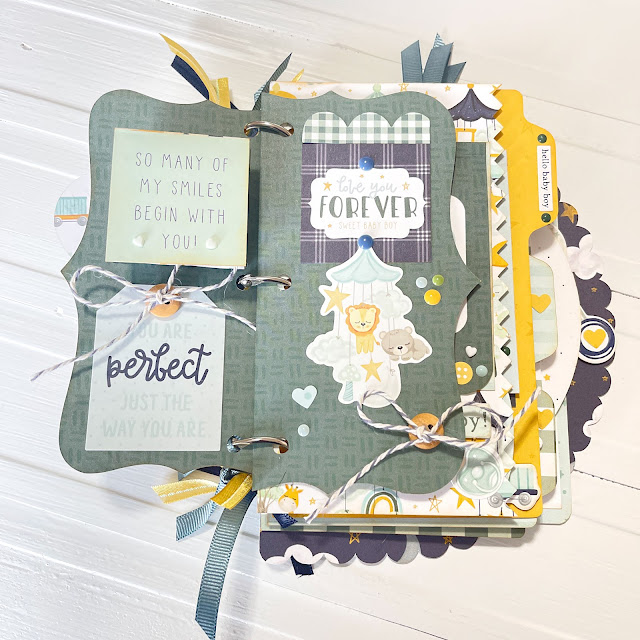
Hello friends! We’re into the Christmas season so, I thought it would be fun to make a holiday mini album using one of Lori Whitlock’s amazing cutting files called Tiered Album Bracket (SVG, Silhouette). It‘s perfect for your favorite photos from the season, and … it would make a sweet gift idea for someone special.

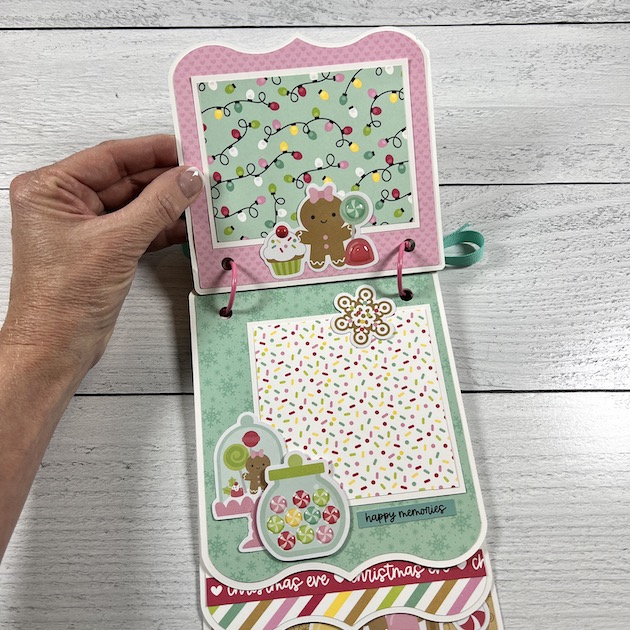
I love making shaped mini albums and Lori has lots of great cutting files with unique silhouettes to choose from. This one caught my eye with its pretty waterfall pages. To decorate it, I chose Doodlebug’s Gingerbread Kisses Collection.

Now, on to how I made it …

First, the cutting file comes with the base pages and the inset pieces for cutting pattern paper.  One tip when cutting out the patterns … be sure to position your pattern on the cutting mat so that it will be cut in the direction you want!

I love how the patterns cut perfectly sized to allow a nice 1/8″ border of white (or whatever color base you choose). 
I decorated my pages with card stock mats and embellishments and love how the waterfall design let’s some of the fun elements peek through!
The pink page above is an example of what I meant about cutting the correct direction for your paper.  Since I wanted my pink hearts to be right side up, I flipped my cutting file design in the software to “flip vertically”.  You could also just place your paper upside down on your mat 🙂 
Lori has several fun waterfall (tiered) album designs in her shop … curved, flag, pennant, pinking, rounded, tabs, scallop, ticket, and wave shapes!  I love them all!

I hope you’ve been inspired to try one of Lori’s tiered albums!  They would make a cute gift for Christmas, and a fun way to display your holiday (or any day) memories!  Thanks so much for stopping by today!

Blog * Shop * Facebook * Instagram * Pinterest

Dino-mite 4×6 Pocket Page Mini Album Tutorial

Hi everyone!  I just fell in love with Lori’s Echo Park collection, Dino-Mite.  It is just so dang cute with the sweetest images and the colors are just so fun.  I have a coworker who has this little guy who is all about dinosaurs and he just turned two, so I thought I would make a mini for her to document some of their adventures over his Birthday weekend.  I used Lori’s 4×6 pocket page mini album here in the Silhouette Online Design Store or you can find it here in Lori’s Store.  I also didn’t realize Lori already had a tutorial on it, so I’m putting the link here for it also.  I put mine together a little differently, lol.

Lori’s Tutorial

I started by using Echo Park’s Dino Mite Card Stock Pack and cut all of my pages first, two of each color.  Using the cardstock pack gives you two colors, so it works out perfectly when you fold your pages over to create the pockets for a nice contrast.  Just fold on the score-lines, add your adhesive and you have your four pocket pages.  Next, I cut my four smaller pockets from the 6×6 Dino-Mite paper pad, fold on the score-line and add adhesive.  Here’s where I did mine differently, I added these smaller pockets to the back side of each of these pages with the pre-attached pockets.  No biggie there.  Turned out just as cute. Each of these pockets also has an insert that Lori’s has designed to go inside, you can matt your photos on these or add your journaling.  You’ll see those in the finished pictures.  I used the Echo Park matching Dino-Mite Card Stock again for those.

I cut my cover next, again from the Dino-Mite matching Card Stock and then just used book rings to put it all together.  Easy peasy.  On two pages, I added little flaps (like you see below with a photo matt under neath) these are just 4×4 element cards from the Dino-Mite paper pack that I scored at 1/4 inch and added adhesive to create the little flap.  I just dug into the paper pack and used all the goodies from the pack and Dino-Mite frames and tags, Ephemera to embellish my album.


I Love It!
This little flap folds up too!
The little borders you see added here and there are Lori’s, you can find them


Thanks for stomping by!
Cathy

Dino Mini Album

Hi crafty friends! Today I am sharing a cute little mini album I made with the new Dino-Mite collection by Echo Park Paper and the Mini Album cut file (SVG, Silhouette).

This paper collection is so cute! Those little dinosaurs have so much personality. Perfect for any dino loving kid.

This little album has five built in hinges but has room to add a few more in-between the pages. The cut file also includes six different pages including a fun tag pocket. This album can be used for all sorts of occasions all that needs to change is the paper and embellishments.

Thanks for stopping by today!

Brandie

Honey Jar Mini Album

Hello, my friends!  Traci here with a fun take on one of Lori’s brand new shaped cards.  I turned it into a mini album (and if you follow me, you know minis are my thing, LOL!). Lori’s adorable new Honey Jar card (SVG, Silhouette) inspired me to turn the card into pages!  Check it out …


I started with the cutting file base and cut it out 3 times.  Then, instead of folding the pieces along the scoreline for a card, I cut the 2 halves of the card in half along the scoreline and created 6 pages (I actually only used 5 for my album).  


Once I cut the black base pages, I created an internal offset in my Silhouette software and cut out 10 cute patterns from Lori’s new Bee Happy 6×6 paper pad (Echo Park).  I love how all of the patterns look layered together when the album is fanned out 🙂


Lori’s Nested Scallop circles (SVG, Silhouette) make great photo mats!  I just punched a 2.5″ round circle for the patterns inside.


Along with the cute scallop mats, I also used stickers and die cuts from Lori’s new Bee Happy collection.  I did trim off the small flowers in the lower left hand of the jar.  


I hope you like my take on Lori’s adorable Honey Jar card!  Please visit my blog over at Artsy Albums sometime to say hello!  Until next time, happy crafting!!