Rainbow Palette Carrot Boxes


Hello, Crafty Friends!! Winter is almost behind us and with all the rain we’ve been getting here lately the flowers will soon bloom! If Spring will be here soon, then so will Easter!! Time for pretty colors and lots of sunshine and BUNNIES!! I consider all my kiddos my little bunnies… they’re quick, bounce around a lot, and so stinking CUTE!!  So, I made these adorable carrot Easter baskets using Lori Whitlock’s Easter Basket with Carrots File for each of them… because what little bunny doesn’t like carrots, right??!!

Image 1

You can find this Easter Basket with Carrots box file in Lori’s SVG Shop, HERE.

OR in the Silhouette Design Store, HERE.

I used my Sizzix eclips to cut out my project. And when you first load it into the ecal software it downloads onto your window, the shapes are displayed stacked on each other. I usually separate my pieces by color.

Then, if I’m making multiples, I add and cluster my multiple shapes together so that I can cut more at one time.  Depending on how large the shape is I may also separate them further into multiple pages.

Then, I cut. The box piece was too big to cut multiples so I just cut one box at a time, multiple times.

I love rainbows. It makes a wonderful Spring palette. It’s bright and cheerful! And since I’m using a multi-color color scheme I chose to tie them all together with my patterned paper. I used a rainbow gingham pattern that contained all the colors I used for my boxes. This way I don’t have to worry about finding matching paper for each color and still have them coordinate with each other.

I cut out all my pieces except the WHITE pieces (the scalloped circles and tags) and I’ll show you why…

I cut my white pieces from the same piece of cardstock. Except, my tags are printed with HAPPY EASTER on them first.

For the tags, I decided to use my machine’s PRINT-2-CUT option. First, I printed my tags.

Go to FILE, then click PRINT from the menu. Don’t forget to print with the registration marks!! That is very important!

Once it was printed, I lined up my print out sheet to the very left of my cutting mat.  Line it up with the corner.

Then, go to the CUTTER tab, click on PRINT-2-CUT. You’ll be taken to the PRINT-2-CUT menu screen. Click NEXT.

Before you proceed, THIS PART IS SUPER IMPORTANT, make sure you HIDE all the text in the tags.

If you do not do this it will CUT each of those letters… and we don’t want that!! So make sure all your tags are blank!

You’ll notice that there are registration marks on your print out.

When you choose NEXT on your PRINT-2-CUT window, it will ask you to align the laser dot with the registration mark. Get it the closest to the center of the registration mark as possible for BOTH registration marks. Then, CUT!!

For the main boxes, I folded at the crease lines, all go the same direction, toward the center of the box.

I added a little line of glue to the tabs and adhered them to the side walls and set aside to dry.

I shaded my carrots using my ColorBox PetalPoint ink pads in Pinwheel and sponge daubers to shade the edges of my carrots. Then, added details using the fine tip ends of similar colored markers. This part is totally optional and for a much quicker project, you can totally SKIP it!!

I ran my carrots, carrot stems, and background pieces through my Xyron 3″ Sticker Maker for quick and easy adhesion.

Then attached them to my cut out scalloped circles and sent them back through my Sticker Maker.

Attached the backgrounds onto the boxes, then attached the scalloped circles with carrots to the centers.

Then topped off each box with iridescent ribbon that I tied to create multi-looped bows and attached my tags.

And here are my finished boxes…

These just make me so giddy!! With the bright rainbow color palette, I can’t help but be HAPPY!

I know my little bunnies (my 4 kids) will absolutely love these! They’d love the box just by itself but I’m a super awesome mom so I’ll stuff it full of goodies!! LOL

Hope you loved this tutorial!

REMEMBER… Easter is April 1st!! Very fast approaching… so get going and get creating!!

HAPPY SPRING, HAPPY EASTER, & HAPPY CRAFTING EVERYONE!!

~ Mitsyana Wright

Sweet Berry Basket Treats

Thank Hello, Crafty Friends!! Design Team Member, Mitsyana, here again! This time to bring you these adorable Berry Bushel Treat Baskets!

I love sweet treats! But what I love even more are sweet friends. So from time to time. I make these sweet friends sweet treats. Whoa, what a tongue twister! Try to say that 5 times fast!

Supplies Used:

Lori Whitlock’s Berry Basket (here in the Silhouette store)

Patterned Cardstock – DCWV’S Peri & Peach Stack

Little Birdie Crafts’ Renae Classic Flowers

Stamped Sentiment- Stamps of Life – Cake2Stamp

Light Pink Crinkle Ribbon

Xyron Mega Runner

VersaMagic Ink- Night Sky, Pink Petunia

Cellophane Bags

CHOCOLATES!!

Stamp Positioner (Optional)

 For my project, I used this adorable Berry Basket file from Lori Whitlock’s SVG shop.

Berry Basket

I downloaded the file. Then extracted the contents of the zipped file onto my computer. Once unzipped and downloaded I can open it using my electronic cutter software.

In my ecal software, I clicked on the SVG/ Import icon to open/add the file onto my virtual cutting mat.

Once the file is open it’ll look the picture below.

Lori pre-sizes the files so there’s no guess work to how big the file should cut. But if you’re like me you like to resize your boxes because sometimes you don’t want a one sizes fits all deal. Which is totally fine too.

To resize a file make sure you file is set to “Keep Proportions”. This will option will be located in the ‘Portion & Size’ panel on the right.

I set the width to 8.75″. With the “Keep Proportions” box checked it automatically sets the height in proportion to the width.

As always, also changed the color of the pieces. This helps me to remember which pieces I’m going to cut in what paper. I sort them by color so that all pieces being cut out the same paper are grouped together.

I load my mat with my paper choices and cut all the pieces at the same time.

Once all my box pieces were cut, I inked the edges of the scalloped tops with Pink Petunia chalk ink. Then used my Xyron Mega Runner to attach them to the tops of the main panels. It’s easier to attach these pieces while the panels are laying flat.

Then I folded the flap on the crease lines. I used a dollop of glue on the tiny side tab and adhered the two side panels together. Then ran glue along the bottom flaps and attached the bottom rounded square piece.

The berry basket file also comes with the little label you can add to the front. It’s optional whether or not to use it. But it does give it a nice little touch.

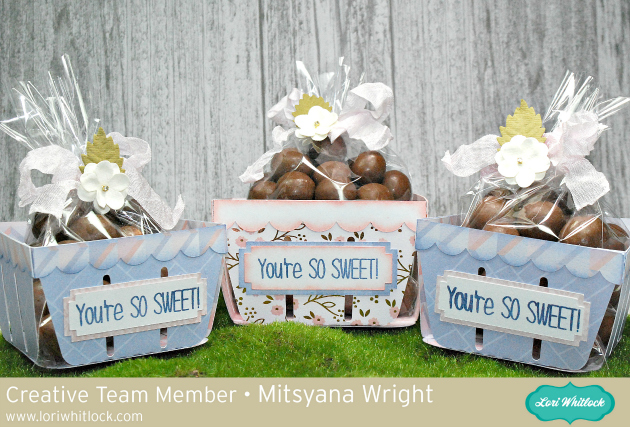
I used a stamp from Stephanie Barnard’s Cake2Stamp set that reads ” You’re SO Sweet” onto the label in Night Sky chalk ink. The sentiment fits perfectly onto the label (even when resized). I knew I may have needed to re-stamp my sentiment a few times so I placed my label in a stamp positioning tool and stamped it about 3 times. This helps to ensure that I get exact placement each time.

I placed a bag of chocolates (you can use your fave) and tied it off with crinkle ribbon. Then attached these adorable pre-made paper flowers from Little Birdie Crafts’ Renae Collection.

And here is my finished box…

Here are the 2 different sizes I made standing side by side…

These are absolutely beautiful.

These treats are sure to wow all the sweet people in your life!

Hope you enjoyed today’s project!

Until next time…

Happy Crafting!

~Mitsyana Wright

My Favorite Place- Flower Card

Hello, Crafty Friends! Mitsyana Wright here, back again and now officially part of the New Lori Whitlock Creative Team! Woohoo!!   I have this wonderful Flower Card Tutorial to share with you all using one of the flower files from Lori’s Bird Tree Flower Bundle Set. (here in the Silhouette Store)

This card is perfect to give to your significant other or your bestie.   And makes a great ‘feel good’ or ‘just because’ type card, because you don’t need a special holiday to let someone know you’re thinking of them.

I used my Sizzix eclips and ecal software to cut the flower file #6 from the bundle set. I sized the flowers to 3″ tall and cut two sets of flowers.

I inked edges of my die cuts for more depth, choosing an ink one or two shades darker than my cardstock.

Then attached the layers of the flowers together using a glue pen.

Once both flower pots were assembled, I snipped off the ‘pot’ to of one of the flower cuts, just leaving the stemmed flowers intact.

I used this shape from Lori’s 5 Labels set, to create a card mat & shadow, and sized it to 3.460″ x 4.406″ (white cardstock) and 3.66″ x 4.606″ (brown cardstock).

I layered the pieces together using Xyron Mega Runner and attached it to a matted A2 Sized card base (patterned paper “mat” measures 4″ x 5.25″).  Next, I attached double stitched ribbon along across the bottom of the card and trimmed off the ends.  Then, I attached both flower cuts. Stacking one on top of the other and placing the trimmed one in the back.   I used a stamping tool to stamp my sentiment onto the front of the card.  Finally, I attached the little bow with a dab of strong clear glue.

And here is my finished card…

I really love the detailed layers on these flowers!!! These were so much fun to make! I’m sure these flowers will bring a smile to anyone’s face!!  Hope you all enjoyed this tutorial and give these pretties a go!

HAVE FUN CREATING!

~Mitsyana Wright