Bee Happy Tutorial with Guest Designer Lorrie Nunemaker

Hello everyone!

It’s Lorri Nunmaker, and I’m so excited to be a guest on LoriWhitlock.com.  I was a part of the Lori Whitlock design team for a couple of years, and was so excited to be offered a guest blog post.  Lori’s products have always been super inspiring!

Today, I am happy to share with you a tutorial for this “Bee Happy” card.  When I started thinking about what I would like to create for this post, I instantly knew I wanted to use the Lori Whitlock “Fine and Dandy” paper line for Echo Park Paper, which led me to this card.

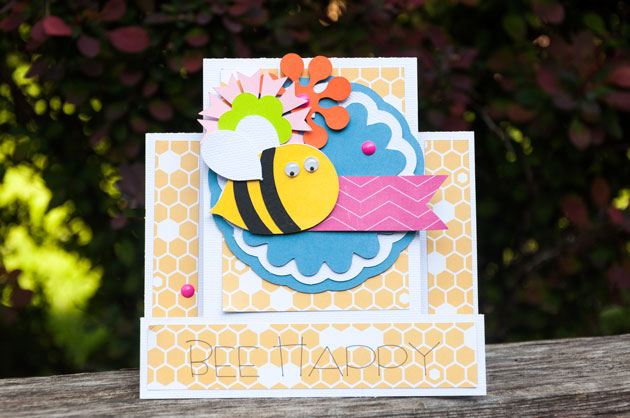
I created this card in Cricut Design Space, and then cut the card base and elements with my Cricut Explore.  I just love how the papers went with this theme.  Here’s a video tutorial for the card set up in Design Space.  Have a great day!

Files Used:

2 Nested Shapes
3 Bugs
Mega Flower Collection
Nested Scalloped Circle
Square Center Step Card-School


Thanking the Best Teacher

When you literally have no time and HAVE to throw a card together, Lori Whitlock comes to the rescue with thousands of designs and design elements that can save the day and make you look like a PRO!

All this card took was some patterned paper with a school theme and one of Lori’s designs. I used Cricut Design Space to upload the images, flatten the elements and use the print then cut function to put together my card.

20160405-20160405_221245-Edit

For this card, I used Lori Whitlock’s Teacher Thank You Tags file set.

20160406-2016-04-05_21-38-44
After uploading my files, I flattened the images I wanted to print, then cut.
I did the same with the school house I used on the inside of the card.
This is how the images looked after they were flattened.
Design Space prepared the print then cut for me.
All I had to do was print the file.
Then I chose my printer and the settings I wanted to use.
After printing, my image was ready to cut.
After printing, my image was ready to cut with my Cricut Explore.
Perfect job.
Perfect job.
Ready to cut the front sentiment for the card.
It's just too easy.
It’s just too easy.
The front of my card.
With a little schoolhouse on the inside.

It’s a simple card, but it took no more than 15 minutes and I didn’t have to go out and buy one.

Thanks so much for stopping by.

Please visit my blog at ScrappyDIVAblog.com for many more projects, tutorials and ideas.