I am so excited to show you all a project that I have really been working hard on — a 3D Chipboard Village! These darling chipboard houses are part of a premium project series. My goal was to design a village that is sturdy and that can be displayed all year long. The village is made up of 5 buildings, each more fun than the next! In addition to the houses, I have created a print and cut embellishment set for Christmas. Going forward I plan on creating other seasonal/holiday embellishment sets so that you can decorate and enjoy your village all year long!
The village houses can be purchased in the Silhouette Store individually and as a bundle.(Silhouette bundle is available for a limited time, see link for details) They are also available in SVG format in the Lori Whitlock SVG shop both individually and as a bundle. Below are photos and links for the village.
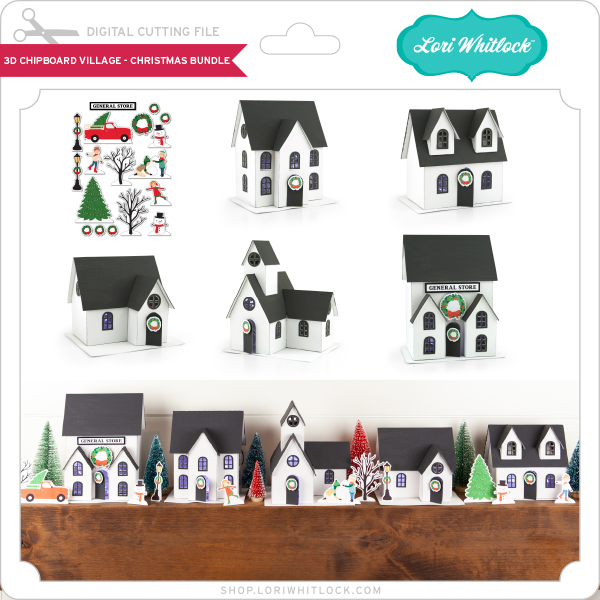
3D Chipboard Village Christmas SVG Bundle
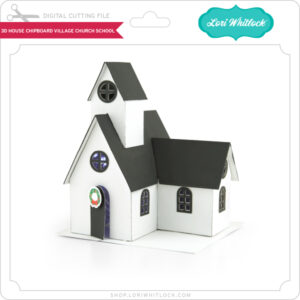
3D House Chipboard Village Church/School (SVG, Silhouette) Finished size: 5 1/2″ x 7 1/2″ x 5″
3D House Chipboard Village Cottage (SVG, Silhouette) Finished size: 4 3/4″ x 5 1/2″ x 4 1/2″
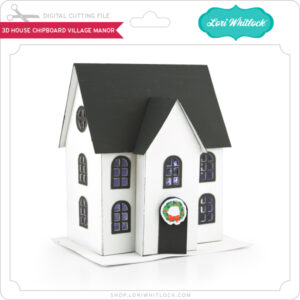
3D House Chipboard Village Manor (SVG, Silhouette) Finished size: 6″ x 5 1/4″ x 4″
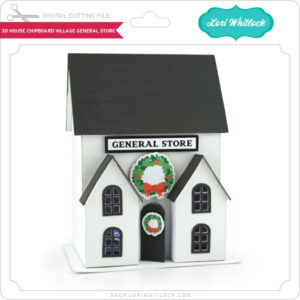
3D House Chipboard Village General Store (SVG, Silhouette) Finished size: 7 1/4″ x 5 1/2″ x 4″
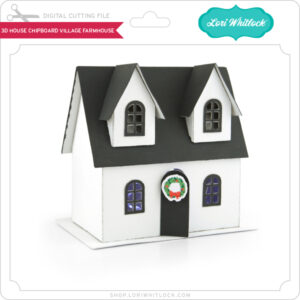
3D House Chipboard Village Farmhouse (SVG, Silhouette) Finished size: 5″ x 5 1/2″ x 3”
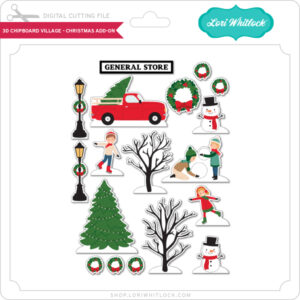
3D House Chipboard Village Christmas Add-On (SVG, Silhouette) Created using the print and cut feature of your cutter
I will be conducting a 2-part Chipboard Village class that will broadcast live from the Silhouette headquarters. The first session will be November 9th, 2021 at 11am (MT) and the second session will be November 16th, 2021,11AM (MT) These classes will mainly focus on the assembly of the village along with helpful hints and techniques. The classes are free, and open to all, but you do need to register to watch the live sessions. You will need to purchase the files to create the houses.
Class One – November 9th, 2021 11AM MT – REGISTER HERE
This class will cover the assembly of the 3D House Chipboard Village Church/School, 3D House Chipboard Village Cottage and the 3D House Chipboard Village Manor
Class Two – November 16th, 2021 11AM MT – REGISTER HERE
This class will cover the assembly of the 3D House Chipboard Village General Store, 3D House Chipboard Village Farmhouse, and the 3D House Chipboard Village Christmas Add-On
Unable to attend the classes? Both sessions will be added to Silhouette’s YouTube Channel within a couple of days of the live broadcast.
If you’re ready to join us, all you need to do is to download the files in your preferred format (links above). I’ve also listed some basic items I used to create the village as seen above including…
• 1 Package Silhouette Chipboard
• White spray paint
• Charcoal Acrylic Paint
• Adhesive (THIS one works well, too)
• Sticker Magnet Roll
• fairy lights or electric tea lights
• Patterned Paper (optional – I didn’t use any on these samples)
Of course you can use your imagination to create and embellish your chipboard house any way you desire. Because this house is made of 2 layers of chipboard, it’s nice and sturdy!
I hope that you are able to join us! Have a great day!