Summer Pinwheel

Hi:

Anita here with a fun and really easy tutorial to make this giant pinwheel.  It is part of a whole set of goodies that I made for my nieces to have a lemonade stand.  I used Lori’s Echo Park Collections called Celebrate Spring and Celebrate Easter.  The cut file that I used for the pinwheel is called 3D Double Pinwheel and you can find it here in Lori’s store and here in the Silhouette Design store.

Here is what the cut file looks like when you it open it in the Silhouette program.  You have to ungroup it as the pinwheels will only fit one to a page.

Here are the supplies that I used for the pinwheel.  You will need a hole punch that can go through the paper straw and a brad that has a long enough shank to make it through all the layers.  I used one of Lori’s Echo park I Love Christmas Decorative Brads.  I placed the sides of the paper that I wanted to see most of  facing up.  Two sided papers work beautifully with this project as you can see some of the other side when it is put together.

I used a paper straw and punched a small hole near the top of the straw.  Paper straws come in many different colors and look so cute with the pinwheel!

The first step in putting together your pinwheel is to put the brad through the two center pieces of the pinwheel.

You put it all together by pulling gently on the center piece that has the hole in it and pushing the brad through the hole.  Keep going until you have all the holes connected through the center brad.  Then push the brad through the straw.  Depending on how thick your paper is and how long your brad shank is you may have to fuss with this a bit.  I pushed it through with the assistance of my Tim Holtz pick and then bent the shank pieces down with a knife.

You can only see one tab of the brad but they are both there just underneath one another.  Turn the pinwheel over and you should be able to separate the two pieces to fan them out and show a bit more of the paper designs.

Here is a close up of the pinwheel.

I used a whole lot of Lori’s files to create this set and just love that huge pinwheel.  Have a great day and hope you have a chance to make something pretty today.

Hugs,

Anita


St. Patrick’s Day Card with Anita


Hi Everyone:

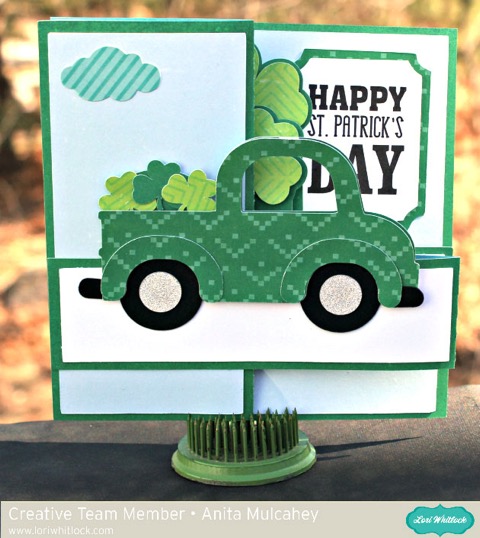
Anita here with a card that I just fell in love with.  These pop up box cards of Lori’s are so cute and so easy to put together.  You can find this file called Pop Up Box Card St. Patrick’s Truck here in Lori’s store and here in the Silhouette Store.  I made this for my son and daughter-in-law as he has and loves his truck.  I used several of Lori’s Echo Park Collections to complete my card.  I used Happiness is Homemade, Celebrate Easter, I Love Winter, Celebrate Spring and some cloud stickers from the Celebrate Spring collection and those adorable enamel dots from Celebrate Easter.

This is how the card looks half way open.  The dimension is so cool on these cards.

Here it is complexly flat.  Also, Lori has a wonderful, quick video tutorial on how to put these cards together on her YouTube Channel here.  Hope you have a great St. Patrick’s Day and be sure to check out all the fun cut files Lori has to celebrate the wearin’ O the Green.

Hugs,

Anita


Happiness is Homemade Gift Box with Anita

Anita here with a quick and easy tutorial to put together Lori’s Matchbox Drawer Card-Cooking.  You can find this cut file here in Lori’s store and here in the Silhouette Design Store. It is such a cute box and you can fit many little treats in it. It would be a great thank you gift for a good deed done.

First, cut the pieces of the box.  I cut one extra rectangle because I wanted my box top to use the lovely Happiness is Homemade collection from Echo Park Paper.  I also used one of the die cut cardstock pieces from the matching Ephemera kit. I love to bake so this line was made for me.

This piece is for the main box.  Fold it along the score lines and glue it together.  It is easiest to glue the tabs in place first and then glue down the ends as you will see in the photos below.

Here the completed box.

Fold the outer wrap for the box on the score lines and glue the tab to the end of the strip.


These are the pieces for the card top.

To make the tab,  fold a 3″ piece of ribbon in half and glue it between the two layers of paper when you glue the inner piece inside the card.

You can see where I put the Die Cut from the Happiness is Homemade Echo Park Collection by Lori.  It’s so cute.

Here is a view of the slide for the box.

And here we have the completed pieces.  This box went together very quickly and Lori has so many different designs for many occasions to choose from.  Lastly, you will embellish your box with the cute baking tools that are part of this cut file.  Hope you have a chance to get creative today.

Hugs,

Anita

Digital Inspiration with Ashley

Happy First Friday of February!  Hope you have fun plans for the month.  It’s Valentine’s Day this month.  The most beloved day to send hand-made cards and love notes.  I made up a quick card in Photoshop Elements with Lori’s files.


This is the entire preview.  I’ll print it out and fold it in half.

Files found from:

Kiss Me Collection

Valentine Script Brushes

I think there are many cards to be printed and made.  I can easily swap out the files to get another look like this:

So many possibilities.  Print a few and send them out to all that need a little Valentine’s cheer!


Snow, Sparkle and Shine Card with Anita

Anita here,  on this last Monday in January with an A2 Stacking Card Base Snowflake card (here in the Silhouette Store).  Isn’t it just so cute?    I used Lori’s Echo Park line called I Love Winter.  I love how sweet this collection is!    I used some of the  matching brads and a sticker from the collection to finish  my card.


I did not pop up my layers but you certainly could to give it some more depth and dimension.

That’s it for me today.  I hope that everyone has a great day and be sure to check out the A2 Stacking Base Card Snowflake as well as so many other wonderful designs when you visit Lori’s SVG Shop or the Silhouette Store.

Hugs,

Anita