Shaped Summer Cards

 Hi everyone!  I have a couple of quick cards to share with you today…they are a couple of older files from Lori, but I knew they would be perfect for her new collection from Echo Park.

Have A Great Summer

I used the 6×6 pad, sticker book, enamel dots, washi tape, and stick-on brads for these two cards.  I have always been a huge fan of Lori’s shaped cards, and I adore how these two turned out.  I know they will brighten someone’s day this week.

Thanks for stopping by!

Cathy

Hexagon Pop Up Beach Ball Card

 
You can find this card in a Hexagon Pop Up Bundle, or purchase it by itself. 
 
You can buy the single card here (Lori Whitlock, Silhouette)
 
 
Here is a tutorial for you today!
Here are some of the working parts glued together and ready to go.
This is the base piece. I creased all the fold lines.
You will add glue to the center of each section and then fold the piece upon itself, matching the two glued parts together.
This is what it will look like from the side.
This is what it will look from the top. There are 3 slots with the largest in the center.
You can insert the pieces numbered 1, 2 and 3 in order to get an idea of what this card will look like but you will need to take out #2 an #3 while dealing with #1-it’s just easier.
Glue the tab of #1 and glue it so it stands straight when folding the base upright.
Fold the first base section, being careful to make sure when you fold it flat, that it will flatten fully.
Here it is flattened. 
 
Insert #2 into the other side base section and glue it flat onto the  inside center piece.
Here I am inserting #3 piece. When you fold the second side up make sure your #3 piece is glued up straight and then glue the main side flap together, forming an open square on each side
It looks like this when you set it up. Take note of the little tabs on the bottom of each side.
Add glue to the front and back of each base piece. Here, you will align the long piece,  making sure to line up with the bottom of the box and going over  each little side tab. The tab on the long piece should secure in the back by adding glue to the last tab. Assure your card will easily flatten. As you stand the card up and push down on the outside frame, it will lock  those little side tabs sticking out into the outside frame.
Here you can see what the bottom looks like. Very neat and finished.
Side view. To re-flatten just push on the  inside and that will pop out the secured tabs. 
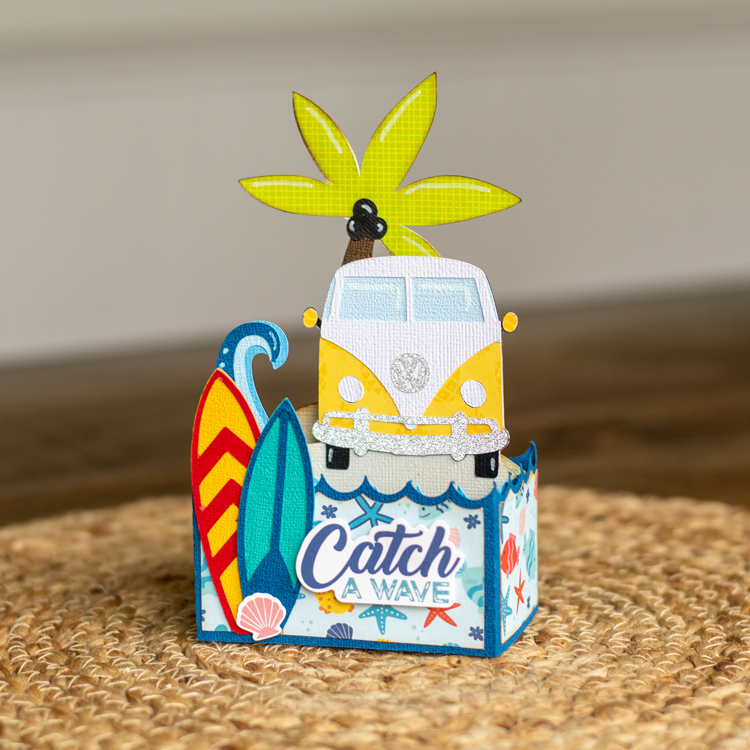
All finished! I just adore the little bluebird Lori added to the file!
 
I hope you enjoyed this card–the hexagon  cards really impress people when they pull it out of the envelope! 
 
💕Sue Kment


You’re So Cool – Island Hut Box Card Tutorial

Hello friends, Marcia here.

I have a tutorial for you today for this fun summer Island Hut Box Card (SVGSilhouette). I used solid pattern papers from the Here Comes The Sun, Bee Happy, and Pets collections. I love the beachy vibe of this card.

Box cards are actually much simpler to put together than you may think. Plus once you have done one, other cards will be so much simpler. Let me show you.

1. Pick out your colors and cut out all the pieces. I like using cardstock for my base as it is stronger than a pattern paper base. Lighter-weight pattern papers work better for the paper piecing layers that are added on top. Once I have all my pieces cut out, I like to ink the edges to add dimension.

2. Let’s do our card base first. Glue the door and windows on the front of the island hut as indicated in the photo below. Then adhere the two layers of grass roof, lining up the curve at the roof’s top.

3. Bend at the dotted lines to form a box. Glue the small tab to the back of the island hut’s front panel. Fold the card flat to ensure it will fold flat to fit in an envelope.

4. Let’s piece together the back panel next. Adhere the sun’s face to the black circle and then onto the sun rays. Glue this onto the card panel matching up the notches as best you can. Glue the palm tree trunk overlay to the palm tree trunk. Then adhere the palm tree’s trunk to the card base. Glue the palm tree leaves to the top of the palm tree and add the coconuts.

5. Bend the tabs of the back panel back and adhere to the card base lining up the edge of the tab to the back of the card base. After adhering both sides, ensure you can still fold the card flat.

6. The front panel is next. Adhere the orange beak piece to the black beak leaving the tip of the beak black. Glue the white eye on top of the black beak too. Adhere the beak in place on the parrot’s body. Glue the parrot’s wing in place. Adhere the parrot onto the card base. Glue the palm leaf on the card base too.

7. Bend the tabs of the front panel forward and adhere to the card base lining up the edge of the tab to the front of the card base. After adhering both sides, ensure you can still fold the card flat.

8.  Add embellishments if you want. I added the You’re so Cool! die cut ephemera piece from the Here Comes The Sun Frames and Tags ephemera pack and added a puffy flower sticker.

I hope you give assembling one a try. Thanks so much for stopping by.
~Marcia

Surfing Van Box Card

Hi Everyone! For my project today I made the Surfing Van Box Card, (SVG, Silhouette). I used some patterned paper and stickers from Echo Park’s Endless Summer designed by Lori which was absolutely perfect for this card. These box cards are so simple to put together and definitely a favorite for those who receive them. This one is great for someone who is going on vacation or just spending a special day at the beach!

For help putting this together, there is a general assembly for shaped box cards here.  Thanks for stopping by and have a wonderful day!