Check out what’s coming this week! Aren’t these the cutest TicTac’s® ever! What a fun way to package a little gift this holiday season!
Watch for the cutting files THIS WEEK in my Silhouette Online Shop and my SVG shop! I used the DCWV Jolly Whimsy Stack and the DCWV Holiday Glitzy Glitter Stack for these projects!
We have a few new things at JessicaSprague this week. First is this awesome NEW Silhouette Class we’ve been working on….
check out what our team member Mendi has created with files from this class.
This is a beautifully designed mini album. There are a few different cover options so you can make it for many occasions including December Daily, Month at a Glance or move outside the box and do your own thing. This class also includes exclusive files and a free font with your purchase. From now until Nov 29 you can purchase this class for $26.25. After that date it will return to regular price, $35.00
Don’t forget, Lori is giving away a spot in this class, AND the paper pack we used AND a Cameo! Be sure to enter here if you haven’t yet.
This weekend we also have an adorable December Daily Kit. It is labeled as 2013 only as a reference tool. There is nothing in this kit limiting the use of the cards. You can pick it up this weekend for 25% OFF. What a deal! This price is good through SUNDAY; Check out the adorable samples from our Creative Team. I was blown away.
I’m so excited to be sharing one of my all time favorite ways to use Lori’s adorable cutting files: Shaped Cards!!!
There are so many different ways to approach shaped cards. For my first card I took Lori’s Santa Tote and cut off the flaps that formed the box and removed the hole in his hat (which formed the handle) to transform it into a cute card instead.
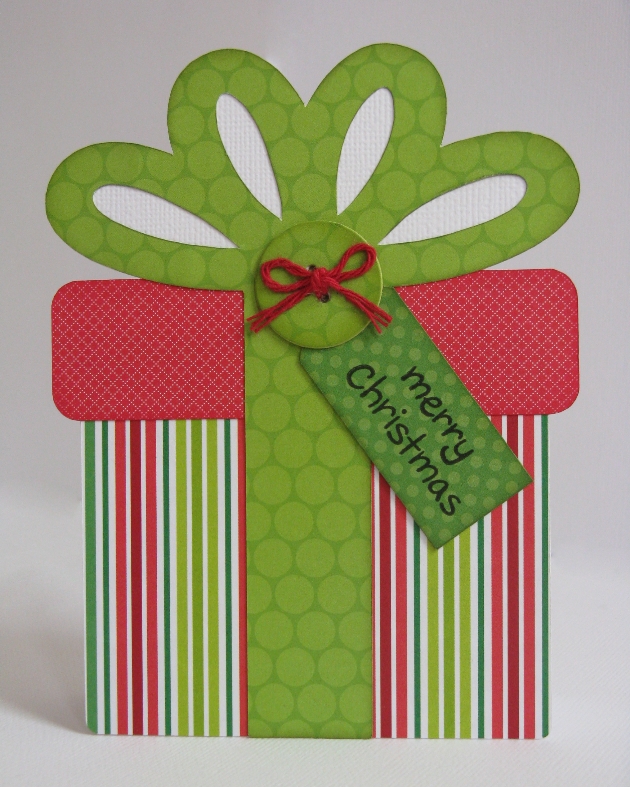
For my second card I used Lori’s Present cutting file into a card, pairing it with her button cutting file to form the knot on the bow. I also elongated the bow and bottom portion of the gift to so that the overall dimensions of the card would be 4.25 x 5.5 inches to perfectly fill an A2 sized envelope. To form my card base I cut 2 of the overall outline of the gift from white cardstock by welding all the shapes together.
For my snowman card I transformed another one of Lori’s treat box using the 3D Snowman Tote cutting file. Once again I removed the circle handle in the top and instead cut a bigger circle to form a pom-pom for my snowman’s hat. Rather than cutting two to form my card base, I mirrored my base shape and overlapped the two ever so slightly and welded them together, using a bone folder to create my crease and fold the card after cutting. To give a little shine to the eyes and mouth, I added glossy accents.
For my Nativity card I cut two of my background shape from the blue cardstock to form my card base and scored the back piece along the top so that my score line was parallel to the bottom of the card. Martha Stewart’s Score Board is an awesome tool for this. I then just added adhesive above the score line and adhered it to the other card base piece.
I printed my sentiment on the computer using iridescent gold paper and popped the top portion up with foam tape. I finished off my card with random dots of Stickles “stardust” glitter glue to give the look of a star filled sky.
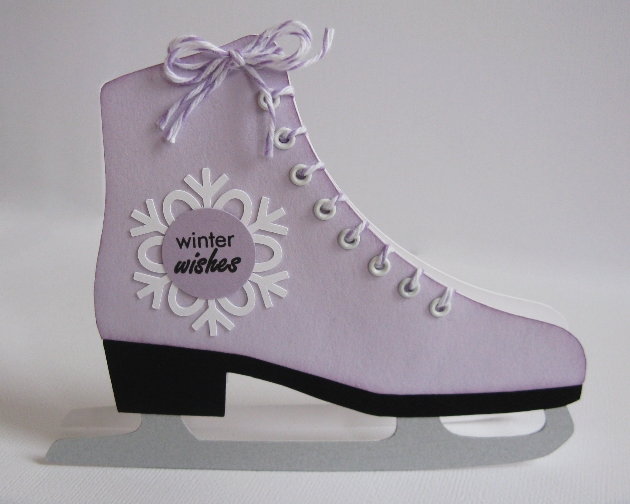
This last card is a favorite of mine using Lori’s Ice Skate diecut from her Christmas Winter Set (available in the Silhouette store). To create my card base I used the same method as I did on my nativity card. To give my skate a more realistic look I also chose to cut the blade from iridescent silver paper.
I had so much fun embellishing the skate! I chose to discard the curly cutout for the laces and instead used my We R Memory Keepers Crop-A-Dile to set a row of eyelets along the edge. I then ran bakers twine through them and added a bow to the top. To ground my sentiment I slipped one of Lori’s snowflakes behind a basic circle.
If you’re like me I do better with a visual example so I’ve created a video tutorial showcasing a couple different techniques I’ve utilized to create my shaped card bases. 🙂
Just to recap, today I’ve used the following cutting files designed by Lori which are available to purchase in her shop:
I have a dream package GIVEAWAY for you today! I’m super excited about sharing this with you!! One lucky winner will be taking home an AMAZING package including the following:
If you do the math that’s a $349 prize package! Now that’s enough to make anyone SQUEAL!! What a way to start the holidays! Are you interested? Just ENTER TO WIN through the Rafflecopter form below. You can enter in a variety of ways. Be sure to enter by November 27 at midnight. The WINNER will be announced on November 28. GOOD LUCK!!
It’s Wednesday again that means TODAY ONLY you can snag two digital kits for an amazing deal… TODAY for JUST $1 you can grab this awesome set: School Days Collection. This kit is regularly priced at $5.99 and TODAY ONLY it’s just $1!
SCHOOL DAYS COLLECTION
And, you can get the following awesome product for HALF OFF, Layout Template 2, making it $1.75
LAYOUT TEMPLATE 2
While you are at jessicasprague.com getting your kits, be sure to check out the samples made with each of these kits at the bottom of each listing.
Aren’t you excited about Lori’s new class? Would you like to WIN a Cameo and a FREE seat in the class? Jessica is doing a fabulous GIVEAWAY a right now. Get details and go ENTER TO WIN at create.jessicasprague.com