Customizing a Shape Using the Knife Tool with Kathy

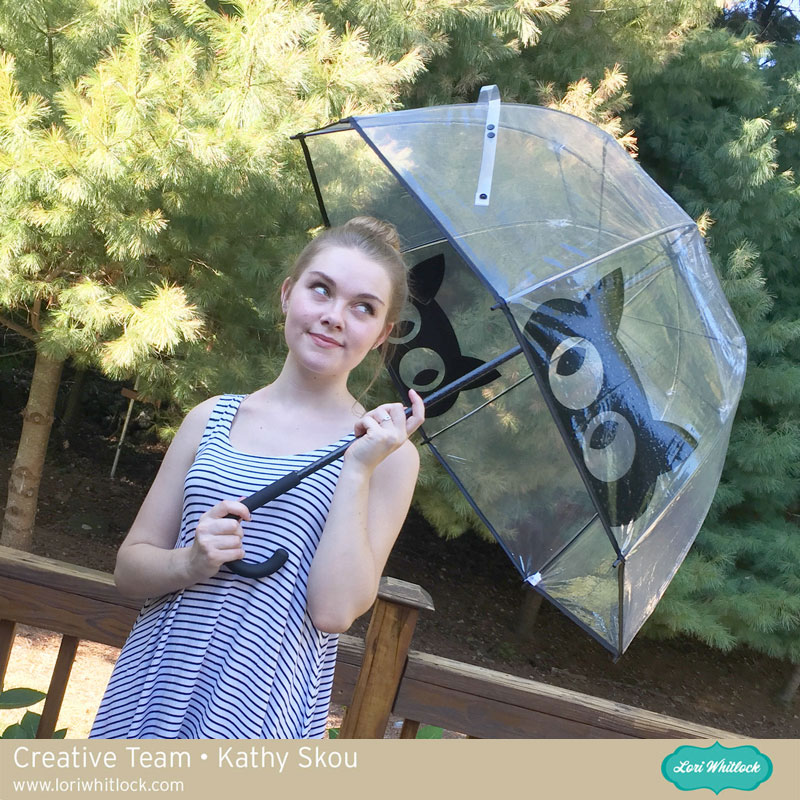
Hi Everyone, it’s Kathy today with a tutorial to show you how to use the knife tool to customize a shape for your project.  I have to start this tutorial with a confession.  I am a crazy cat lady.  I saw a similar item to my project on Pinterest, wanted to purchase it only to find that it was only sold in the UK and it was sold out.  I was determined to have it so I came up with a way to make it myself… take a peek…

How cute is this??  Luckily my daughter was happy to be my model!  This was really pretty easy to do… I started by loading Lori’s Black Cat Design into Silhouette Studio.

 I clicked on the knife tool on the left side tool bar. Using the tool I drew a line across the design where I wanted to cut it.

You can see that the line I created divided the cat, leaving the top half of the face as a stand alone design.

I deleted the portions of the design I didn’t want, then resized the top of the cat’s head to fit my umbrella panel.  I changed my cut settings to vinyl and cut my design.

You can cut vinyl without using a mat, but I usually use my mat so that I can use smaller pieces of the vinyl.  I cut out the cat face, then weeded out the pieces I didn’t want.

Next, I applied the transfer paper to my design and made sure it was down well, eliminating air bubbles using my scraper tool.

I peeled the transfer paper off, bringing the design with it.  The transfer paper makes it easy to apply the vinyl design all at once, exactly where you want it.  I applied it to my umbrella, using my scraper again to eliminate air bubbles, then peeled off the transfer paper, leaving just the design.

And voila!  A crazy cat lady umbrella!

That’s it for me today, thanks for stopping by to peek!

Tuesday Freebie

TODAY & TOMORROW, this SVG file is FREE with any $1.99 purchase!

We have a FREE file with purchase today + tomorrow! Simply add this absolutely adorable Gift Card Holder Apple to your shopping cart along with ANY $1.99+ purchase from the SVG Shop and this file is yours FREE. Be sure to use Coupon Code: APPLEGIFT (case sensitive) at checkout. Hurry! This offer is good until Wednesday at midnight!

(Your cart must reach at least $3.98 before the coupon will be applied and then $1.99 will be subtracted from your total at checkout. The files will be available for immediate download after you pay for your order by visiting the “downloads” section inside of your account.)  

09-22-15-LW-Gift-Card-Holder-Apple

Due to travel and airing on HSN last night, we were unable to post new files for the week. If you’re interested in playing around with the brand NEW Silhouette Curio, you can buy it through HSN.com with flex pay and it includes a $25 download card. So, it’s the best deal out there. I’m attaching a few photos from the set last night. It was my first airing on TV AND it was LIVE TV!! What a way to be initiated! If you missed it I’ll be doing it again on October 7.

I’ll try to post a review and give you a little more about the Silhouette Curio so you can decide if it’s for you. The main thing you have to remember is that it’s not meant to replace the CAMEO. It’s more of a specialty hobby machine.

Thanks for visiting the blog today! Be sure to go pick up your FREE with purchase file today. Please let us know if you need any help with your files. We want to make sure everyone is happy with their purchase. Have a great week!

Watch HSN Today + The Story of Fall

First off, I wanted to let everyone know that I’ll be on HSN tonight (Monday, September 21) between 7:00 pm-9:00 pm talking about the new Silhouette Curio! If you’ve been wanting a Curio, this is your chance to pick one up at a great price with FREE shipping and Flex Pay.

Next up, Cathy is here today to show us a gorgeous project….

Hi everyone!  Cathy here with you today sharing a layout with the gorgeous new Lori Whitlock collection from Echo Park, The Story of Fall.  I had so much fun the other day taking some Fall pictures of our little grand baby and I knew that I wanted to scrap these precious photos with the collection.  If you look closely at the photo, can see she is holding a matching headband to her tutu.    The look of her face is one she gives me often…like really Grandma?, I hate these and refuse to wear this!

Man, I love that face though.

The Story of Fall has so many fun prints and just tons of embellishments.  I used the enamel dots, the ephemera pack, acorn and leaves washi tape, chipboard along with the collection pack.  Plus, check out those hearts, they are all embossed with the Falling Leaves embossing folder from the collection.  I was inspired by a sketch from Paper Issues that you can see here.  It was perfect for using the journaling cards in this collection.

The thankful, hearts and arrows are from Lori’s SVG file… There is Always Something to be Thankful For.  I love how versatile Lori’s files are, I simply sized the thankful  to what I needed and then re sized the hearts and arrow for embellishing my page.  Perfect!

Thanks for joining us today, we can’t wait to see what you create with The Story of Fall!

Mini Album with Gusset Tutorial with Corri

Hi everyone!   Corri here today to show you how to assemble the 5×5 Mini Album with Gusset Pages.  This is such a cute mini album and it’s pretty easy to put together.

First, cut out all the pages and the cover panels.  Once you have them all glued together, this is what you will have.

Next, cut 3 long pieces of twine…about 18 inches long.  I cut mine long just to make sure I had enough.

Thread one piece of twine through one of the top and bottom holes of your cover.

Repeat this step with all all three pieces of twine.


Next, thread one piece of twine through the holes in one of the pages and tie in a knot.

Repeat with all three pages.

Here’s out it looks on the outside.  I love it! I used the new Story of Family Collection that Lori designed for Echo Park.

This little album is so cute and would make a great brag book for Grandma!  Be sure to stop by the shop to see all the new files.  There are several new mini albums.

Changing a File to Fit the Season

Hi everyone – it’s Tya here to share with you a simple tutorial on how to utilize your cut files to fit any season!

 Some of the files that I have downloaded come with specific accents that fit a certain occasion.  For instance I bought these 2 files to use for some Valentines Day projects I had in mind back in February – but with a simple switch of the accents – you can use files that are supposed to be used for a certain holiday any time of the year.

Let me show you how I did these-

First the tall gable box-

I opened up the box and found a leaf shape that I liked that I wanted to substitute.

 I ungrouped the file and separated the heart from the box. I resized the leaf to be about the same size as the heart. I then placed the leaf in the center of the box and then grouped the box and the leaf shape all together.

 Here is the box with the leaf shape in the center instead of the heart. Just right for a little box of fall treats to give to a friend.


The steps are the same with this cute box. The original box had 3 hearts on the lid. I used the same leaf shape.

 Ungroup the hearts from the box, resize the leaf to be the same size as the hearts

 Add the leaf shapes to the box and then group the leaf shapes to the box. Cut out as normal.

Here are the files that I used to make these projects:

-Tall Heart Gable Box (LW Shop) (Silhouette)

-No Glue Box Hearts (LW Shop) (Silhouette)

-3 Fall Leaf Set (LW Shop) (Silhouette)

That’s all there is to it! I hope that I have inspired you to stretch your cut files to fit any occasion. The Silhouette machine makes it so easy to customize your cut files. One of the reasons I love my Silhouette so much – I can make it fit to whatever I want to design with a few simple modifications. Thanks for stopping by! Happy Crafting!