Happy New Year! Now that we’ve said goodbye to 2018, it’s time for me, Michelle, to start my 2019 Valentine crafts. Today I would like to share a tutorial for one of Lori’s Mini Mailboxes. It’s a classic! You can find the SVG files at the Silhouette Design Store, or at the Lori Whitlock SVG Shop.

The file is adorable and so easy to put together. It would be great as a treat box or a fun place for children to leave little notes. It would be a fun snow day activity too. The possibilities are endless, so let’s get started!

First, cut out your pieces. I used the Lori Whitlock I HEART CRAFTING line by Echo Park Paper. It’s not Valentine or Love themed paper, but the pinks and reds are perfect for both! Tip: It’s easier to glue down your embellishments while it is still flat. The paper will curve easier if you use a dry adhesive, like a tape runner or double sided tape for your embellishments.

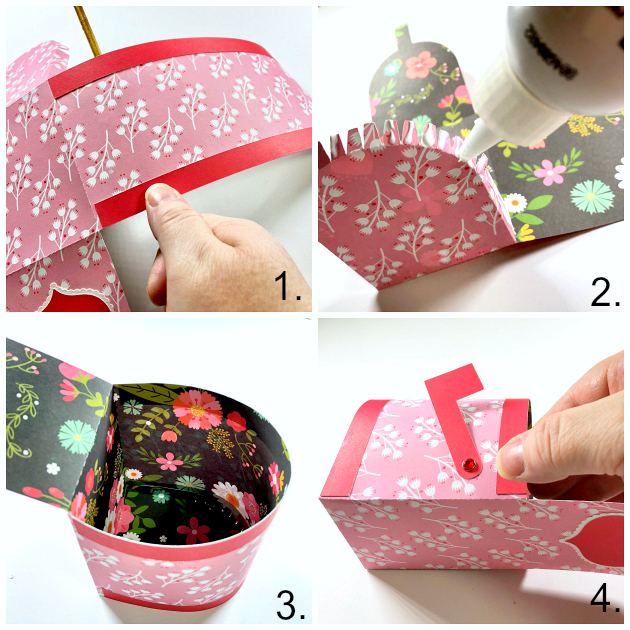
Here are the steps to assemble the mailbox:
- Using a kitchen skewer or dowel rod, gentle train the paper to curve as shown.
- Fold all glue tabs inwards and apply adhesive. I used a quick dry liquid glue.
- Turn the box on its end and place your hand inside to push down against the table. This will give you a flat surface to push against and make sure that the glue tabs are all attached to the inside.
- Attach the mailbox flag to the base with a brad. Tip: Using a brad will allow the flag to move, but if you don’t have any, it will still be cute! Try gluing a button for another fun look!
The cute little postage stamps shown in the photo are also from Lori’s SVG files. You can find them at the Lori Whitlock SVG Shop, or at the Silhouette Design Store. The other decorative elements I cut from some of Lori’s other various files.

The little pull tab at the top allows the mailbox to open easily. Especially for little fingers!

Thanks for visiting today. Happy Crafting!
Love,
