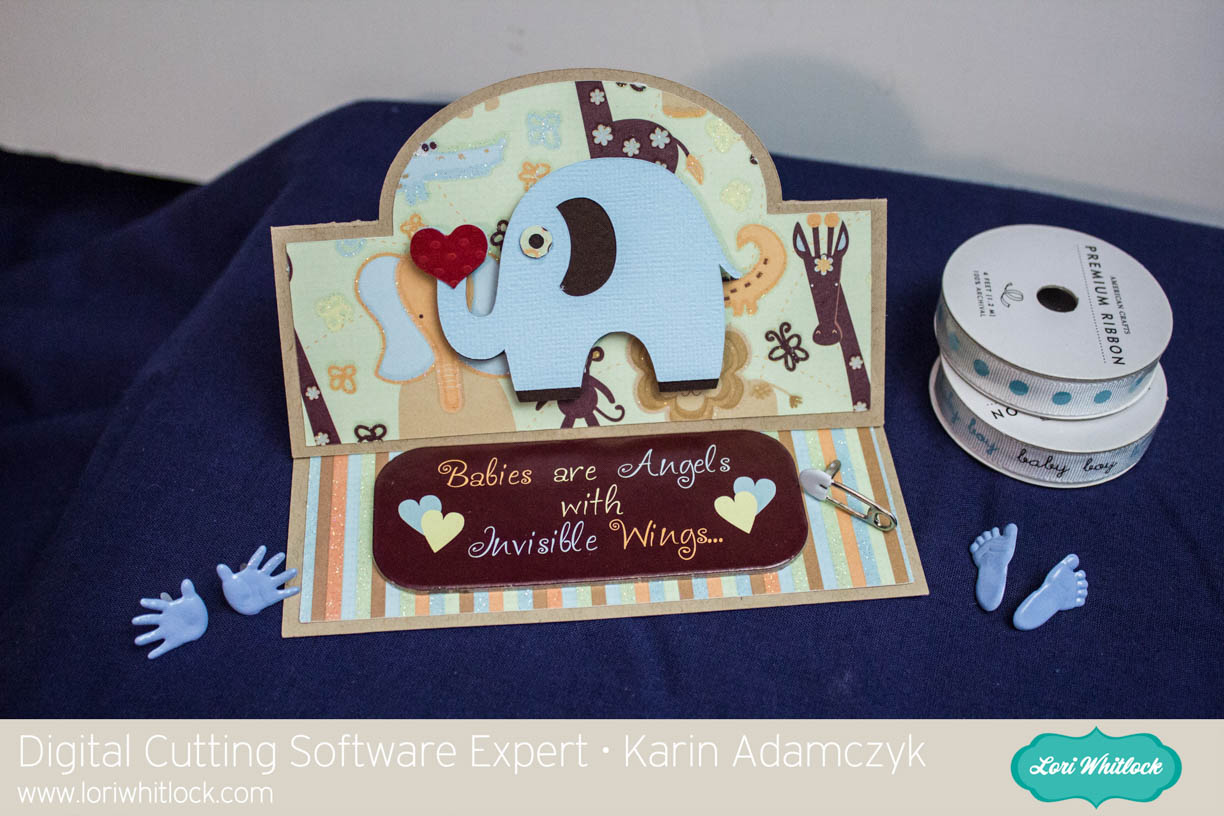
Cricut Explore Scoring Tutorial with Karin

20160205-_MG_5104-Edit

Hi everyone! It’s Karin and today I’m going to show you how to make an easel card in Design Space using Lori Whitlock’s baby elephant easel card design from her SVG Shop. In the tutorial, I will teach you how to change the usual perforated score lines you have in SVG files to the special score lines that Design Space uses. Also, I have some really good news about that — they have improved the scoring function of the machine by having the scoring stylus pass over all score lines twice. This now creates a really nice, deep score line. Wait till you see it in the video.

If you could see my office/studio/craft room, you would know that I really need to use up my stash. I have ridiculous amounts of patterned paper so that is exactly what I’m doing today.

The patterned paper I’m using today is from a Best Creations collection named Safari Boy. I did a quick search and found that you can find some pieces of it on eBay and Amazon, but not much. I’m sorry if you are hoping to find this paper, but I think we can all stand to use something from our stash (wink wink).

The blue card stock I’m using is from American Crafts Tropicals collection. The brown papers are Recollections brand from Michaels. All of these papers cut beautifully in the Cricut Explore.

In addition to teaching you how to upload and cut the pieces for this card, I will teach you how to change the perforated scoring lines to the Design Space scoring lines that are scored with the scoring stylus.

The video below takes you through all these steps.

For information on the products I used in this project, please visit my blog.


Personalized Valentine Stickers by Tya

Hi friends – It’s Tya and today I am sharing with you a tutorial on how to custom make your very own Valentines Day Stickers! Recently Lori came out with a few darling sets of Print and Cut Valentines with the cutest icons on them. So I thought it would be fun to make some matching stickers with the same icons on them and add a little personal touch to them by saying who they were from as well!

 Let me show you the steps on how I did this!

First off gather your supplies – I used some Double Dot papers from Bo Bunny for my enevelopes, some Silhouette White Sticker paper and some buttons for decor.

First step-

Pull up the files in the the Silhouette Software – I used the Butterfly and Heart Valentine file for my project.

Using the Print and Cut feature – I printed out my cards.

Next I ungrouped the images until I got the Butterfly and Heart Image all by themselves.

Now I want to draw a circle around the shapes to make the outside of the sticker, so I took the Ellipse tool and made a 3 inch circle around both shapes.

Next, I typed out my sentiment using the Type Tool – I used the LW Simple Dot Font. I added the sentiment onto the shapes.

 Next , using the Ellipse Tool again, I drew a 2 .75 inch circle.Drag that circle into the larger circle and center. Using the Line Style Tool, changed the line from solid to dashed to make it look like it was a sewn edge. You don’t necessarily have to do this step but I thought it was fun. 🙂 Now go ahead and duplicate the shapes to fill your sticker sheet.

Next we need to make sure that the only lines that the Silhouette is going to cut is the outer line as shown, so go to the Cut Settings tab and make sure you click on every part of the sticker and make sure that the inside shape, sentiment and dotted line circle do not get cut by clicking No Cut. Then select the outer line and select cut edge. This way the only line that will get cut is the very outer edge.

Now we are ready to print the sticker sheet out. Load the sticker paper into the printer. Add registration marks and select the “White Sticker Paper” setting on the Silhouette and then print it out. The settings that are preset for this type of paper are perfect. Here is the paper all printed and ready to cut.

And here are the stickers when then have been cut out.

Next , using pattern paper cut out the envelopes.

Now you are ready to decorate your envelopes with the stickers. I added some fun buttons and twine to fancy them up a bit.

That’s all there is to it! If you are tired of boring, store bought Valentines cards, give these cute cards and stickers a try. This would be so fun to let your kids help with the decorating of the envelopes. Thanks for stopping by! Happy crafting!

Do You Want to Build a Box Card?

20160126-_MG_5092

For my first project as a member of Lori Whitlock’s incredibly talented creative team, I am going to walk you through making a box card using the brand new All Occasion Box Cards Cricut cartridge.

In the video tutorial below, I am going to cover importing digital papers for use as patterns on cutting files, importing digital elements to be used as design elements that will be printed and cut out, and sizing box cards using two methods.

Below are closeups of the box card that show the papers and elements used.

20160126-IMG_5095-Edit

20160126-IMG_5093-Edit-2

The papers and elements I used in this project are from Lori’s Be My Valentine digital collection.

LW_Be_My_Valentine_Elements_PREVIEW__39850.1421453867.450.450 LW_Be_My_Valentine_Paper_PREVIEW__93466.1421453474.450.450

The video below is a step-by-step tutorial on how I put this card together in Cricut Design Space and cut all the elements with my Gold Explore Air available on HSN.

You can see the document with sizes for all of the box cards HERE.

List of products used:

Note that this blog post contains affiliate links. 

Please subscribe to my YouTube channel and follow my blog.

Thanks so much for watching!

NEW Silhouette Class with Craftsy!

You’re the first to hear this exciting news… Today I get to announce that my new, on-line Silhouette class with Craftsy, The Next Steps in Silhouette Studio is now live and available for registration!!!! I’m so excited about this class!


My class is designed to enhance your Silhouette Studio skills by teaching you not only the basics of cutting, but how to create custom designs, how to use your software tools to modify images, make you own cut files and more!  Topics include:   File types for Silhouette Studio, Using Pattern Fills and Tracing, Working with Complex Files, Drawing Tools, Advanced File Edits, Fonts, and Specialty Materials.  After taking my class, you’ll have the confidence to go beyond the basics and get the most from your Silhouette! Here’s the intro video that will tell you a little more:

The cool thing is with a Craftsy online class you can take it as many times as you want, whenever you want and access never expires. The cost of the class is regularly $29.99 BUT with THIS link you can get it 50% OFF!  This includes:  Six video lessons with anytime, anywhere access; Class materials including a supply list, keyboard shortcuts guide and cutting files; Answers to your questions by me in the virtual classroom.  Ready to enroll?  Click HERE to come join us!

Last week we held a contest to WIN a spot in my brand NEW Next Steps in Silhouette Class, and the winner is… Sonya Mullis!!  Congratulations Sonya, look for an email from me with instructions on how to access your free class!

I can’t wait to see you all there! Be sure to go REGISTER!

XOXO Scalloped Rosette Banner with Kathy

Hi Everyone, it’s Kathy today with a tutorial on how to piece together Lori’s new XOXO Scalloped Rosette Banner.  I loved this banner the moment I saw it and wanted to create it for my front door!

I started by cutting 4 of each of the banner back pieces, and one set of X’s and O’s.

I like to add a little dimension to my projects so I adhered the two background triangles together using some foam tape.

Next, I started making the rosettes.  Rosettes are not hard, they just take a little patience.  I fan-folded the rosette strips using the score lines as my guide.

I then attached the two ends of each strip using some liquid adhesive.  I use a quick drying adhesive when making rosettes, it gives you a little wiggle room if you make a mistake (unlike hot glue) and it holds well without taking forever to dry.

To make the rosette, add some liquid adhesive to one of the small circles.  Place the glued, fan-folded strip over the circle (make sure the scalloped edges are on the bottom) and press the top of the glued, fan folded strip towards the center and down.

You may need to play with it a little to get it to be the shape you want.  This is where the patience comes in… you need to hold it down for a little until the glue is dry enough to hold.

Once it is dry enough, put the larger circle on the front of the rosette, let dry.

All that is left is to assemble each of your banner pieces.  I glued the completed rosettes onto the banner pieces, and then added the XOXO letters to each piece using foam tape for more dimension.

I tied my pieces together using some Chunky twine and it’s all ready to go on my door!

That’s it for me today.  Don’t forget that Lori is  having a sale in her SVG shop this week!  Use code JAN2016 and get 30% off your entire order! It’s perfect timing to stock up on Valentine’s Day goodies!


Have a great day!