St. Patrick’s Day House Box

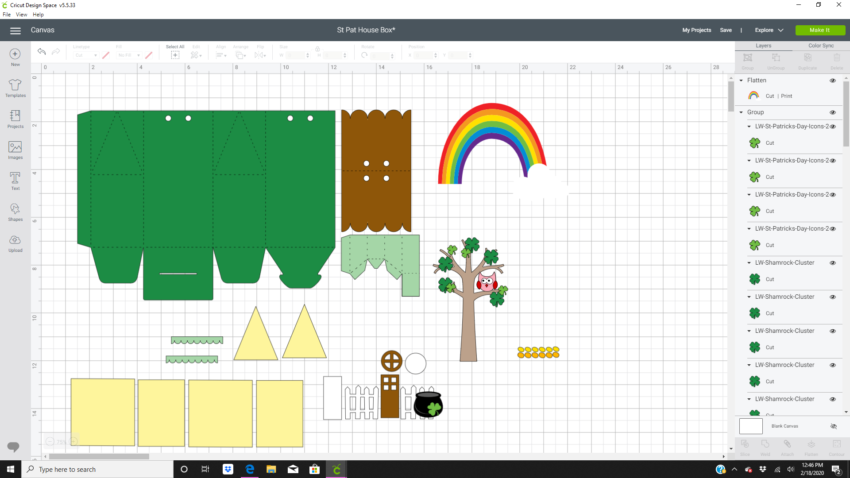
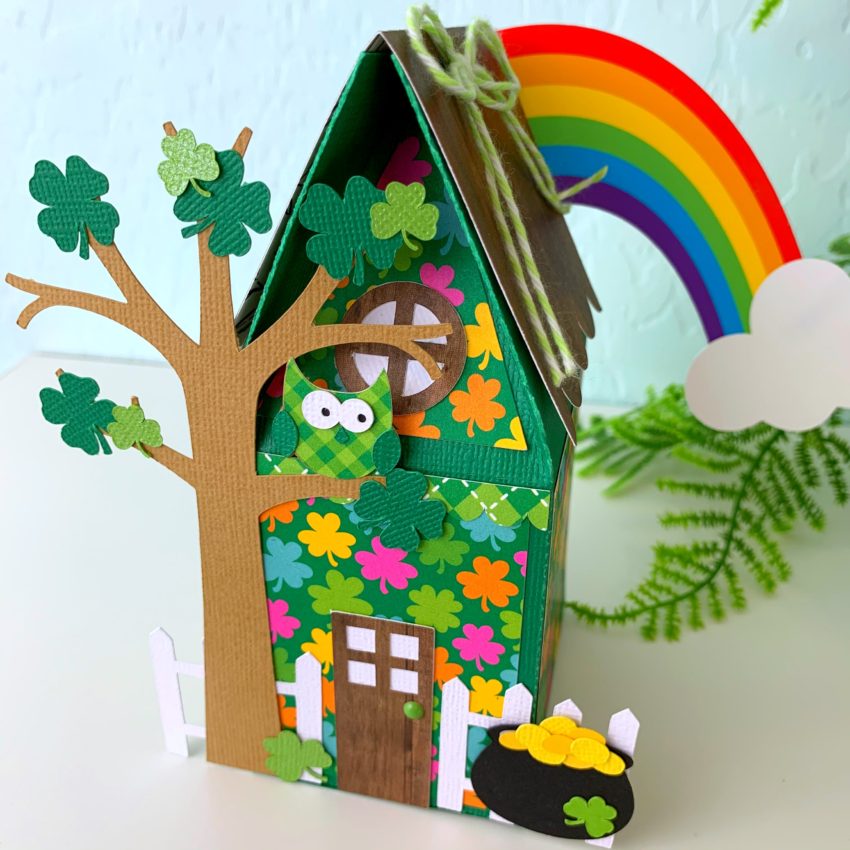
Hi there friends! Brandie here with an alternate theme for the Valentine House Box. (SVG, Silhouette) Thi little house comes in a Spring, Halloween, and Christmas version but I wanted a St Patrick’s Day house.  To get this theme I also used the St Patrick’s Day Icons (SVG, Silhouette) and the Shamrock Cluster (SVG, Silhouette).

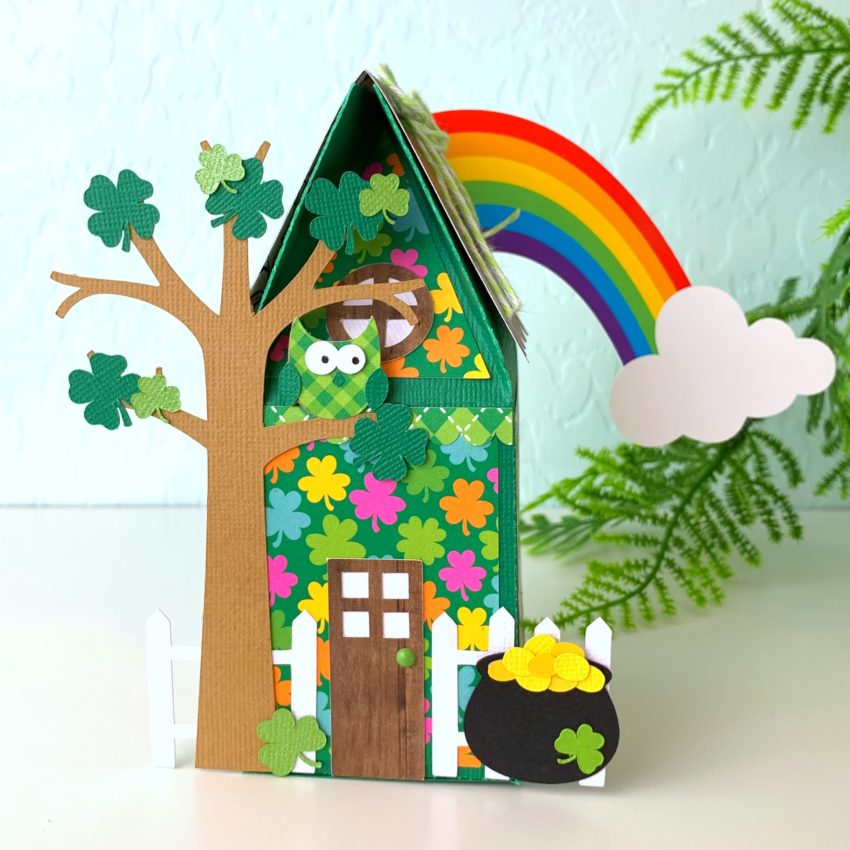
Once I had everything uploaded into Design Space I went to work deleting the images I wouldn’t be needing. The hearts, mailbox, and banner. I also only used two of the shamrocks and rainbow/pot of gold images.

I then resized the tree to 3.141 inches wide by 5.183 inches high. I flattened the rainbow and cloud together and resized it to 5.5 inches wide by 4.158 inches high. The pot of gold is 1.216 wide by 1.084 high. The gold coins are 1.739 inches wide by .479 high.  I also color coordinated the images to the papers I would be using.

There is already a great tutorial on how to assemble this box that you can find here. The only things I changed was to glue the tree up front and to glue the rainbow to the back of the house.

I love how easy it to alter this  house box. I think it would be cute with a beach theme, an Easter theme, and Fall theme too. If you go to Lori store and search icons the possibilities are endless.

Thanks for stopping by today!

Brandie

Explosion Box 4 Gift Boxes Tutorial

I’m so happy to formally introduce you to our newest Creative Team member, Michelle Starcher!  Michelle is an educator and a crafter who comes to us from the great state of Texas!  She has a keen eye for coordinating patterns and designing!  We are excited to see what she brings to the Lori Whitlock Team!  You can find Michelle on her blog the Bookish Designer, Facebook, Instagram, and YouTube.

Hello, my crafty friends! Michelle Starcher here today to walk you through the steps to create Lori’s Explosion Box 4 Gift Boxes (SVG, Silhouette).  In this photo tutorial, I will break down the steps to create this fun project.  I created this explosion box for Valentine’s Day, but this project is so versatile.  You can use it for any occasion!

To build Explosion Box 4 Gift Boxes, follow these steps…

Start by cutting and folding all the pieces.  Make sure you cut 4 each of the inside box pieces and the outside cover panels.  I used double-sided patterned paper for this, so that I could mix and match my inside boxes.

Next, adhere the outside cover panels to the large cross. This will create the base for your explosion box.  (I inked the edges of my cover panels before adding adhesive.  This creates a little texture to the project.)  You will repeat this same process for the lid of the box.


Your next step is to build the 4 boxes that will go inside the explosion box. Since I used double-sided paper, my boxes had a different pattern on the lid and the bottom of the box.  This allowed me to have 4 different looks for my inside boxes.  Of course, you can stick with one pattern or color for your inside boxes.  Either way, the explosion box looks great!

Once all of your boxes are assembled, you are going to adhere them to the inside of the bottom base. For this particular explosion box, you will want the inside boxes to be flush against the right edge of the bottom base. (As I added each box, I folded up the sides of the bottom base to make sure the inside boxes were in alignment.)

The final step is to decorate the box as desired.

I love adding extra dimension to my projects, so I used pop-dots to give some of the elements a little more height.   I had to be careful when adding pop-dots to the elements inside the explosion box to make sure they didn’t interfere with closing the box.  If you decide to add extra dimension to your project, just be sure to keep the extra height in the center of the inside boxes.

I hope that you’ve enjoyed this tutorial as much as I have.  The Explosion Box 4 Gift Boxes will make a great addition to your SVG library. Happy crafting!

Surprise Window Cards and 30% Off All SVG Files!

Have you seen the new Surprise Window Cards in my SVG shop and the Silhouette Store?  These fun cards make quite the impact and they are 30% off this week when you use code FEB2020 at checkout!  Take a peek…

When closed the Surprise Window Cards have cute pictures and sentiments, then pull the tabs and voila! A surprise inside!

There are 9 different versions of these cards currently available and they come with an envelope cut file so they are mail ready!

Surprise Window Card Valentine Typewriter (SVG, Silhouette)
Surprise Window Card Birthday Cake (SVG, Silhouette)
Surprise Window Card Valentine Rocket(SVG, Silhouette)
Surprise Window Card Valentine Mailbox (SVG, Silhouette)
Surprise Window Card Valentine Llama (SVG, Silhouette)
Surprise Window Card Valentine Donut (SVG, Silhouette)
Surprise Window Card Valentine Cat (SVG, Silhouette)
Surprise Window Card Hot Air Balloon (SVG, Silhouette)
Surprise Window Card Birthday Balloon(SVG, Silhouette)

I have an assembly tutorial on my YouTube Channel here.


And don’t forget, all SVGs, Fonts and Commercial Licenses are 30% off through Saturday, February 15th when you use code FEB2020 at checkout!

Have a great day!

State Heart Dingbat Tutorial

Today I’m going to show you a fun way to use Lori’s State Dingbat Font (Silhouette Store) for a baby body suit.  Start by opening Silhouette Studio and typing a letter using the font.  Most of the States will be their first letter, either lowercase or capital.

You can see in the above image the state of Utah on the mat, in the font the states and hearts have a double line.  To delete this select your state, right mouse click and then select ungroup, and then release compound path.  Now you can delete one of the outlines of the state and heart.

Now resize for the project.  I made the heart a little bit smaller for my project.  For my words  I used another of Lori’s fonts–Longhand, Silhouette Store.  I typed the words “made in” and welded them together and resized.  The design is ready to cut.

Since I used Heat Transfer Vinyl,I cut the mirror image and then applied it to the bodysuit.


This is such a fun personalized gift to give new babies. Enjoy!

Box Card Valentine Camera

Hi everyone!  Corri here today sharing one of the new Valentine’s Day box cards.   I love cameras so I was super excited to see this new Box Card BoValentine Camera (Silhouette, SVG) in the shop this week.

When you cut the file you will end up with these pieces:

Once you have everything cut, glue all the pieces to form the the “layers” of the camera.  Next form the box by folding on the score lines, applying glue to the tabs and forming the box.

Apply glue to the tabs on the layers with hearts slide into camera “box” towards the back and press tabs to sides to glue into place.

Add the insert with the camera viewer in the center in the same manner then add the circle heart insert towards the front.

This little camera is so cute and folds flat for mailing!  Be sure to stop by the shop to see all the other new box cards!


Thanks for stopping by!