Box Card Crayon Back to School Tutorial

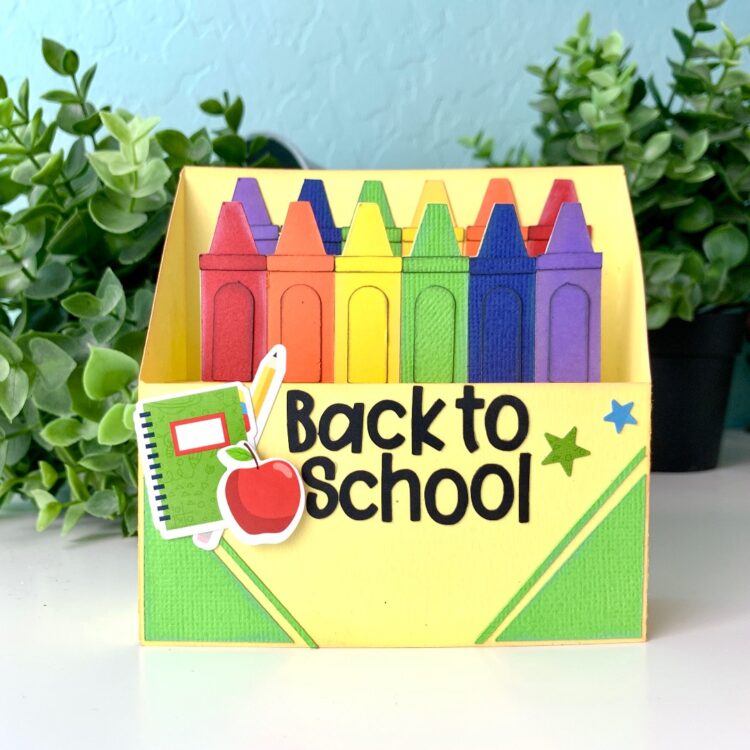
Hi there! Are your kids already headed back to school? Mine starts next week and I have nieces and nephews who have already started. Crazy. With school starting soon we also have “meet the teacher night” and I like to give a card to our new teacher. This year I made the Box Card Crayon Back to School (SVG,) card. Here is how I made it.

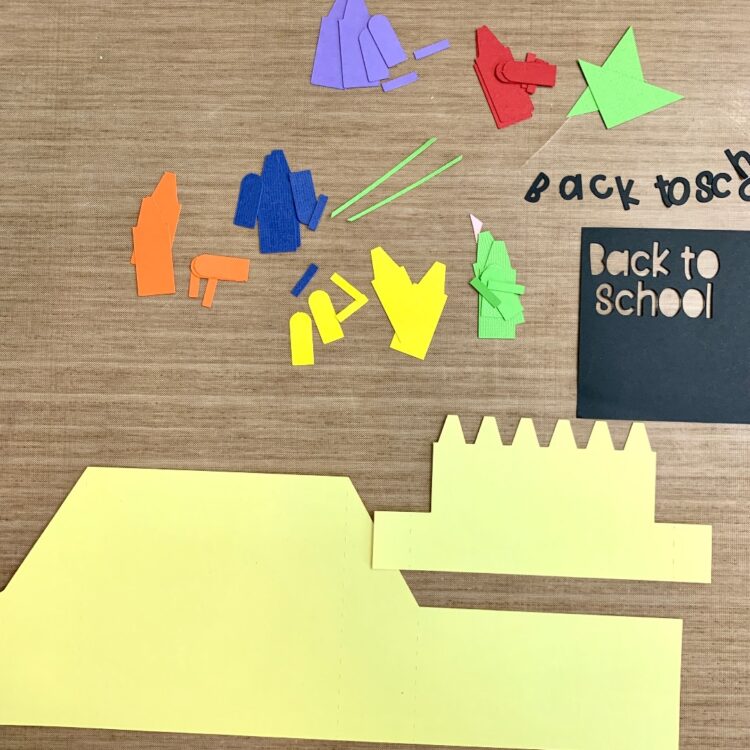
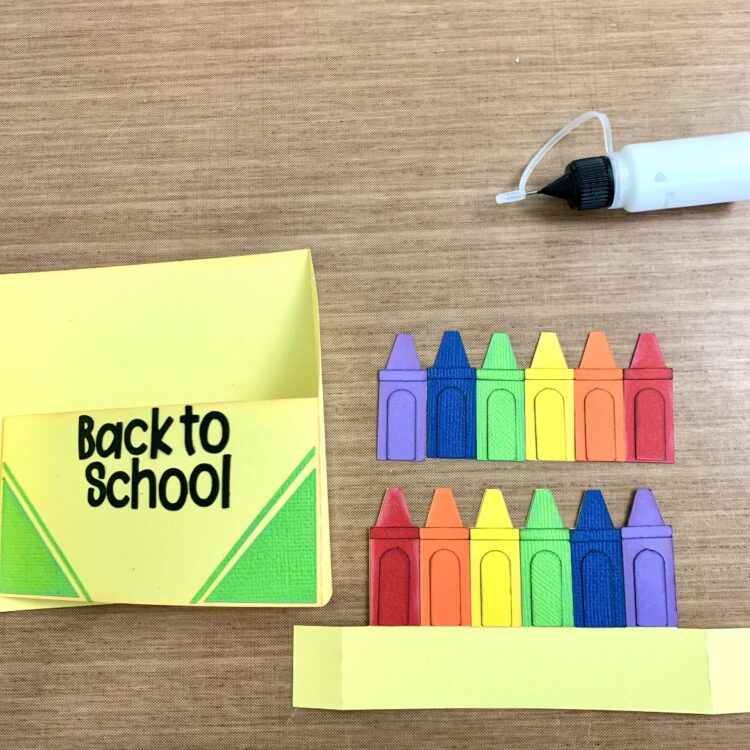
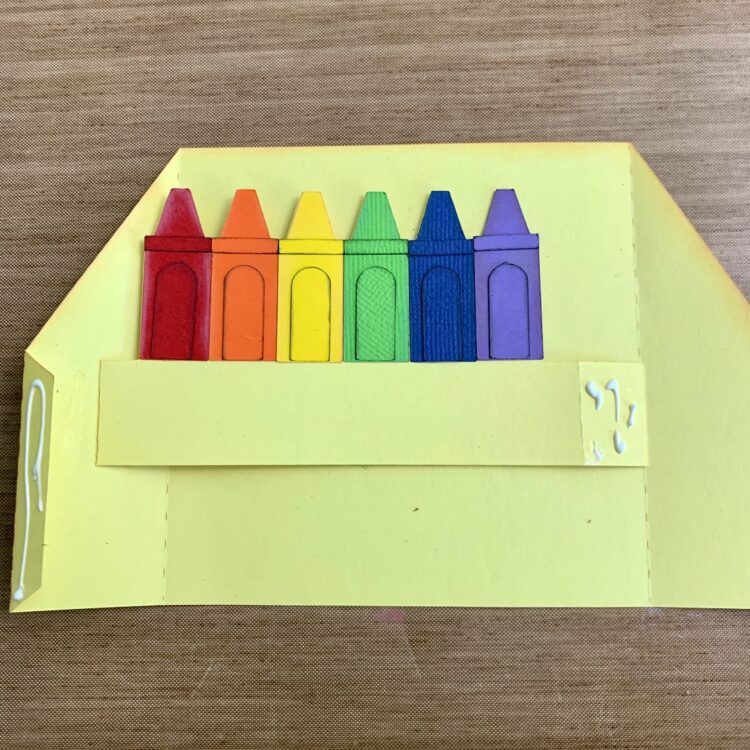
This box card only has one insert, but I cut two of each of the crayons. The pieces are kind of small but manageable. I used a sticker maker for some of the really small ones and I fine tip glue bottle for everything else. I folded all of the score lines as mountain folds. I inked the outside pieces with like colors and the smaller detail pieces of the crayons I used black ink.

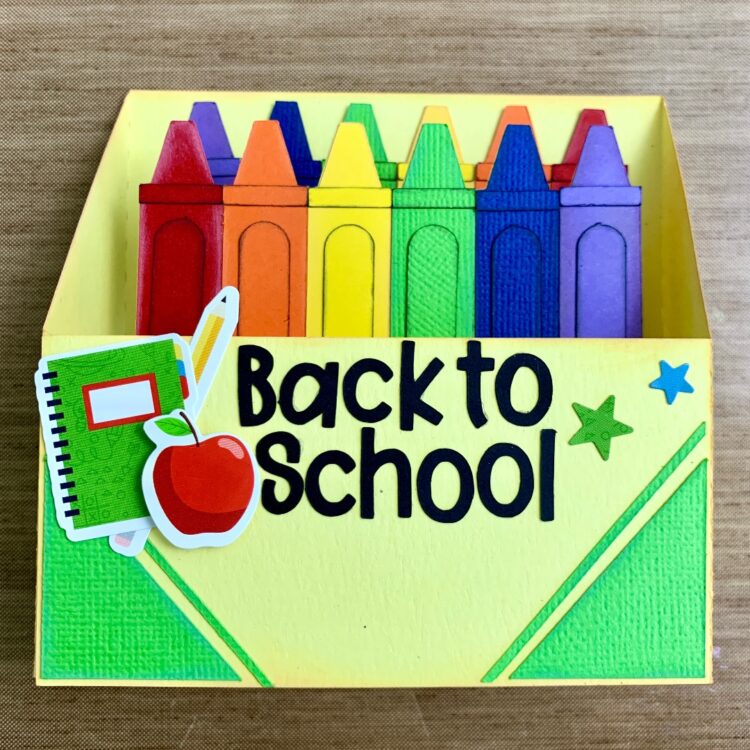
I glued the crayons in ROYGBV order on the insert and glued the second set of crayons in the reverse order on the inside of the back of the box card (I did this after I glued the box together). I also glued the front details of the crayon box on as well as the sentiment.

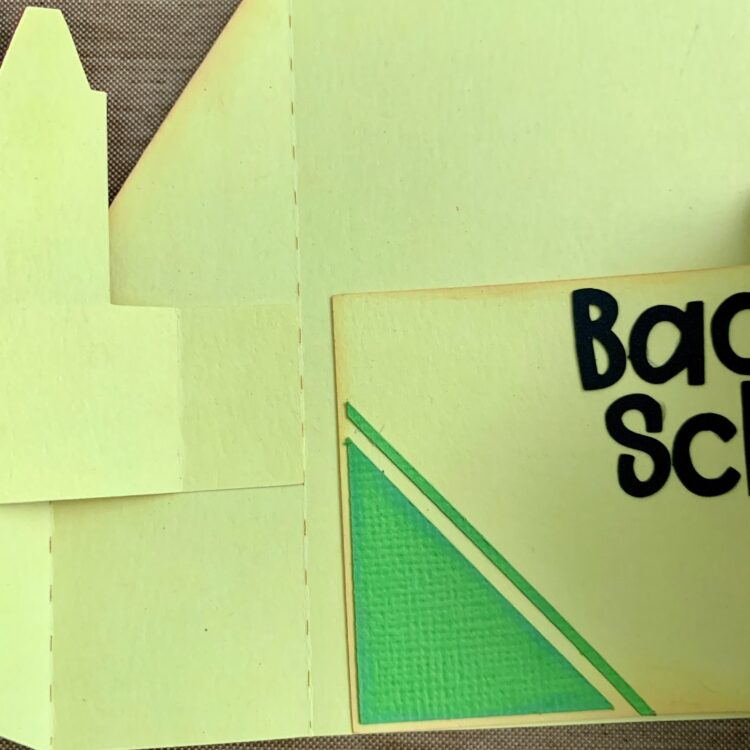
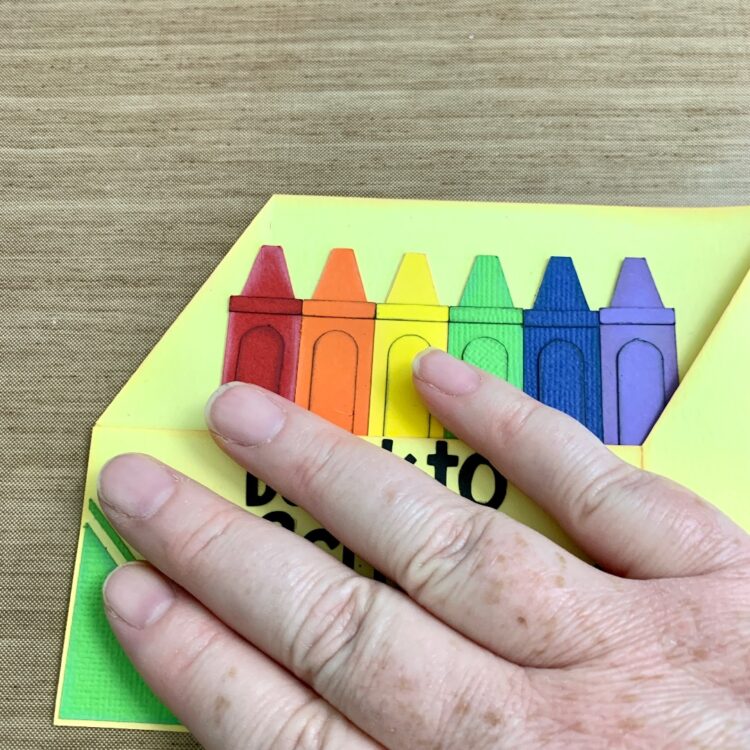
With the crayon box open flat, I glued the left tab of the insert onto the left side of the box card lining up the tab up with the innermost score line. I also folded the front of the box card over to help line everything up.

With the box card open flat again I folded the left outside edge tab in and added the glue. Then I added glue to the right-side tab on the insert. The tab should be lined up with the score line on the inside of the box card.

I folded the front of the box card over and held in place while the glued set. Also making sure everything was lined up correctly.

I glued the second row of crayons in and added a few stickers from the School Rules collection by Echo Park Paper.


This card turned out so cute. Thanks for stopping by today and Happy Back to School!
Brandie

Explosion Box Dinosaur Tutorial

Oh my Gosh everyone!  Lori has designed the cutest new collection for Echo Park and I just couldn’t wait to play.  Dino-Mite is just that, dynamite.  The cutest dinosaurs, colors and patterns.  I had so much fun putting my project together and digging through the collection to find all the perfect pieces for my explosion box.  You can find the Dinosaur Explosion Box here in Lori’s Shop or here in the Silhouette Online Design Store.

First, cut all of your pieces. Sort your pieces to make assembly easy.  I started with the lid of the box.

Fold your lid on the score lines to start to create the shape, adhere your patterned paper pieces and then add scor-tape to the tabs.

Adhere your tabs and you’ve now got the lid for your box.

Next, we will create the bottom of the explosion box. On one side you will add the 3 panels for the bottom the box and scor tape on the 5 tabs.  The extra piece you see here is the very bottom of the box, which goes on last.

Flip the bottom of your explosion box over and add the remaining pieces as shown.

Now fold and adhere into a box and add your bottom square.
You should now have this as your base.
Next up is adding the 3 inserts inside the box.  Lori makes the easy for us by numbering them.  Disclosure:  One of my favorite things to do when creating with Lori’s amazing collections is use the darling stickers and elements from the paper packs as part of the card.  I replace some pieces with the stickers.  I just dust the stickers with baby powder.
The original file is darling, I just couldn’t resist these stickers.
Fold on the score line and add scor tape
Insert your pieces next.
Now for the fun part………….EMBELLISH!  This does not fold flat for mailing. So it might have to be hand delivered.
The bow is easy peasy, is just loops together.  You don’t need my assistance here.
Adorable!
Thank you for stopping by today!
Cathy


Shadow Box Bee Card Tutorial

Hello friends! Traci here and today I have the cutest little card to share with you that’s perfect for summer. I made it using one of Lori’s awesome cutting files called Shadow Box Bee Card (SVG, Silhouette) and I’m so in love with all the pretty layers!

Shadowbox Bee Card made with a Lori Whitlock cutting file


I’ve had so much fun creating with Lori’s Bee Happy Collection that she designed for Echo Park. So, I chose the honeycomb print from it called Life is Sweet for the front and the solid green for the leaves and stems. The colors were perfect. 

Here’s a quick tutorial on how I put the card together …

Cut out all of the white pieces first so that you can see how
the colored pieces are going to be adhered.

Shadowbox Bee Card Tutorial by Artsy Albums

Add your colored patterned paper to the white cardstock pieces before gluing the 2 card bases together. 

Then adhere one of the base tabs to the back of the other base as shown above. The other tab (on the right side in the photo above) will be what you use later to secure the front with.

Shadowbox Bee Card Tutorial by Artsy Albums


Adhere all of the fun colored pieces to the 3 inside white scenes.  

Shadowbox Bee Card Tutorial by Artsy Albums


Then add the scenes inside the shadowbox base. Start with the blue flowers first, inserting the tabs into the slots on the sides.

Shadowbox Bee Card Tutorial by Artsy Albums

Repeat this for the bee scene, then continue with the last one that has the red flowers.

Shadowbox Bee Card Tutorial by Artsy Albums


Once they are securely in place, you can close the front of the card and adhere it to the tab on the left.

Shadowbox Bee Card Tutorial by Artsy Albums using a Lori Whitlock cutting file


And voila!! You’ve got an un-bee-lievably cute card to send to someone special. When it’s open, it can stand alone on a shelf, desk, or counter for display.

Shadowbox Bee Card Tutorial by Artsy Albums

But when it’s being sent through the mail or stored, it can be folded flat. I hope you have fun with this one! Thanks for stopping by the blog and have a great day!


Blog * Shop * Facebook * Instagram * Pinterest

Box Card Tropical Suitcase 2 Tutorial

Anita here with a fun summer box card that I assembled.  It is Lori’s Box Card Tropical Suitcase 2 (SVGSilhouette).  I used some of Lori’s Echo Park Paper collections including All About a Girl, Day in the Life No. 2 and Our Little Princess.
 
Here are the steps that I went through to put together this card:
1.  Cut out all the pieces.
2.  Fold all the score lines on the card base and glue the suitcase together.
3.  Glue the backing piece on the suitcase lid.  I thought this would be a great place to write a sentiment.
4.  Take your piece that is labeled as 1 and fold along the score lines at the edge.  Glue the leaves down first and then layer your flowers ending it up with the stamen and set aside.
5.  Move on to piece number 2 which is the flamingo.  Fold the score lines at the edge and glue the black layer, with the whole flamingo body onto piece number 2.  Then add the darker pink layer which shows up on the bird’s back and on its face.  Finish off your flamingo with the light pink top layer of the bird and the white piece near the beak and set aside.
6.  You are now onto the palm tree, piece number 3.  Fold the edge score lines and glue down the trunk first and then the palm leaves.  I used enamel dots for the coconuts but you can use the coconuts that come with the file.
7.  Decorate the outside of your suitcase with the handle and the suitcase edges.  Glue down the edge pieces and finish with the dots included in the file or use enamel dots like I did.  
6.  I like to put the pieces into my card and view them with the card both open and closed to make sure that I am happy with the placement.  This top-view photo shows where I chose to glue my tabs into the suitcase.  I always favor a wet glue when putting these box cards together so that the pieces stay where I want them to.  You can also glue it in and then close the card and press it on a table to make sure that it adheres well.

Here is the card folded flat and ready to be mailed to someone who is off on an adventure this summer.

That’s it for me today.  Be sure to check out all of  Lori’s fun summer cards.

Hugs,
Anita

Rectangle Pop Up Card Fishing Stand Tutorial

Hello everyone, Marcia here today. I made this fun masculine pop-up card for my son. This Fishing Stand Pop-Up Card is perfect for your fishing enthusiasts and is available here (SVGSilhouette).

This card has a lot of pieces but is not that difficult to assemble, let me show you how…
1. Cut out all the pieces from the desired color cardstock and pattern papers. I like to use cardstock for the base to ensure stability and lighter weight pattern/solid papers for layering. To give your shapes some dimension, ink the edges. We are going to proceed to assemble the card doing the inside inserts first.


2. Use the photo below as a guide for which piece goes where. Take care not to throw away the inside pieces of your sign’s letters if you want to add them back. I forgot to save mine and decided it was ok to leave them out.

3. Next we are going to ink and assemble the icons for the front of the fishing stand.

I used the Print and Cut feature in Silhouette for the Gone Fishing sign.

Be sure to adhere the larger fish in the bucket before adding the front of the pail.

4.  I decided to emboss the panels for the card base with a woodgrain embossing folder from Sizzix.

5. I applied some distress ink to the top of the panels to bring out the woodgrain texture even more and then adhered them to the long base strip.

6.  Let’s assemble the base next. Fold on all score lines and glue the center piece together as shown below.

7.  Find the card insert labeled “2” and insert it through the middle slit face down. Adhere the tab to the middle of the base.

8.  Find the card insert labeled “3” and insert it face down through the tab closest to you. Fold the tab up and apply glue to bottom of the tab. Adhere to card base just above the tab at the bottom.

9.  Flip the card over. Find the insert labeled “1” and insert it face up through the slit in the base. Fold the tab up and apply glue to the bottom of the tab. Adhere it to the card base.

10. Your card inserts should be adhered as shown below.

11.  Glue the bottom tabs to the front and back of the card base.

12.  Fold the panel strip creasing the cardstock at all the perforations. We are going to adhere the panel strip lining the edge of the strip up with the edge of the card. Leave the edge unglued about 1/4″ so we can tuck the other end of the panel strip underneath later. Wrap the sides closely around the base sliding the panel into the tab sticking out from the bottom. It helps to fold the card flat by pushing the inserts down into the base so you can ensure a good adhesion when gluing the front and back panel strip to the base.

13.  Adhere the back of the card to the panel strip and continue to wrap it around the other side of the card coming back to the front. Apply glue to both sides of the tab and slide the tab between the front panel strip and the card base.

14. Add the fishing icons to the front of the stand. You can use foam tape to pop some of the icons out from the base.

Lori has lots of other fun pop-up cards in her shop. Go check them all out.

Thanks so much for stopping by
~Marcia