Rectangle Pop Up Card Fishing Stand Tutorial

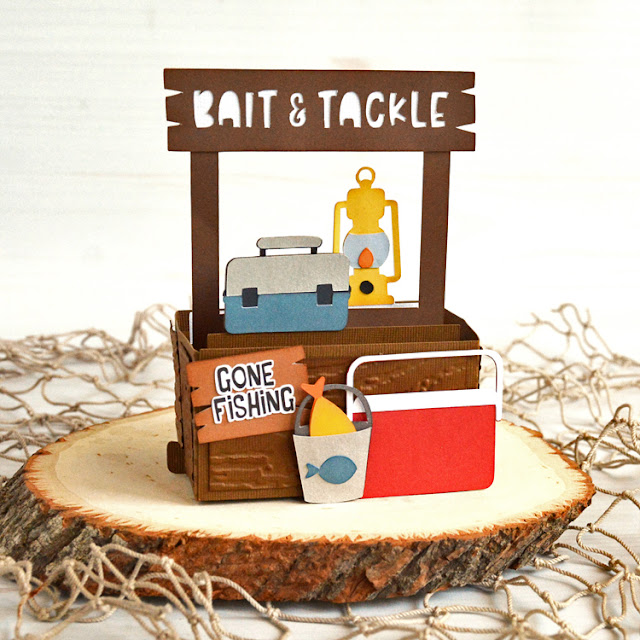
Hello everyone, Marcia here today. I made this fun masculine pop-up card for my son. This Fishing Stand Pop-Up Card is perfect for your fishing enthusiasts and is available here (SVGSilhouette).

This card has a lot of pieces but is not that difficult to assemble, let me show you how…
1. Cut out all the pieces from the desired color cardstock and pattern papers. I like to use cardstock for the base to ensure stability and lighter weight pattern/solid papers for layering. To give your shapes some dimension, ink the edges. We are going to proceed to assemble the card doing the inside inserts first.


2. Use the photo below as a guide for which piece goes where. Take care not to throw away the inside pieces of your sign’s letters if you want to add them back. I forgot to save mine and decided it was ok to leave them out.

3. Next we are going to ink and assemble the icons for the front of the fishing stand.

I used the Print and Cut feature in Silhouette for the Gone Fishing sign.

Be sure to adhere the larger fish in the bucket before adding the front of the pail.

4.  I decided to emboss the panels for the card base with a woodgrain embossing folder from Sizzix.

5. I applied some distress ink to the top of the panels to bring out the woodgrain texture even more and then adhered them to the long base strip.

6.  Let’s assemble the base next. Fold on all score lines and glue the center piece together as shown below.

7.  Find the card insert labeled “2” and insert it through the middle slit face down. Adhere the tab to the middle of the base.

8.  Find the card insert labeled “3” and insert it face down through the tab closest to you. Fold the tab up and apply glue to bottom of the tab. Adhere to card base just above the tab at the bottom.

9.  Flip the card over. Find the insert labeled “1” and insert it face up through the slit in the base. Fold the tab up and apply glue to the bottom of the tab. Adhere it to the card base.

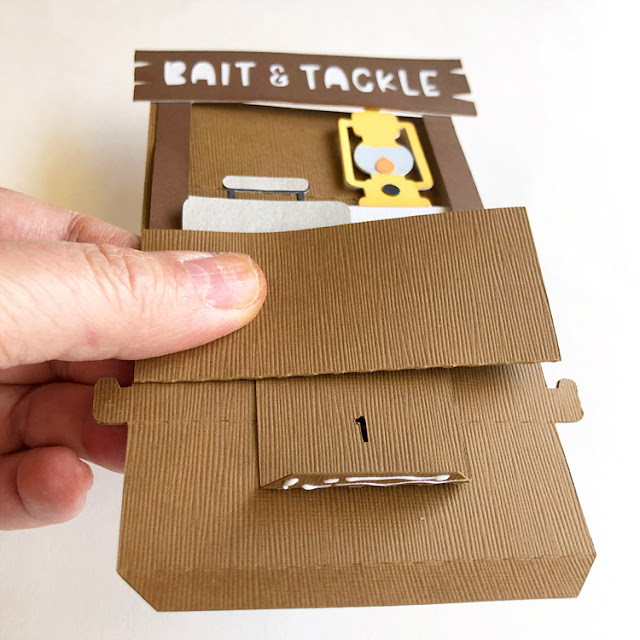
10. Your card inserts should be adhered as shown below.

11.  Glue the bottom tabs to the front and back of the card base.

12.  Fold the panel strip creasing the cardstock at all the perforations. We are going to adhere the panel strip lining the edge of the strip up with the edge of the card. Leave the edge unglued about 1/4″ so we can tuck the other end of the panel strip underneath later. Wrap the sides closely around the base sliding the panel into the tab sticking out from the bottom. It helps to fold the card flat by pushing the inserts down into the base so you can ensure a good adhesion when gluing the front and back panel strip to the base.

13.  Adhere the back of the card to the panel strip and continue to wrap it around the other side of the card coming back to the front. Apply glue to both sides of the tab and slide the tab between the front panel strip and the card base.

14. Add the fishing icons to the front of the stand. You can use foam tape to pop some of the icons out from the base.

Lori has lots of other fun pop-up cards in her shop. Go check them all out.

Thanks so much for stopping by
~Marcia

5X7 4th Of July Balloons Card Tutorial

The 4th of July is right around the corner.  Lori has some new 4th of July projects in her shop. Today I’m going to share a tutorial for this card (SVGSilhouette).

The front of the card can either be created by printing or using a sketch pen.  Today I’m going to show the card using the sketch pen.

In Silhouette Studio open your file and ungroup the pieces. Place the front of the card on the mat. Click on Send, to open the Send panel.

Notice above, the cut lines are selected in red. Select the Line panel (available in some version of Studio).

Click on the box to select the No Color selection.  And change the tool to Sketch.

Now we have the red lines set to cut and the no color set to sketch.  We are ready to send to the machine.

Here you see the sketched lines.  I think it looks so cute.

Now cut all the other pieces for the card.

I then used the front piece to lightly trace the balloon outlines onto the card base.  This helps with placing the balloon pieces.  Adhere all the balloon pieces to the card base.

Next, adhere the card front to the card base.

Also, adhere the white star middle pieces and the ribbon.

There is how to make this adorable 4th of July card.  You can also sketch with Cricut software.  Similar steps. Let us know if you sketch this card with your Cricut and share your projects.

Thanks for stopping by!

Ashley

Tuesday Awesome New SVG File!

NEW FILES – 25% OFF this week!

Check out the new SVG file project that I designed for you this week! The best part is that this new SVG file is ON SALE 25% OFF through Sunday at midnight in the SVG Shop. This project has been a labor of love and I’m super happy with how it turned out. This is the only new release we have for the week and it’s a special one. I designed a birthday card organizer that includes compartments for pens, 5×7 cards, A7 envelopes, and a print+cut birthday date planner that you can make. It also includes 3 drawers to store stamps, washi tape, paperclips, and tags in. I think you’re going to love it! I also have an assembly tutorial video for you on my YouTube Channel.

Note: I’m sorry that there are not more new releases this week, but my 91-year-old father fell and broke his hip this weekend so I’ve been helping him through surgery and the beginning of recovery. We have a few hard weeks ahead as he recuperates from this. But, he’s a trooper so we all have hopes of a good recovery for him. Everyone careful out there!

Take a peek at our new files…

These downloads include SVG files that may be used with Cricut Explore, Silhouette (Designer Edition upgrade required), Eclips, Brother Scan and Cut, and any other software that will open SVG files. Be sure to go get them while they are on SALE this week.

ALL WEEK, this SVG file is FREE with any $1.99 purchase!

Hi Everyone! We have a new FREE file with purchase this week! To get it, simply place an order of $1.99+ in the Lori Whiltock SVG Shop and this Roll with it Toilet Paper file will automatically be added to your cart for FREE!  No coupon code necessary! This offer is good through next Monday.


(Your cart must reach $1.99+ before the FREE file will automatically be added. The files will be available for immediate download after you pay for your order by visiting ORDERS > ORDER # > RED DOWNLOAD ARROW)

Another deal we have going for two more days is the FREE 2023 June Kit of the Month with any $20+ purchase (purchase must be in one transaction). Simply place your qualifying order in the Lori Whitlock SVG Shop and this file will be automatically added to your cart for FREE. No coupon code necessary. This offer is good through June 30, 2023. Grab this one while you can.

(Your cart must reach $20+ before the FREE file will automatically be added. The files will be available for immediate download after you pay for your order by visiting ORDERS > ORDER # > RED DOWNLOAD ARROW)

Thanks for checking out the NEW FILES and be sure to go grab the freebies of the week/month with your purchase.

Have a great day!

Lori

Box Card Cherry Carton Tutorial

Hi there friends! Have you seen all the new cherry themed projects in Loris’s store yet? So darling! Let’s make the new Box Card Cherry Carton (SVG, Silhouette-soon to be in the store!).

I used papers from the Down on the Farm Collection by Echo Park Paper Co. Once I had everything cut out, I inked the edge of the cherries, flower, and decorative panels. I then glued the all the panels and cherries in place. The first insert has four cherries, and the second insert has three. The two tabs on the ends of the box pieces are mountain folds and then glued together creating the box.

Now to add the inserts. The tabs are valley folds, and the glue is applied to the outside of the tab (the side that is going against the inside of the box card). I lined up the front of the tabs with the front of the inside of the box and the top of the tabs with the top of the box card.

Before the glue is dry, I fold the box card flat making sure it will fold flat all the way.

I use the same process for the second insert except I line the tabs up to the back of the first insert and the top of the box card.

Lastly, I glued the sentiment and the flower to the front of the card.

Now the card is ready to send! Thanks for stopping by today, I hope you have a cherry good day!
Brandie

Explosion Dog House Box

HI everyone!  I’m sharing a fun, easy tutorial with you today with Lori’s Explosion Dog House Box.  There are a lot of pieces, but it really goes together quickly and easily.  I was done in no time at all.  I used Lori’s Echo Park Pets Collection for my project today.  Almost every pet is represented with this collection, soooooo cute and the colors are just too fun.  You can also find this file here in the Silhouette Design Store.

I always start by cutting everything out, it’s easy as Lori has everything colored and easy to ungroup.  After I get everything cut out, I organize my pieces and just start assembling them.  I used scor-tape, scotch atg adhesive, glue dots and a glue pen to adhere the box.

Below are all my pieces, cut and sorted.


First, start with the lid, adhere the panels and add scor- tape to the little tabs.  Fold on the score lines and assemble.


Next, score and add scor tape to the tabs for the inside dog house.


Adhere.
Now the same for your roof pieces.  I changed up some colors, as you will see.  These score lines and tabs are a bit smaller, so on this I used some mini glue dots and a glue pen.
Too cute!
Now onto the pockets for the inside of the box.  Just fold on the score lines and add scor-tape.  Adhere the pockets and add the inserts.
Next, I glued the four pockets to the base of the explosion box, for this I just used my Scotch atg gun.
Then assemble your little dog house and adhere the bottom the dog house to the box base with scor-tape.
Now you are ready for the fun part….just embellish and have fun.  This collection is so happy, I found all the perfect embellishments and little details to make my heart smile.
Here’s the box all folded up!
And the box exploding!
Perfect to hide some treats of trinkets in for a new puppy owner.
And it’s just too stinkin’ cute!  I adore this project!
Pretty sure I need a new bully dog just to go with my project…lol!
Thanks for joining us today.