Box Card Hedgehog Tulips Tutorial

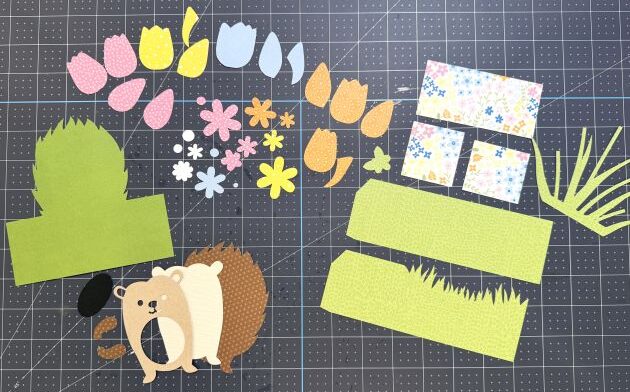
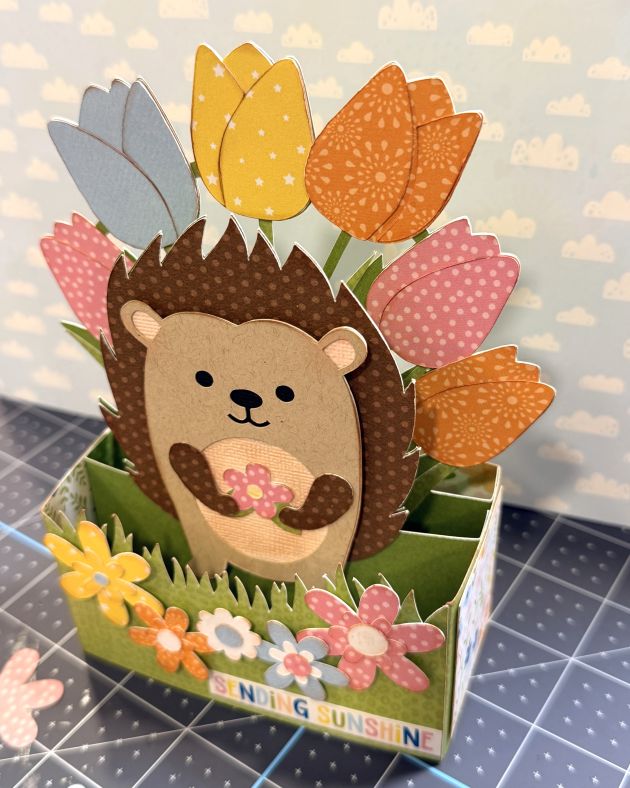
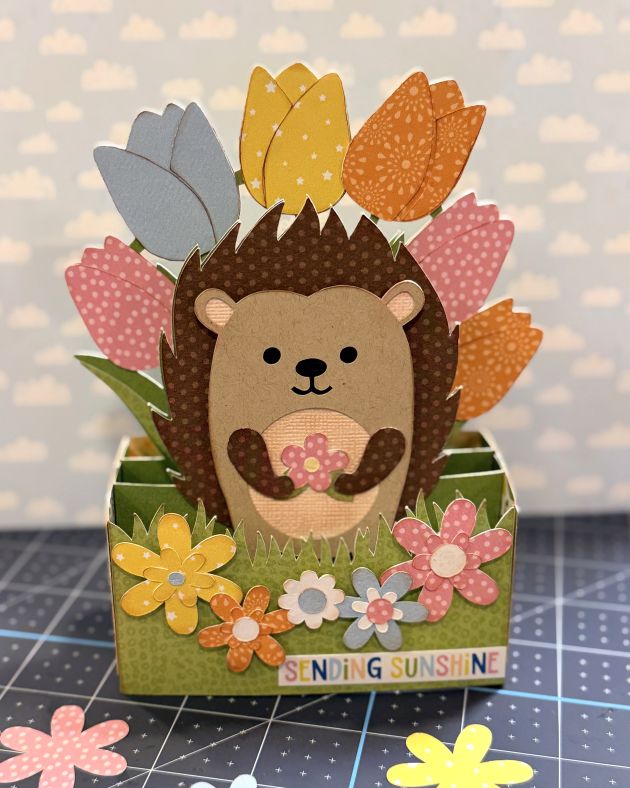
Hello, crafty friends! This is Lindsay, and I’m here today sharing my first ever tutorial for the Lori Whitlock design team. I am so excited to share my projects with you. I use my electronic cutting machines (yes, plural!) on a daily basis. For today’s project, I have created the most adorable card using the Box Card Hedgehog Tulips file (svg, silhouette). I used the You Are My Sunshine collection from Echo Park and some additional cardstock.

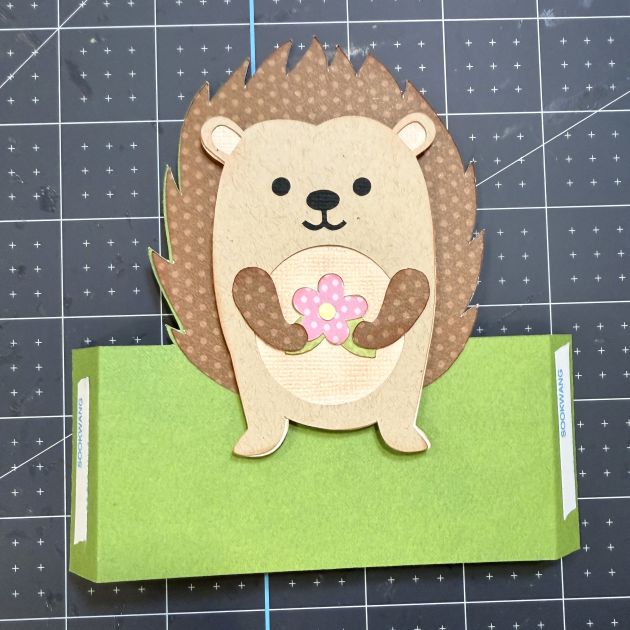
After cutting all of the pieces, I started assembling the card in sections. First up is the hedgehog. I used brown ink to distress the edges of each piece. I used liquid adhesive to add the black oval behind the face of the hedgehog, then adhered the face layer onto the cream layer. After that, I assembled the small flower and added the arms to the hedgehog. I then used foam adhesive to attach the body of the hedgehog to the dark brown layer. Finally, the entire animal is adhered to the green base layer. I folded along the scored tabs and added strong tape to either side.

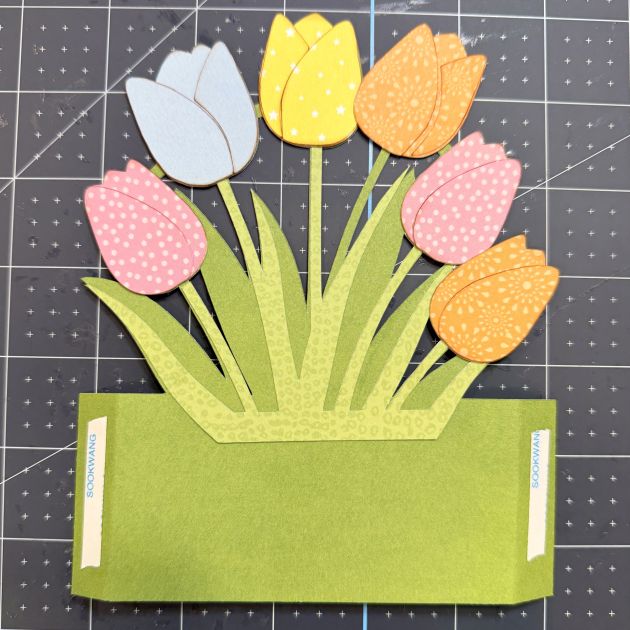
The next section is the tulips. Using liquid adhesive, I added the grass/leaves layer first. Next, I assembled each flower and adhered to the green base piece. I folded along the scored tabs and added strong tape to either side. It helps to have the sample image pulled up on Lori’s website. That way you can zoom in and piece the flowers together easily.

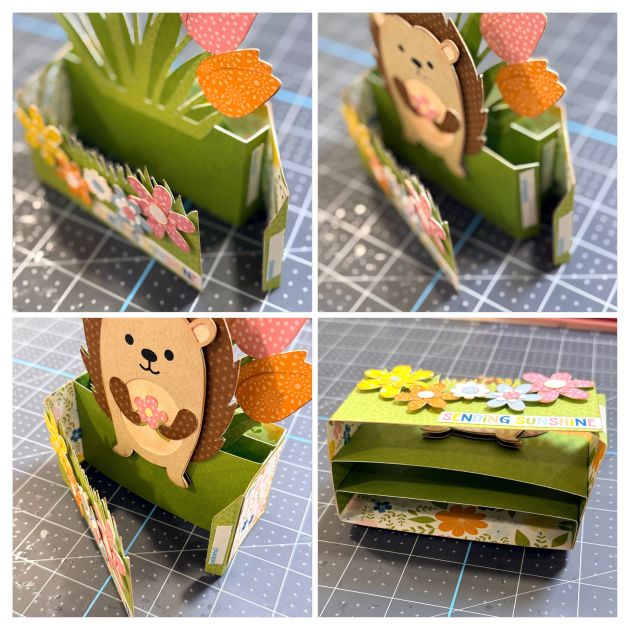
The final section is the box portion of the card. It is two large pieces that will come together to form the box. I added floral patterned paper as a cute accent.  I assembled all of the flowers and adhered them with foam adhesive just under the grass border. I added a sentiment sticker that says “Sending Sunshine.” Then I folded along the score lines and added strong tape to each tab.

Now it’s time to put it all together. I connected the two box pieces, peeling just one tab, to create one long strip. I did not adhere the final tab just yet. Once I had the box shape in place, I added the tulip layer. I peeled off the tape on only one side and lined up the tabs so that they touched the back of the box card. Next, I peeled the tape off one side of the hedgehog layer and adhered the tab directly in front of the tulips section. I peeled off the other side of the tulip and hedgehog sections and attached them to the side of the box. Finally, I closed the outer box card. I’ve added an image that shows what the bottom of the card looks like. You can see how the sections stack on top of each other like tables.

The end result is an adorable card that will fold flat into an envelope! You could easily tuck a gift card behind the hedgehog and use this for a birthday card.

I hope this inspires you to create today. Thanks for stopping by! Happy Spring!

Lindsay


5×7 Picket Fence Box Card

Hello Crafty Friends, today I have a box card from the Lori Whitlock file called 5×7 Picket Fence (SVGSilhouette).
 I love how pretty this card turned out. It also comes with optional sentiments, which inclued: Happy Birthday, Happy Mother’s Day, Hello Friend, Happy Spring & Congratulations.

I added some sprinkles to make the flowers pop.

For more inspiration, check out my Instagram!
Thanks for stopping by!
Hugs
Noelene 🙂

3D Easter Egg Tutorial

Hello crafty friends. Noelene here today, I want to share with you how I made these cute fun 3D Easter Eggs, using the following Lori Whitlock Files: 3D Easter Egg 2 (SilhouetteSVG), 3D Easter Egg 3 (SilhouetteSVG), 3D Easter Egg 4 (SilhouetteSVG), 3D Easter Egg 5 (SilhouetteSVG) & 3D Easter Egg 6 (SilhouetteSVG).

For my tutorial I am using 3D Easter Egg 4 (SilhouetteSVG).
I started out by opening my file in Silhouette & using the transform tool to enlarge all my panels to 135%. This gave me an egg with the dimensions approx 3.5″ wide x 5″ high.
Then I proceeded to cut the panels using coloured cardstock for the coloured panels & vellum for the grey panels.

I finely glued the vellum onto the back of eacg tulip patterned panel being careful not to put too much. Now let them dry.
Next I took the 3 egg shaped panels & insterted them into each other starting with the one with the 2 slits on top & bottom (far right on above image). Then I insterted the one with the slits on the outer edge (middle on above image) then lastly inserting the one with the slits on the inner edge, (far left on above image).

Then I inserted the big round shape onto the bottom slits.
Doing the same with the smaller round shape on top.
Lastly take the tulip panels & insert the wider part into the bottom of the egg shape & the narrower part into the top part of the egg.
Now do the same with the remainder of the panels & you are done. If you wish you can add some light using led tealight candles for a lantern effect.

I will be using mine in my Easter table setting.

If you want to make the lot like I plan to do, (because why not! They’re quick & simple to make! You can purchase these files individually or as a bundle here!
For more inspiration, check out my Instagram!
Thanks for stopping by!
Hugs
Noelene 🙂

12×12 Easter Bunny Page

Hello friends! Traci here and today, I have a cute 12×12 Easter scrapbook page to share with you. I made it using two of Lori’s pretty cutting files and lots of colorful papers. Since Easter is this Sunday, I thought a fun layout would be perfect for a few holiday photos of coloring eggs. Take a look …


12x12 Easter Bunny Scrapbook Page with pretty flowers, carrots, and colorful eggs

This sweet bunny rabbit is the star of this page! I just 🩷 her little flower crown. So, let’s start with her …

12x12 Easter Bunny Scrapbook Page with pretty flowers, carrots, and colorful eggs


I used Lori’s adorable 5×7 Easter Bunny Card 4 file (SVG, Silhouette) and a colorful mix of solid card stock. I assembled the pieces, then added
some enamel dots to the flowers for sparkle. 

12x12 Easter Bunny Scrapbook Page with pretty flowers, carrots, and colorful enamel dots


She’s so cute … she deserved a close-up! 


12x12 Easter Bunny Scrapbook Page with a scalloped border, pretty flowers, and enamel dots

Next, I chose another one of Lori’s cutting files called 4 Spring Borders (SVG, Silhouette) to make this pretty scalloped piece. Now … time to build the page!


12x12 Easter Bunny Scrapbook Page with pretty flowers, a scalloped journaling spot, and colorful stripes

To begin, I chose a rainbow stripe pattern paper from the Doodlebug Design Bunny Hop
Collection as the base. Then, I added bubblegum card stock at the top and the scalloped border in the middle.

In the top corner, I adhered the “coloring”, “eggs”, and flower die cuts from the Bunny Hop Collection along with some pretty enamel sprinkles. And for the journaling spot, I used 3 punches to make this … a 3″ scallop circle, a 2.5″ circle, and a 2.25″ circle then layered them all.


12x12 Easter Bunny Scrapbook Page with pretty flowers, colorful eggs, and a scalloped border

Next, were the photo mats. I cut 2 out of limeade paper and added more die cuts, dots, and the “Happy” tab.

12x12 Easter Bunny Scrapbook Page with pretty flowers, carrots, and colorful eggs

As a finishing touch, I gave the bunny 3 colorful egg die cuts to hold on to, and … she’s ready for Easter! Yep … she and her carrots are pretty cute. 🥕🐰🥕

I hope this layout gives you a little holiday inspiration. I had so much fun using the 5×7 Easter Bunny Card 4 and the 4 Spring Borders cutting files. Highly recommend! Thanks for stopping by and have a great day.


Blog * Shop * Facebook * Instagram * Pinterest

Easter Projects Tutorial

Hello there! 
 
My tutorial is very easy today but I wanted to show you the cute little candy baskets, bags and boxes I have been making for Easter. You still have plenty of time to make some of these fast and easy projects!
 
Basic directions on these projects is to cut your pieces and fold on the scored lines. Glue any little pieces to form faces etc and glue the project up joining at the flaps. These cut files are simple so you can make all of these, or pick one and make multiples. They are perfect to hold a bit of candy. The chick bag and the white Easter bunny basket with it’s fun little hair bow are also a good size to hold a gift card.


*****
 Treat Bag Easter Chick (SVGSilhouette)
The chick on this bag is adorable. Lori also made a bunny bag too . With so few pieces this is a  quick one to finish. Glue the black piece behind the chick head and add the rosy cheeks and the beak. I added some shading with distress inks before I put the pieces on. This bag would easily hold a nice size candy bar and is the largest of all the projects. Stands 5.5 inches tall.
*****
Easter Basket with Carrots (SVGSilhouette)
 
Fold this one up, add glue to all side tabs and fold up to form the box. Burnish the glued tabs a bit so that they all stick well. Add your little carrot design on the front and tie up the top.
*****
Easter Bunny Petal Basket (SVG)
 
I made this guy with kraft paper. I creased all the score lines and glued the black piece on the inside where the face cut out is. I added the nose with dimensionals before closing the box by bringing up the two top loops and then slip the sides with the slits over the top. I  glued on the ears about a quarter of an inch from each edge. 
 

*****

3D Easter Carrot Box (SVGSilhouette)
 
Glue on the “greenery”(love the fun scallops) and then fold the carrot in half along the center score line and glue together with the side tab. All that’s left is to tie the top with some twine or ribbon. This project is just over 8 inches long including the carrot top greens.

*****

Easter Bunny Tote (SVGSilhouette)
 
For this file- glue the black piece on the back of the piece with the face so the eyes and whiskers show through. 

Glue the other white piece with the ears  to the back of the face section so it covers the black piece for a finished look. Glue the sections together then fold in half and glue together with the tab. Glue the bottom flaps One thing about Lori’s files- when you fold a file in half (like boxes ,bags, 3D cards) the two sections match perfectly. I love this-no struggle to force a file to fit together. Glue the bottom flaps.

 I added the handle on with two brads but you could easily just glue them on.
I hope you enjoyed these little projects-it’s just so hard to pick from all Lori’s fun Easter creations!