Cyber Monday Sale + Christmas Tree Shaker Card with Lorrie

I hope you all had a fabulous weekend! I sure did, it was a wonderful Thanksgiving at my house with my brother and his family from Colorado here with us along with my sister from Southern Utah. We had so much fun together! And, I’m heading to the gym right now as I ate WAY too much!

Please disregard the earlier email that went out. We are in a little bit of a transition as I have a new assistant starting today. I’d like to thank my good friend and amazing assistant Lisa for her service over the past few years. I appreciate her hard work to keep me, the blog, the shop, and the creative team all organized and functioning properly. Thank you, Lisa!! You’ll be missed.

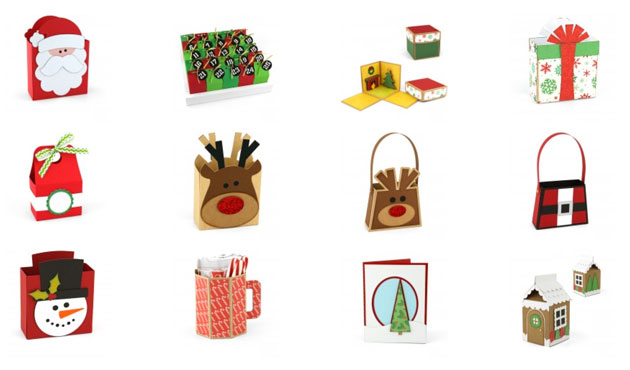
We would like to help you get a jump start on your holiday crafting projects. Today only, you can pick up these festive holiday SVG files, AND EVERYTHING else at our SVG shop for 40% OFF. Just use code CYBER40 at checkout! Hurry, the sale ends at midnight.

Now we have an awesome project for you by Lorrie Nunemaker. Lorrie has become quite knowledgeable about the new Cricut Explore…

Hello everyone!  I am excited to share with you this fun Christmas Tree Shaker Card.

For this project I used the Christmas Tree Pop-Up Card.  Using the Cricut Explore I cut the pop up label 2 times, once using fun foam and once using the red striped paper from Echo Park Christmas Cheer Collection by Lori Whitlock.   I added a layer of transparency and some sequins to make the tree portion a shaker card.

For Silhoeutte users, you can find the file HERE.

Have a great day!

Santa Shaped Card with Corri

Happy Thanksgiving, everyone!  Corri here today sharing a fun shaped card made with Lori’s Santa Face file. Here’s how I made it.

First, ungroup the pieces and drag them off your mat.    Drag the beard portion onto your mat and then click on the replicate menu along the top. Click on mirror above.

Next, select the top beard and move it down slightly.  Select both pieces and the right click and select weld.

Now you have your card base. Next, cut all the layers including an additional white beard piece.   To add some texture to the card, I embossed this layer.

I used paper from the Christmas Cheer Collection from Echo Park Paper.  Such a fun card and it goes together really quickly.

Be sure to check out all the new Christmas files in Lori’s SVG shop and Silhouette Shop.

Also, be sure to check out the Silhouette Black Friday Sale from last night’s post. To get these deals be sure to shop HERE. And use code LORI at checkout. Sale ends December 8.

Already a Silhouette user?
Use code: LORI to receive 40% OFF at SilhouetteAmerica.com (*excluding machines, design downloads, download cards, subscriptions and gift cards) PLUS Free Shipping on orders over $25 for the lower 48 states
50% OFF all designs at SilhouetteDesignStore.com – no code needed!

Flower Card Tutorial with Lorrie

Hi everyone,
It’s Lorrie here, and I have a quick tutorial for you using the Lori Whitlock 6 flowers SVG files.  Spring is finally here and what better way to let someone know you are thinking of them than to send a card filled with happy flowers.  This card could work for so many occasions.  You could also make it using all the different flowers included in the set.  I hope you enjoy the tutorial, and don’t forget to pick up this flower set from the Lori Whitlock shop.


Graduation Gifts with Traci

Hi Lori fans…it’s Traci here with some fun projects to help you congratulate your graduate!
I just love Lori’s box cards…and the nice thing about making them for graduation is that you can make them in the graduate’s school colors!  They are fun and easy to put together, and fold down perfectly for mailing in an A2 size envelope.  Won’t they look cute sitting on the graduate’s party table or mantel?  And these adorable pop-up box cards also make nice place cards for the graduation dinner table!
I paired one of the cards with a matching gift card box for an easy, but thoughtful gift.  Just cut three simple pieces from the Silhouette, adhere the pieces and tuck in a gift card — super easy and what a nice presentation!  Lori is a genius (smile).
Thanks for visiting the blog today…and if you know of a high school or college (or even kindergarten!) student that is graduating…have fun creating these for them!  Here are the links:


Silhouette Tutorial: Card Making with Mendi

Hi there!  It’s Mendi here and I’m super excited to be sharing a Silhouette technique that I’ve been having a lot of fun using lately on all sorts of cards and layouts:  Creating journaling and sentiments around the edge of a circle using Silhouette’s print and cut features!

Unfortunately when preparing for today, I realized the hard way that this print and cut technique really works best when using circles that fit within the registration marks so for those of you that have a 12×12 printer, that means your circles can be up to 10.5″ wide and sadly for me (whose wide format printer recently bit the dust) that meant I was limited to a circle 7.2″ wide.  I had planned a layout using a 11.5″ circle but as hard as I was trying to find a way around it, I decided I needed to set that aside for another day and come up with a new project that would be easier to share with all of you.
As an alternative I settled on a fun spinner style birthday card for my nephew which can double as a rainy day activity spinner (or with the addition of numbers can be a great game piece for any game a child can dream up).  I think this would also be darling idea for chores too (although I’m not sure children would agree).  😉
My papers are from Lori’s fun new 6×6 “That’s My Boy” paper pad which she designed for Echo Park.
Without further ado, here’s my video tutorial sharing how I created it:
On a side note, I layered and glued 3 of the black arrows together to give it extra stiffness and make it easier to flick for spinning.  I also enlarged the center holes a bit and made sure to not tighten my brad too much so that it can still spin freely.
To complete my card and tie my theme together,  I decided to run the back of my card through my printer for a quick sentiment (using temporary adhesive on a piece of printer paper).
For my project I used the following cutting files available in Lori’s shop:
I have a link to another example using this same technique at my blog today.  I hope you’ll give it a try!  🙂

Silhouette has some great deals starting today running through the end of the month:

  • 1 CAMEO, 1 stamping starter kit, 1 light hold cutting mat, 1 teal CAMEO dust cover for $269.99 (MSRP $351.96)
  • 1 Portrait, 1 stamping starter kit, 1 light hold cutting mat, 1 grey Portrait dust cover for $129.99 (MSRP $229.96)
  • Stamping starter kit 25% off
  • Almost everything at silhouetteamerica.com is 20% OFF! (Excludes Silhouette CAMEO®, Silhouette Portrait®, downloads, download cards, subscriptions, and gift cards.)
  • PLUS: all orders over $25 SHIP FREE (that includes the machine bundles)(Reminder: FREE shipping only applies to the lower 48 states)

To get these prices use code: LORI at checkout and shop through this link: www.silhouetteamerica.com/stamp