Box Card Teacup Fall Raccoon Tutorial

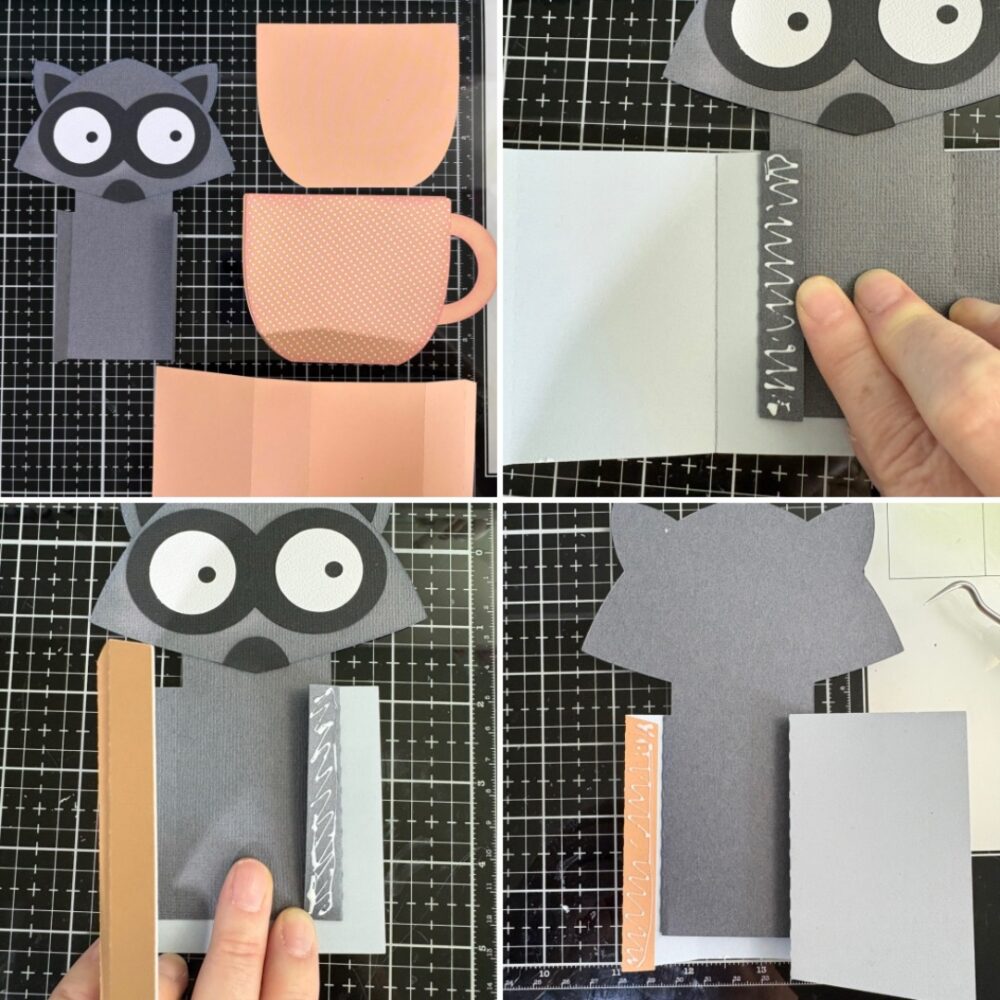
Hello friends! Today I am sharing an assembly tutorial for the Box Card Teacup Fall Raccoon (SVG, Silhouette). This box card works well for any fall occasion, but I will be using it as a birthday card.

I used the Firefly collection by Echo Park Paper to cut most of my pieces; I also used some cardstock from my stash. Before I started the assembly, I inked the edges of my pieces. The raccoon is the only insert in this box card, and he comes together pretty easily. I glued the eyes and nose to the face piece, and the inside of the ears were glued to the body piece of the raccoon. The tail is separate from the body and will be glued to the back of the insert.
The flowers are all a single layer, except for the middle of the sunflower. There are three circles for the middle of the sunflower, but I lost one and didn’t recut the missing circle.

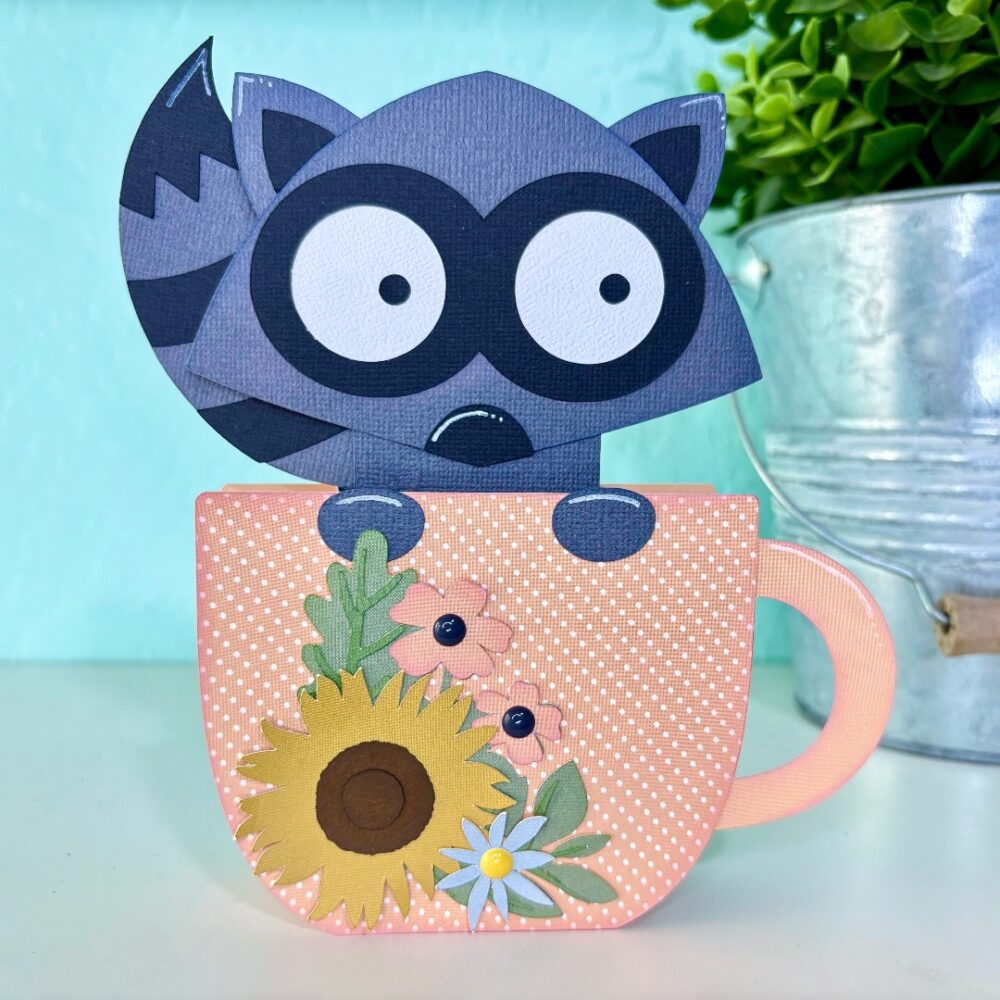
For the teacup I cut an extra cup piece without the handle to give my cup a two-toned look. I folded the score lines of the box portion of the card as mountain folds and the racoon tabs as valley folds. The raccoon insert tabs are glued to the shortest sides of the box. I lined up the tabs of the insert with the score lines and the top of the inside of the box. With one side secure I added glue to the back of the second tab of the insert then folded the box over making sure everything was lined up. Once the tab was secure, I flipped the card over and added glue to the box tab and folded the back of the box over making sure everything was lined up before the glue set.

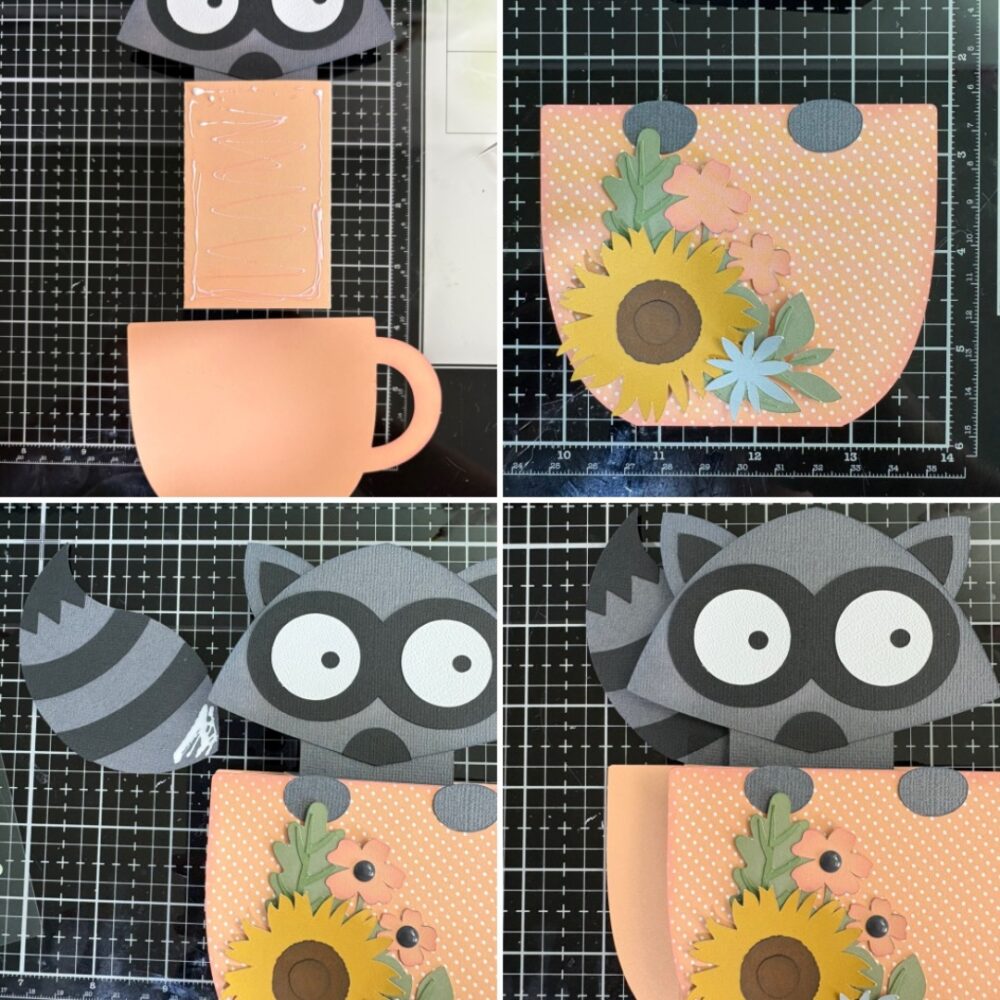
I then added glue to the front of the box and lined the bottom edge of the cup with a handle to the bottom edge of the box making sure the corners line up. With my extra decorative cup piece, I glued the raccoon hands and flowers into place and glued it to the front of my card. Then I glued the back piece of the cup to the back of the box. Lastly, I glued the racoon tail to the back of the racoon insert making sure the card would fold flat. I also used a white acrylic pen to give my raccoon some highlights.

I love how this card turned out. It is perfect for a fall birthday. Thanks for stopping by today!
Brandie

Number Lace for a Birthday Page Tutorial

Hello everyone! Traci here and today, I have a fun 12×12 scrapbook page and simple tutorial to share with you. I wanted to create a layout for a picture of my sweet grandson’s 4th birthday and I found one of Lori’s cutting files that would be perfect for it.


12x12 Birthday Scrapbook Page layout and Tutorial with numbers, a cake, and balloons

I chose her Number Lace Cutting File (SVGSilhouette). Not only did it have a number 4 on it, but I also loved the positive and negative spaces it created in the background.


Lori Whitlock Number lace Cutting File

Here’s how I made this layout … 

1. I added the cutting file to my mat and resized it to 10.75 x 10.75”.  I cut it out of white card stock and set that aside. 

2. Next, I used the knife tool to chop down the background into smaller pieces so that I could focus in on the number 4.  I didn’t want to cut the entire background piece again just to get the 4. 


3. Once I isolated the 4 in the file, I deleted everything else and cut this section out of orange paper.


4. Then I used my scissors to trim the rest of the paper from around the number. 


12x12 Birthday Scrapbook Page Layout and Tutorial with numbers, a cake, and balloons


12x12 Birthday Scrapbook Page Layout and Tutorial with numbers, a cake, and balloons

5. Now that I had the white background and the orange number cut out, it was time to create my layout!


12x12 Birthday Scrapbook Page Layout and Tutorial with numbers, a cake, and balloons

I used the Echo Park, Vroom Collection that was also designed by Lori. I decorated my Race Car Mini Album with it and the colors and patterns were just what I was looking for. 


12x12 Birthday Scrapbook Page Layout made with the Lori Whitlock Number Lace Cutting File

I started with the orange 12×12 pattern called Ready Set Go Stripes as my base and layered the blue Winner Winner print and Ready Racers paper on top. Then, I added the white number lace sheet and I backed each corner with a yellow triangle cut from a solid in the Vroom Collection.


12x12 Birthday Scrapbook Page Layout and Tutorial with numbers, a cake, and balloons

Next, I adhered the orange 4 on top of the white 4 that’s part of the background. I cut some photo mats out of a few other papers from the Vroom Collection and I added my photo.


12x12 Birthday Scrapbook Page with numbers, a cake, and balloons

Then, I finished the layout with lots of fun embellishments. The “Let’s Go” is from the Vroom 12×12 sticker sheet. And the other birthday themed stickers and die cuts are from the Bella Blvd, Birthday Bash Collection. 

I hope this project inspires you to create something wonderful with Lori’s Number Lace Cutting File (SVGSilhouette). Until next time, happy scrapping! 😊


Blog * Shop * Facebook * Instagram * Pinterest

Shaped Summer Cards

 Hi everyone!  I have a couple of quick cards to share with you today…they are a couple of older files from Lori, but I knew they would be perfect for her new collection from Echo Park.

Have A Great Summer

I used the 6×6 pad, sticker book, enamel dots, washi tape, and stick-on brads for these two cards.  I have always been a huge fan of Lori’s shaped cards, and I adore how these two turned out.  I know they will brighten someone’s day this week.

Thanks for stopping by!

Cathy

August Blog Hop + 30% OFF!

Welcome to the August 2025 Creative Team Blog Hop—we’re thrilled you could join us! This month our amazing team has been busy crafting a gorgeous collection of fresh, inspiring projects that are sure to get your creative ideas flowing. And because we love to make things extra special, we’ve got a limited-time 30% OFF sale, a fabulous FREEBIE, and an exciting GIVEAWAY waiting just for you. Ready to join the fun and see what we’ve been working on? Let’s get hopping!

We have a 30% OFF SALE at Lori’s SVG SHOP on all digital files and commercial licenses until Saturday, August 16th! Simply use the code AUG2025 (it’s case-sensitive!) to grab your favorite SVG files  at a fantastic price. SHOP HERE.

As a heartfelt thank you for joining our June Hop and sharing in the springtime fun, we’ve got a special treat just for you!

For today only, you can download this adorable Ribbon Tie Box SVG file absolutely FREE. Just add it to your cart and complete checkout—no strings, no catch, just a little gift from us to you!

 THIS WEEK’S NEW RELEASE!

Get ready to add a pop of fun and charm to your crafting! 🐞 This week’s brand-new Ladybug Project Bundle is bursting with cheerful designs—perfect for birthdays, thank yous, and just-because smiles. You’ll find playful ladybugs, bright flowers, and sweet mason jar accents that are sure to make your projects stand out. Whether you’re making a card, a 3D project, or a darling little treat bag, these files are as fun to assemble as they are to give. So fire up your cutting machine, gather your favorite papers, and start creating something truly irresistible! And, remember to use code AUG2025 during the Blog Hop this week to save 30% OFF your purchase!

***CLICK HERE TO GO TO THE SHOP***

How about a giveaway? You’re in luck! Enter our giveaway below, and we’ll announce the winner on the entry form right here on this blog post. Keep an eye on your inbox—you might be the lucky winner!

<a Rafflecopter giveaway

Be sure to check out the CT member blogs listed at the top of this post! Thanks again for dropping by! Have a GREAT day!

~Lori

Shadow Box Card BBQ Invitations

Summer Vibes & BBQ Invitations!

The first week of the summer holidays is behind us here in the Netherlands, perfect timing to dive into some summer creativity!

What better way to celebrate the summer than with good food, great company, and a little handmade magic? That’s why I created the “Shadow Box Card BBQ” – a fun and festive card that’s just bursting with summer vibes!

You can buy the file HERE in Lori her webshop, and its available in the Silhouette shop

This card is perfect for wishing someone a happy holiday, but let’s be honest… it’s even more fun to use it as a BBQ invitation for your friends and family! Imagine their faces when they open this cheerful card, packed with grill-goodness – it’s a guaranteed succes!

I absolutely love cards that are 3 dimensional and still fold flat to be sent in the mail, don’t you?!

So fire up the barbecue, grab your craft supplies, and let the summer fun begin. Whether you’re heading to the beach or staying close to home, there’s always room for a little handmade sunshine & good food with friends and family ☀️

Happy summer & happy crafting!
Tamara