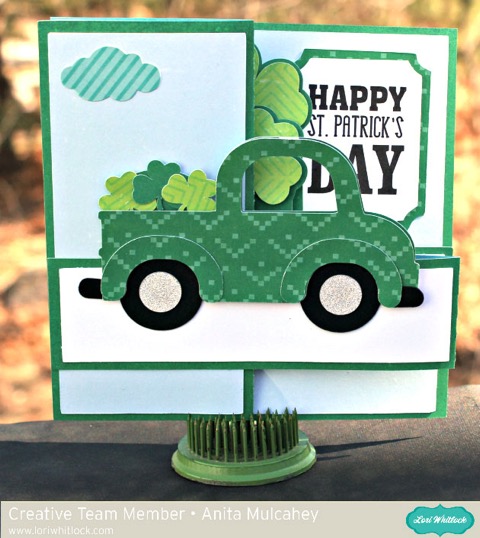
Happiness is Homemade Gift Box with Anita

Anita here with a quick and easy tutorial to put together Lori’s Matchbox Drawer Card-Cooking.  You can find this cut file here in Lori’s store and here in the Silhouette Design Store. It is such a cute box and you can fit many little treats in it. It would be a great thank you gift for a good deed done.

First, cut the pieces of the box.  I cut one extra rectangle because I wanted my box top to use the lovely Happiness is Homemade collection from Echo Park Paper.  I also used one of the die cut cardstock pieces from the matching Ephemera kit. I love to bake so this line was made for me.

This piece is for the main box.  Fold it along the score lines and glue it together.  It is easiest to glue the tabs in place first and then glue down the ends as you will see in the photos below.

Here the completed box.

Fold the outer wrap for the box on the score lines and glue the tab to the end of the strip.


These are the pieces for the card top.

To make the tab,  fold a 3″ piece of ribbon in half and glue it between the two layers of paper when you glue the inner piece inside the card.

You can see where I put the Die Cut from the Happiness is Homemade Echo Park Collection by Lori.  It’s so cute.

Here is a view of the slide for the box.

And here we have the completed pieces.  This box went together very quickly and Lori has so many different designs for many occasions to choose from.  Lastly, you will embellish your box with the cute baking tools that are part of this cut file.  Hope you have a chance to get creative today.

Hugs,

Anita

Luck of the Irish by Lezlye

Feeling Lucky? I had so much fun creating the Love banner last week, I just had to whip up this one for March! I used two files from Lori’s shop, enlarging the group from the original imported size.  The Lucky Banner and the St. Pat’s Day Icon’s. The various green cardstock’s are Echo Park Happiness is Homemade and Celebrate Easter.

I used my embossing folders again and ink to add texture to the clovers. Always add stickles, glossy accents, flowers and ribbon. I love the gold glittery cardstock I found in my stash.

I like to re-enforce my pennant holes with eyelets, I choose Tulle to string my banner and added a bow in between each pennant. After assembling this one I wished I would have stenciled the white pieces with some light ink, also patterned paper would be nice here too!

Hope you enjoyed my little luck of the Irish! I am all ready hanging it on my mantle!

Here are the links to the file and products I used.

Lucky Banner  Silhouette here

St. Pat’s Icons Silhouette here

Echo Park Homemade Happiness

Echo Park Celebrate Easter


Sneak Peek with Kathy

Hi Everyone!  It’s Kathy today with a sneak peek of a new card that will be available tomorrow!  It’s another of the Stacking Base Cards, this one Valentine-themed.  Take a peek…

This is the Heart Shaped Card Stacking Card Base.  I assembled the card using some of the solid papers from the Celebrate Easter and Happiness is Homemade Collections from Echo Park Paper.  I embellished it with the LOVE word from the Mason Jar Bouquet Box Card (here in Silhouette) and the 3D Flower 17 (here in Silhouette.) I just love how you can customize the bases to suit almost any occasion!  You could use this one for Valentine’s Day, a wedding or just Love!   The Heart Shaped Stacking Base Card Base will be available this week in the Lori Whitlock SVG shop and The Silhouette Store!  That’s it for me today, thanks for stopping by to peek!

4 Step Card Tutorial With Courtney

Hello! This is Courtney Lee from Court’s Crafts here with the 4 Step Card with Front Flap from Lori Whitlock!


Step 1: Cut out all the pieces. If you are using Cricut Design Space make sure to “ungroup” the images, highlight all of the brown piece you are going to cut including the small black lines and click “attach”. This will keep the image together and the scoring lines in place.


Here is the paper I chose as the card base so that these adorable glossy white bunnies would be the front of the card and the tone on tone would be the inside. Make sure to always check both sides of the patterned paper! 🙂 

Step 2: Score along all dotted lines. It doesn’t matter which way you score them. I ended up flipped mine over because it was easier to see them on the yellow side. 🙂

Step 3: Bend the left ones “up” and the right ones “down”. This is a side shot so you can see what I did. I bent them the wrong way first and then the right way so don’t stress about which way they go as long as they end up stepping “down” when you are done! I bend them both ways no matter what to make them a little more pliable. 🙂


Step 4: Sew. I decided to sew along all edges to create some visual borders. However, on the pink adorable lamb paper I only did the outsides to give it a continuous feel with the panel to the left to make it feel like it was one piece. Scroll down for the later pictures to see what I mean if that was confusing. Adhere all of these pieces down while the card is flat.


Step 5:  Time to decorate. The steps were just begging for something adorable.

I knew this was going to a great-grandparent so I decided to put a picture of the us on the left hand side.


I kept the front simple. There is a lot going on visually inside the card.


Here are some other angles of the card so you can get a feel for it. This is what it looks like when the stair step is still folded in when you open the card. Now you can see what I mean about making the lambs feel continuous with the stitching and I also did that by adding the grass at the bottom on both sides.

On this one my oldest said, “The bunny! I didn’t see the bunny before!” so I thought I would share this photo with you too.

Well, that is all for me today! I really hope that you have a wonderful day and that you make a special card to send to someone special using this ADORABLE Celebrate Easter collection by Lori Whitlock for Echo Park Paper!

4 Step Card with Front Flap in Lori’s Store

4 Step Card with Front Flap in Silhouette Store


Snow, Sparkle and Shine Card with Anita

Anita here,  on this last Monday in January with an A2 Stacking Card Base Snowflake card (here in the Silhouette Store).  Isn’t it just so cute?    I used Lori’s Echo Park line called I Love Winter.  I love how sweet this collection is!    I used some of the  matching brads and a sticker from the collection to finish  my card.


I did not pop up my layers but you certainly could to give it some more depth and dimension.

That’s it for me today.  I hope that everyone has a great day and be sure to check out the A2 Stacking Base Card Snowflake as well as so many other wonderful designs when you visit Lori’s SVG Shop or the Silhouette Store.

Hugs,

Anita