Father’s Day Gift Set

Hello crafty friends! We’ve already celebrated Mother’s Day and now it’s almost time to celebrate Dad! Aimee here with you and my tip for the day is take a minute to look at the svg files you have and see which ones can be matched up. And I also have a small tutorial on putting this adorable new box together for you.

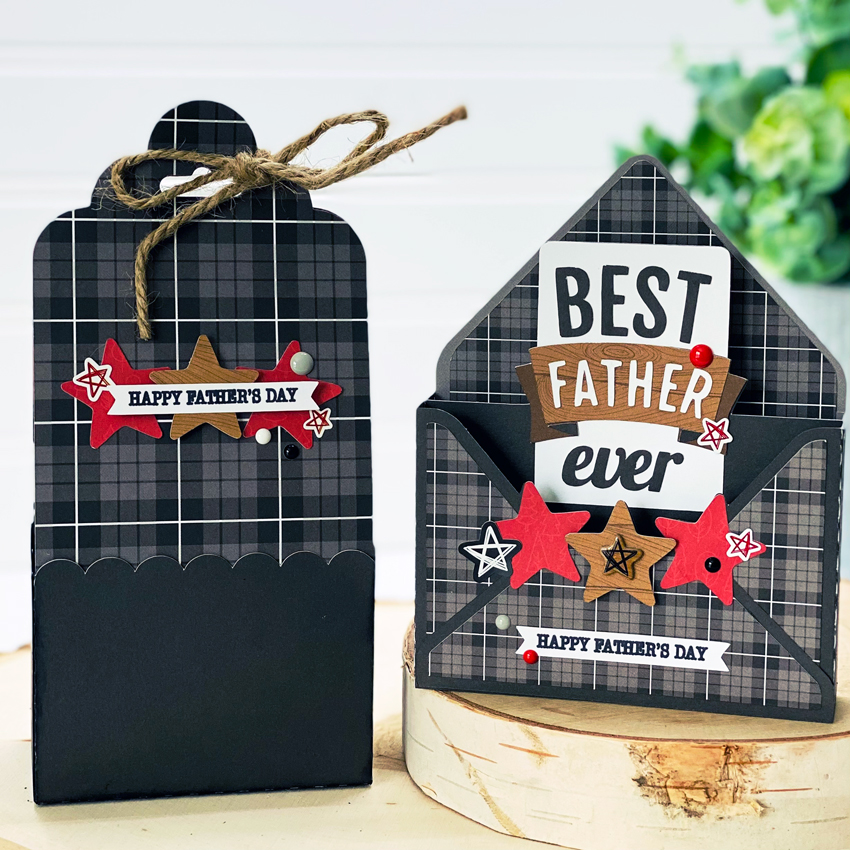
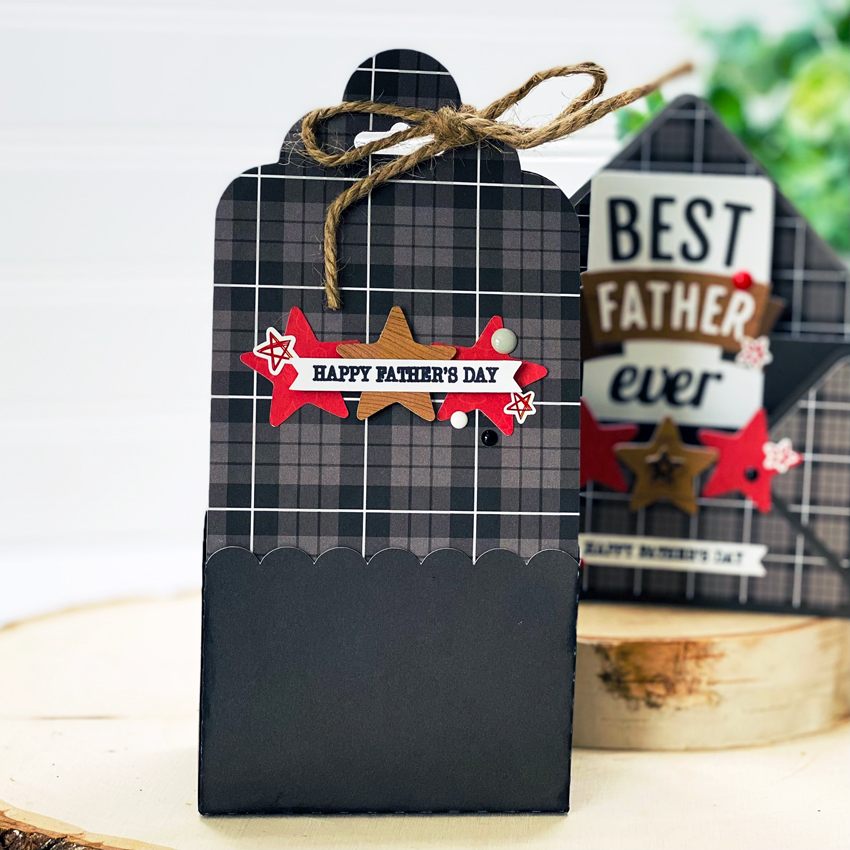
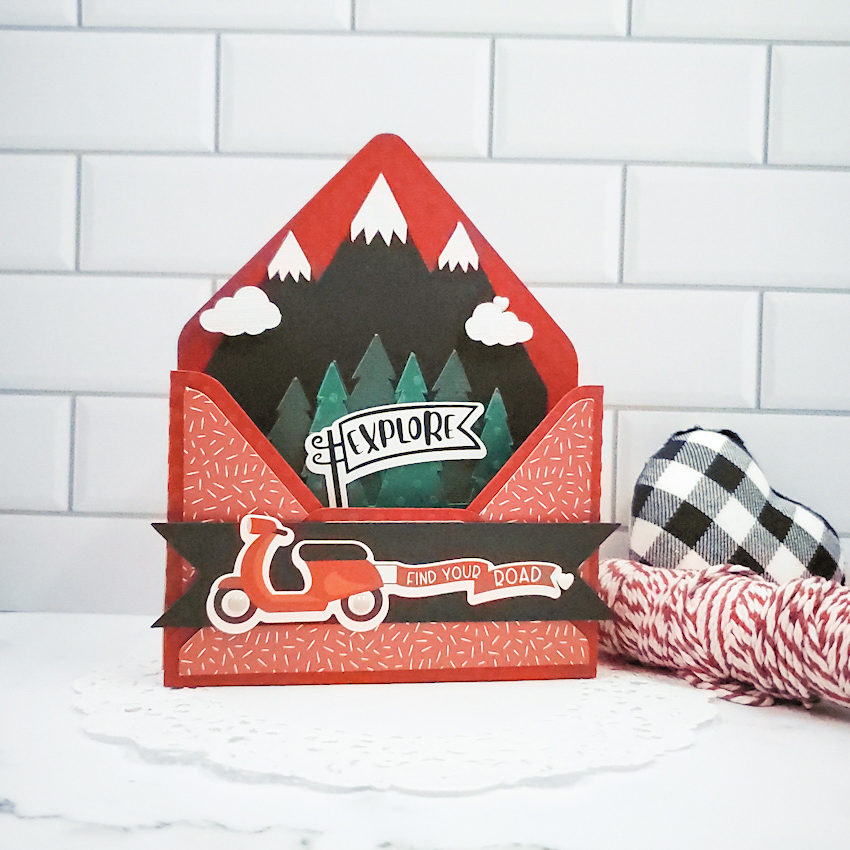
For my Father’s Day Gift set, I’ve used the Box Card Envelope Father’s Day (Lori’s SVG Shop, Silhouette) and Tag Wrap Gift Box (Lori’s SVG Shop, Silhouette). Instead of using the flower that came with the box file I decided I wanted to cut out some additional stars that came with the Father’s Day card file and make a small collage on the box so the two would match. I also used some fabulous papers and stickers from the Little Lumber Jack collection.

The assembly for the Tag Wrap Gift Box is very simple! I started off by cutting my papers and getting my adhesive ready. I wanted to point out that my box piece is upside down in the picture. So make sure when you are adhering the front and back piece to the box panel that the scallops are right side up.

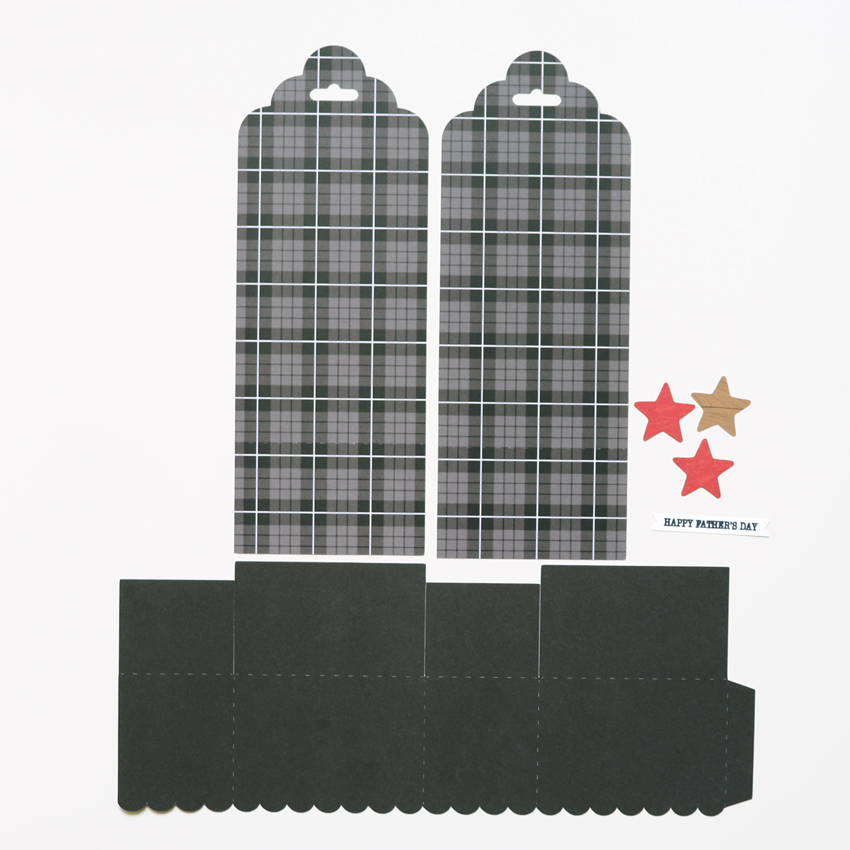
Next thing to do is fold all of your cuts on the dotted lines. Then adhere the tag pieces to the box…scallop side up! Lol!

And then adhere the side tab and the bottom tabs as you would any normal box bottom. Now your box is ready for decorations.

When looking through my stash I found some rope twine that matches perfectly with the wood in the papers! And I added some enamel dots and star stickers to both pieces.

Now all I need to do is buy a gift for my hubby and I’m all set for Father’s Day! Hope this cute set gives you some ideas and inspiration for your Father’s Day gifts! Thanks for stopping by!

Aimee

Our Wedding Gatefold Easel Card

Hi there paper crafting friends!  It’s Michelle Starcher, aka the Bookish Designer, popping in on the blog to share the Congrats on your Wedding card I made using Lori’s Our Wedding collection by Echo Park Paper Co. I love seeing the new stuff Lori has in the shop each week, but I also enjoy doing a deep dive into past products.  Last week, I spent some time looking through all of the card options available in the shop, and I found several files that I just couldn’t live without including the Gatefold Easel Card (SVGSilhouette).

One thing I really love about this card is the band that holds the card closed.  It’s a small detail, but it adds a little something extra to the card.  You can use it in place of an envelope to address the card or add an embellishment to the front of the card like I did.

Another feature of the Gatefold Easel Card that I love is how it looks when opened.  This is a card that was meant to be on display.  In my example, I used a sentiment from the Our Wedding Ephemera as the easel stop.  I inked the sentiment and then used adhesive foam to give it the extra dimension to act hold the main card in place.  Then I attached the bride and groom element card from the Our Wedding Collection to the front. Such a beautiful reminder of the couple’s special day!

Lori has so many wonderful cards available in the shop, and I know you will find something you can’t live without.  With so many options, it’s easy to add several new card files to your collection.  The hard part may be picking which one to make first!

Until next time,

Michelle

Let’s Go Anywhere Envelope Box Cards

Oh how I love this new collection from Lori and Echo Park, Let’s Go Anywhere!  It is just so fun and the perfect colors and patterns, I am smitten.  I am also head over heels for Lori’s Envelope Box Cards, they are just too easy to assemble and way too cute.  They really go together quickly, fold flat for mailing and bring a smile to everyone. (for a tutorial, see this post)  You can find them individually in Lori’s SVG Shop or in the  Silhouette Design Store.  She has several bundles of envelope box cards available in her shop.  I need them all.

I created two envelope box cards using the base of the  Box Card Envelop Camper file. I just customized them up a bit with some stickers.  I think I’ve said this before, but I absolutely love to use all the fun embellishments from Lori’s Echo Park designs and add them to her files.  I love the look I can create this way.  You can find this card here in the Silhouette Design Store, too.  I just used stickers from Let’s Go Anywhere Sticker Book and enamel dots to create these.  I just adore how they turned out.

I hope you try some of these envelope box cards out.  They are just so fun to create.  Please share with us too!  Have a great Monday!

~Cathy

Making a Shaped Card in Cricut Tutorial

Hi friends! I have a quick tutorial on how I made a card with the Best Teacher Ever file (SVG, Silhouette). Now that Cricut has updated the design space software making a shaped card is easy!

First I resized the apple and leaf to be 5 inches high which made the width 3.96 inches. This file uploaded into Design Space grouped together for me. If it isn’t grouped I recommend grouping it together before resizing.

With the apple selected select the offset feature on the edit tool bar. In the offset window I slid the distance bar to 0.25 inches, selected rounded corners, and left the weld offset box checked.

I then duplicated the offset and flipped one of them horizontally.

Next I moved the two offsets together so they are touching in the center. With the just the offsets selected I aligned them on the bottom and welded the offsets together creating one piece.

I added a score line to the center and aligned and attached it to the offset. (I changed the color from black to white for this picture.)

I needed a solid white apple for the inside of the card and the front of the card.  I duplicated the red apple and welded the image then hid all of the contours. I then duplicated the solid apple image so that I had two.

I also needed to flip the leaf  horizontally so that it would fit correctly on the front of the card. (If you use solid paper you don’t need to do this. I used double sided paper and wanted the green to show.)

Once everything was cut I glued everything together with liquid glue in a fine liner bottle.  (Be sure to keep all of the centers of the letters from the cutting mat.) I used papers from the School Rules collection by Echo Park Paper Co.

Thanks for stopping by!
Brandie


Shadow Box Card Friends


Anita here with a card that I made for a dear friend who is moving away to be closer to her daughter and be in a warmer climate.  I wanted to give her a special card which reflected the importance of her friendship to me.  I made this 5X7 Shadow Box Card Friends which you can find here in Lori’s SVG Shop and here in the Silhouette Design store.  I used one of Lori’s new Echo Park Paper collections called A Slice of Summer to piece it together.  This card folds flat for mailing and is sure to add some cheer to a friend’s day.

If you need help with assembly, Lori has a video here.  That’s it for me today.  Thanks for looking and have a great day.  Be sure to check out Lori’s other beautiful friendship cards.

Hugs,

Anita