Good Moring friends! Today I am sharing an assembly tutorial for some of the new strawberry projects that were posted this week. I made the Strawberry Purse (SVG, Silhouette) and the A2 Strawberry Jam Jar Card (SVG, Silhouette). For this project, I also cut out a 3D Bow for the top of my purse. I used the bow from the Gable Box with Bow (SVG, Silhouette).
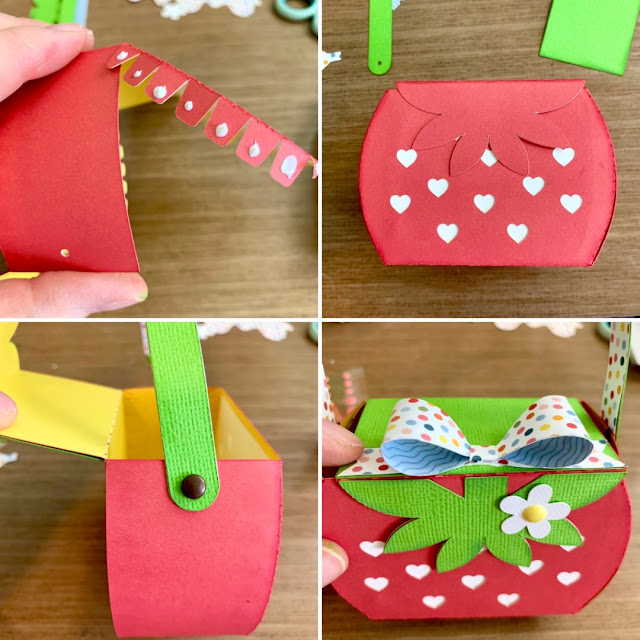
Once all of my pieces were cut, I folded all of the tabs in a mountain fold. Then inked all the edges with a corresponding color to help cover the white core paper and add dimension to each piece.
Before gluing the sides together, I glued the white panel piece inside the purse to cover the heart holes. This would also be cute left open. I then folded the lid back out of the way and added glue to all the tab on one side of the purse. (I find less glue is best when using a wet glue.) I started with the back of the purse. I pinched the first tab on the top to the flat edge to secure then moved along the side pinching each tab to ensure it was secured.
Then repeated for each side. Now with the edges all glued, I added the green leaves and lid. (Sorry I missed a picture.) I cut two handles one green and one with a pattern paper that matched my bow. I put the green one on the outside and pattern paper on the inside. I did glue the two handles together and added the handle to the purse with brads. I assembled the bow and glued it to the top of the purse. I also added the flower to the front of the purse. I used an enamel dot for the center of my flower.
The jam jar card is really quick and so cute. I inked the edges of all the colored pieces and around the outside edge of the tag. The strawberries are in three pieces. I added tiny amounts of glue to the back of the red pieces then attached the white pieces to the red. Then glued the green leaves into place. The small strawberry is for the tag and the large one is for the scalloped label. The paper ribbon slides through the tag hole and then glued to the dotted cover of the jar. I then glued the scalloped label to the middle of the jam jar.
I embellished the purse with a few stickers from the Here Comes the Sun sticker book. All of the papers and stickers came from the Here Comes the Sun collection by Echo Park Paper.
This little gift set is so sweet! It will be perfect for a mom, teacher, grandma, sister, or friend! Thanks for stopping by today and I hope you enjoy the rest of your week!
Brandie