Magazine Holder by Corri

Corri is here on the blog today sharing this beautiful magazine holder! Great job Corri!

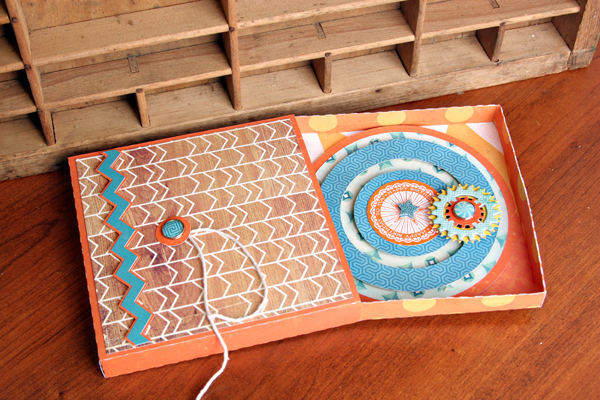
With all the cards I make, I thought Lori’s Magazine Holder would help me organize some of them.

I wanted mine to be able to hold several heavy cards so I cut it twice out of kraft card stock and glued the two layers together before assembling.

I used the print and cut feature on my Cameo to print the “cards” label.  The paper on my file is from the  Echo Park – Sweet Girl Collection.

I was able to fit 6 fully embellished A2 cards in my file.  This would be a great way to sort your cards for gift giving or would be a cute gift for a friend who loves sending out cards.


Layout by Christine

So I am guessing that there are a lot of you out there that have been bitten by the “Project Life” style of scrapbooking and I have to say that it really has a lot of appeal to me as well.  I feel that with my current style of scrapbooking that I focus more on the design and less on the story.  Which is okay because I use scrapbooking as my creative outlet as well as a way to do something with all of the thousands of pictures that I have taken of my family over the years.  But I also see the benefits of “telling the story” and with the “ProJect Life” style of scrapbooking I feel that I have an easier time doing that.
So, with all of that said, have you seen all of the cool Life Cards that Lori has in her store? There are so many different options, but I also want to show some ways to be creative with these files and “make them your own!”
The following picture shows a closeup of the title, Remember This.  This card is actually a combination of two different files, a frame and the Remember This title.  I sized them to fit each other and then welded them together so that it cut out as one piece.  You can also see another embellishment that I created in this picture.  I took one of the labels from the file 3 Labels, cut it out with my Silhouette from a couple patterned papers and stamped the words, “Taking It All In” from an Ali Edwards stamp set.  Then I cut out the word “wonder” from the layout file, Wonder Layout.
This picture shows how I used the arrow files to create a 3×4 filler card.  I ungrouped the arrow file and drew a 4×3 rounded rectangle around them.  The arrows that overlapped the edges, I either deleted or moved around to fit into the rectangle shape.  I cut it out and attached it to a piece of patterned paper.
In this picture I have a close up of my journal card. I used a premade card from the Boy’s Life patterned paper collection and added some journaling using my Silhouette.  This is a new trick that I learned recently and I am totally hooked.  I need to perfect the technique a little bit more but I am so excited about the possibilities.
Lori Whitlock supplies used:
3 Labels (Silhouette store Design ID# 14672
Other Supplies:
All About a Boy paper collection and chipboard embellisments by Lori Whitlock for Echo Park
All About a Boy washi tape
All About a Boy decorative brads
Ali Edwards Just Awesome Tabs stamp set
Aunt Jana Sketch Silhouette font
Silhouette Cameo
Silhouette Sketch Pens
Becky Higgins Project Life Photo Sleeves
Night of Navy Stampin Up!  ink

Butterfly Kisses by Corri

Today we are bringing you an adorable project by Corri…

I love the new bracket shaped card that Lori just added to the shop.

It has such an elegant feel and this lace damask paper from the Echo Park- Sweet Girl Collection is a perfect match.   I cut a scallop circle and flag label  from this set and two butterflies.  I embossed the pink one with my Cuttlebug D’vine Swirls folder and added some clear glitter to the turquoise one.  Applying glue to the center of the butterfly only, allow the wings to be lifted for added dimension.

The bracket flap treat box compliments the card perfectly and makes this into an adorable gift set.

I added some ribbon, a rosette, and a die cut flower sticker from the Sweet Girl Collection.

Flip Swing Cards by Christine

These cards are one of my favorite products that Lori has created and Christine has done such a great job personalizing them. LOVE these Christine!  lisa
Lots of oohs, and aahs occur when I showed these cards to friends.  The Swing Flip cards are just adorable and oh, so much fun.

Just pull the sides and the card opens to reveal the inside and the backside of the front panel.  Lori has created these great card files in many different panel shapes.  Everything from scalloped circles to squares to stars.

Here is another look at the card from a different angle.  I used papers and pretty stickers from the brand new collection Sweet Girl by Lori Whitlock for Echo Park.  The sentiment Happy Birthday came from another card file by Lori called, Happy Birthday card set.

I also made a fun flip card for a boy using the brand new paper collection, All About A Boy, by Lori Whitlock for Echo Park.  This particular flip card file also includes the panel shapes that I used to cut the patterned paper from.

Sorry that the card looks a little warped.  These kinds of cards are little hard to keep standing for photographs.  This photograph shows what the inside of the boy card looks like when pulled apart.

 I added a little washi tape on the panels.  Yes, new washi tape from Echo Park!!  Love it!!  The next photograph shows the back of the card.  I used some of the Echo Park matching cardstock paper to create the card base.  It is a double sided paper with orange on one side and red on the other.

Supplies Used:
Flip Swing Card Set 2  (See the assembly video at this link too)
Happy Birthday Cards  (Happy Birthday sentiment)
Sweet Girl paper collection and embellishments by Lori Whitlock for Echo Paper
All About A Boy paper collections and embellishments by Lori Whitlock for Echo Paper
Silhouette Cameo

Spring & Easter projects by Christine & Natalie

Today we have 2 different Creative Team members sharing their talents with us. First is Christine, she says…
I have created a mini book using the Mini Album Pinking Edge and some papers and embellishments from Sweet Girl by Lori Whitlock for Echo Park.  These are just a few of the pages.  You can see the rest at my blog.

The front page of the mini book has a banner title that is part of the Sweet Girl collection by Echo Park in the Silhouette store.  I loved that I could make this banner larger so it really becomes the focus of the page.

I used another digital cutting file by Lori, called Scalloped Shapes for the background of this journaling card that is part of the paper pack.

You can see yet another frame on this page from Lori Whitlock.  It is called the 4×6 Frame in the Silhouette Store

Mini books are really so much fun, especially when you can cut out your own.  It easy to add as many pages as you want and even alter the size.  Have a great day and thanks for stopping by to see my project.
Supplies Used:
4×6 Frame- Silhouette Store #9783
Sweet Girl Paper Collection by Lori Whitlock for Echo Park
 Natalie has a beautiful Easter project to share with us. 
I’ve been know to make big signs for my front porch.  So when I brought this wooden pallet sign for my front door home from my local craft store, my son immediately said, “Mom, that isn’t nearly big enough for the front porch.”  I said, “silly, it’s for the front door.”  I had to figure out how to make it work, because I just had to bring the pallet looking sign home.  And since Easter is around the corner, I came up with this:

I first cut out the Easter saying out of vinyl, and placed it on the unpainted pallet.  Then I painted the wooden pallet blue, sanded and distressed it, removing the vinyl to reveal the color below.  I then cut out the Easter egg out of card stock, and using mod podge adhered it to foam core.  I then used plain old doilies, and cut circles and used the left over flowers that were cut to make the banner and stapled them to some twine and attached it to the pallet using hot glue.  It took me about an hour to make it.

I used the following files from Lori Whitlock’s store
Easter phrase – found here
Easter egg set – found here